
New/Latest Activity
14 August 2017, 19:58
We have a video coming soon...
To import EVENTS into your online account go to the Settings menu (Top Right) then choose Import. In the import window you can then paste your data, or open your CSV, iCal, or VCS file, then choose which of your data columns match with the fields in your online account.
Each line of your import file or text is an event. Each event needs at least a start and end date/time. E.g.
2023-01-29 09:00,2023-01-30 17:00, Some title, John Smith
You must select a default resource to import your events into. This is only used as a fall back in case the importer cannot find the resource names in your file to know where the events should go.
5 June 2017, 09:07
Events can be colored in a number of ways to help you quickly see its status or condition. Its background color, foreground color, and the inclusion of colored notch can all be set.
- You can show the background color for your resources/keywords as small bars with or without the resource name, at the top of your events. This allows multiple different colored markers on a single event. Hovering over the event shows the bars and the resource/word you associated with that color. Note that resources with a background color of white will not be shown at the start of an event.
You can have an unlimited number of resources/keywords that can color your events and these can help you track different status like Confirmed, Paid, Cancelled, Busy, Free, Vacation, Holiday, Sickness, Call Out, Breakdown, Service, Training etc.
- Within an event you can press the color icon next to the title to manually change the background and text color of the event. As this is a manual process you have no way to see what that color represents. We recommend adding a resource/keyword that describes what the color means, like the word 'Confirmed', and within that resource set the 'Event Color Option' (from the second color icon next to the title) to the colors you want the event to take when this is selected. Now you no longer need to manually pick an event color as its set automatically for you.
- You can also create a template event. Marking an event as a template means you can use it in the future to create copies with all the same preset resources, colors and other additional information. See this FAQ on how to create a template.
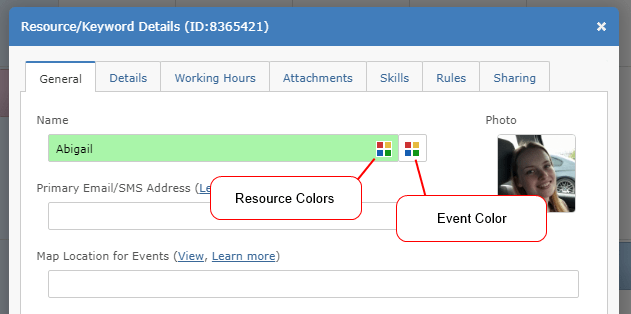

If you do not wish to use colors and dont want the see them in your event you can set the resource background to white or unselect 'Resource Colors' from the Layout menu in your Timeline view.
#color,colour,marker,style
- You can show the background color for your resources/keywords as small bars with or without the resource name, at the top of your events. This allows multiple different colored markers on a single event. Hovering over the event shows the bars and the resource/word you associated with that color. Note that resources with a background color of white will not be shown at the start of an event.
You can have an unlimited number of resources/keywords that can color your events and these can help you track different status like Confirmed, Paid, Cancelled, Busy, Free, Vacation, Holiday, Sickness, Call Out, Breakdown, Service, Training etc.
- Within an event you can press the color icon next to the title to manually change the background and text color of the event. As this is a manual process you have no way to see what that color represents. We recommend adding a resource/keyword that describes what the color means, like the word 'Confirmed', and within that resource set the 'Event Color Option' (from the second color icon next to the title) to the colors you want the event to take when this is selected. Now you no longer need to manually pick an event color as its set automatically for you.
- You can also create a template event. Marking an event as a template means you can use it in the future to create copies with all the same preset resources, colors and other additional information. See this FAQ on how to create a template.
If you do not wish to use colors and dont want the see them in your event you can set the resource background to white or unselect 'Resource Colors' from the Layout menu in your Timeline view.
#color,colour,marker,style
24 August 2023, 10:02
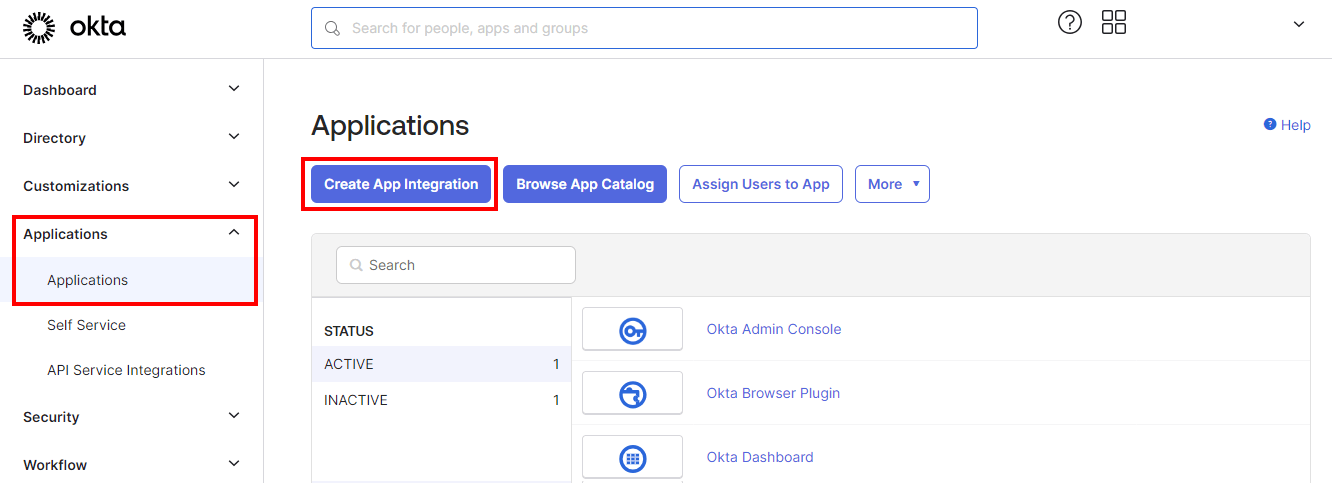
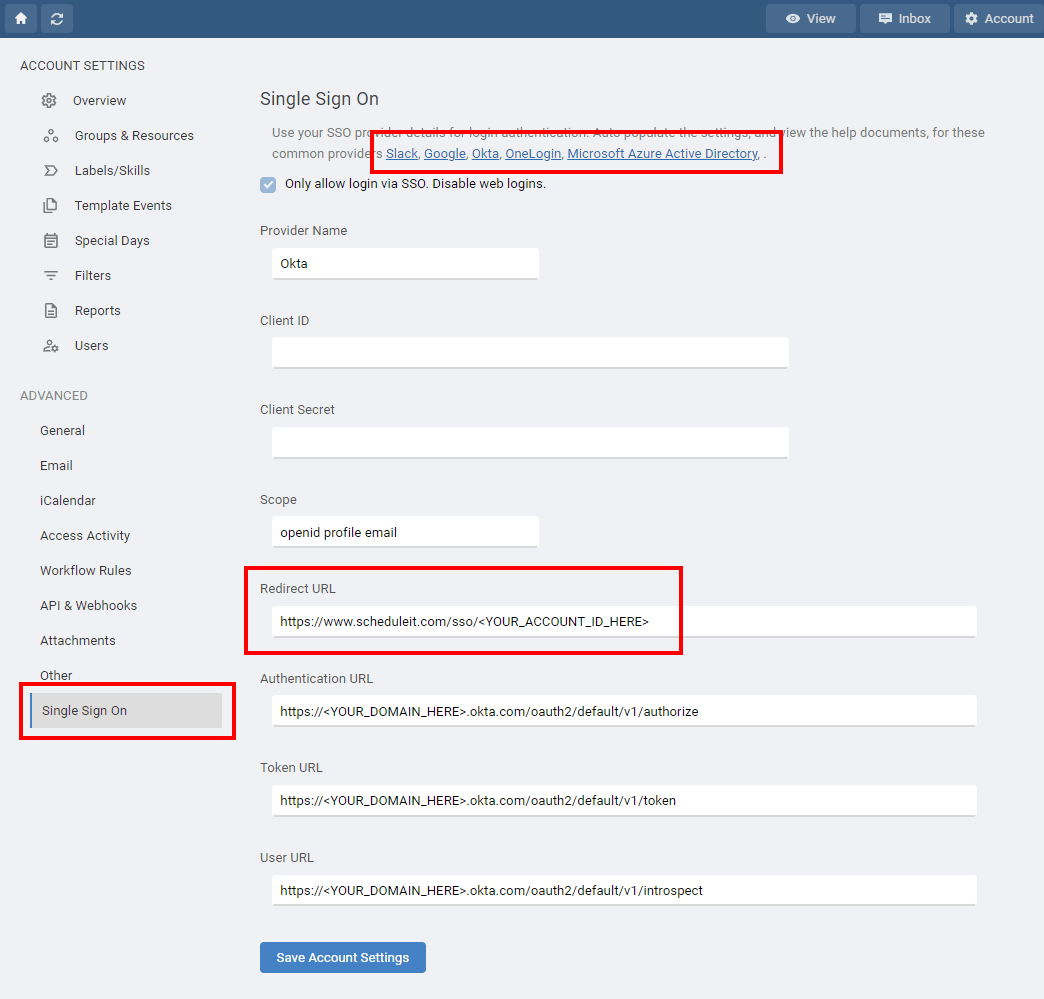
The following steps guide you through creating a custom application integration between Schedule it and Okta for user login authentication.
From Schedule it Account Settings > Single Sign On (SSO) page, click the Okta link to populate the SSO form with the initial details. Change all the <YOUR_DOMAIN_HERE> tags for your Okta domain.
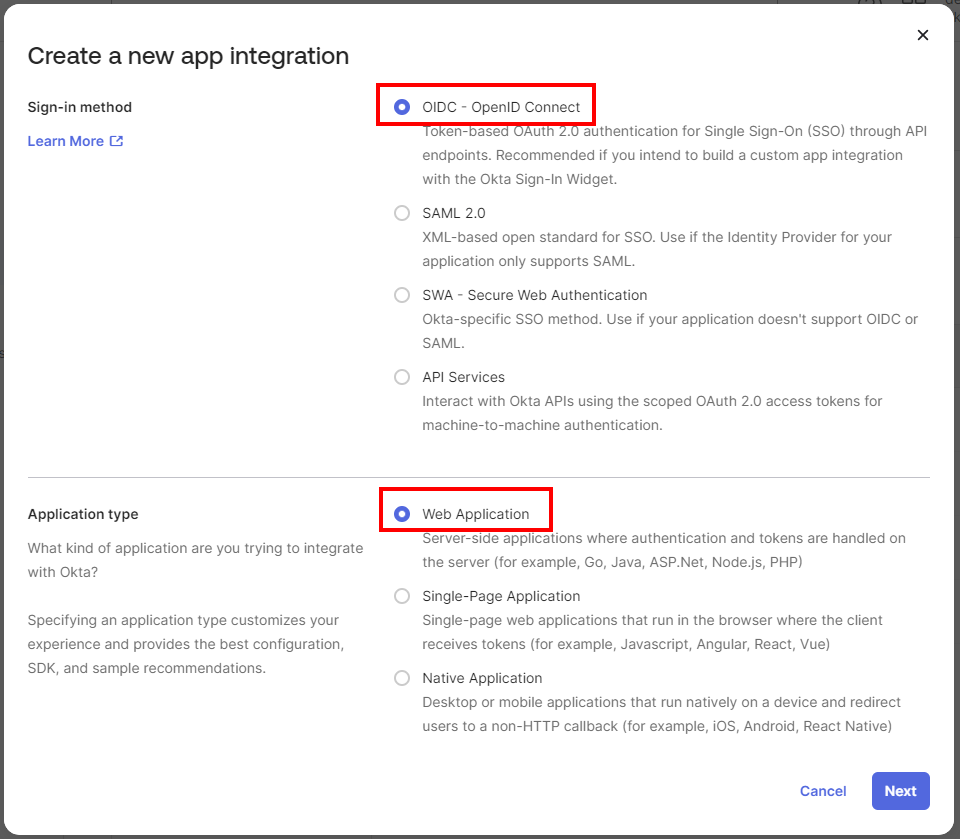
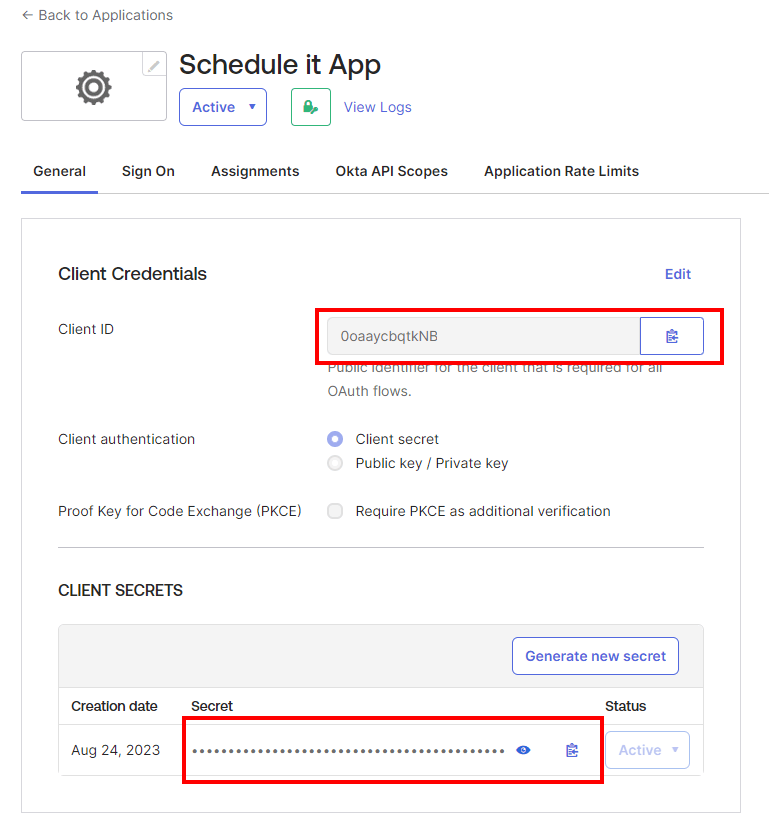
In the Okta Console, click Applications > Create App Integration. Select OIDC - OpenID Connect as the Sign-in method. Select Web Application. Click Next.
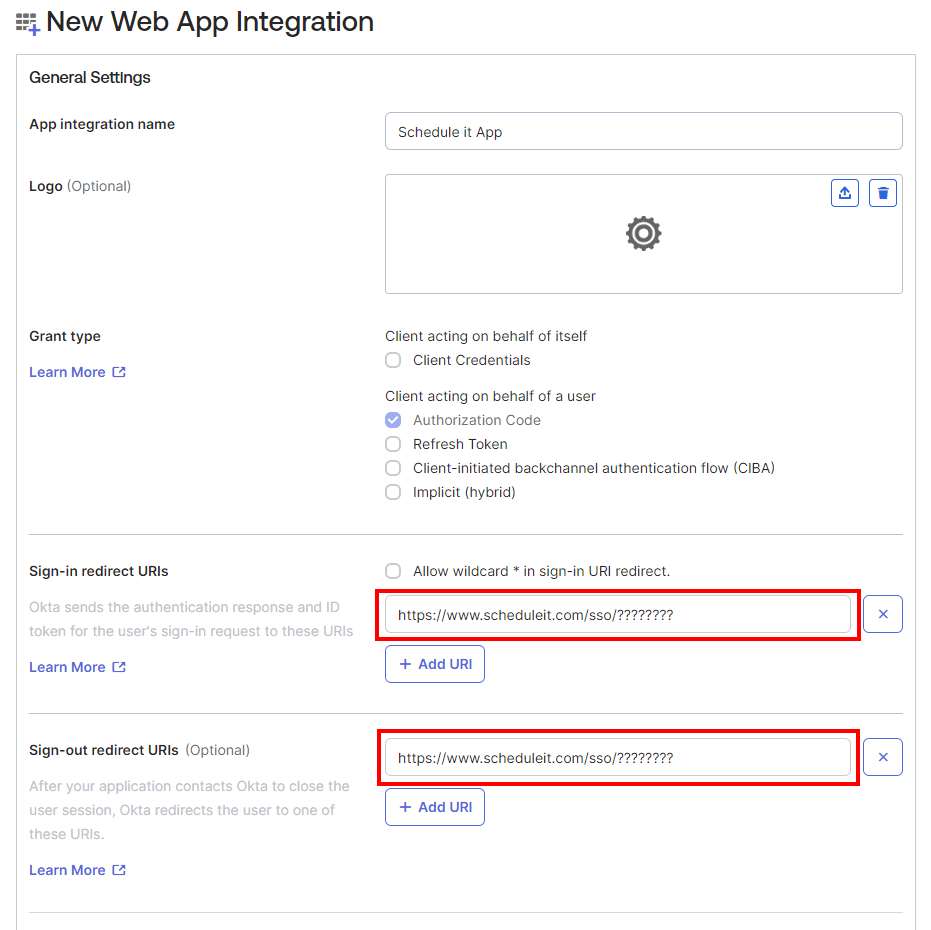
In Sign-in redirect URIs, paste the Redirect URL from your Schedule it Account Settings > SSO > Redirect URL. In Sign-out redirect URIs, paste the Redirect URL from your Schedule it Account Settings > SSO > Redirect URL. Download and add the Schedule it logo to your app so its easy for your users to recognise it. 
Click Save.
Copy the Okta Client ID and paste into your Schedule it Account Settings > SSO > Client ID. Copy the Okta Client Secret and paste into your Schedule it Account Settings > SSO > Client Secret. Save your Schedule it settings.
Update each of your Schedule it users SSO details to include their SSO ID from your provider.
If you are unsure of the ID provided by your SSO provider, then you can attempt a login (from your Redirect URL)which should show the ID provided.
Create a new app integration
If you are unsure of the ID provided by your SSO provider, then you can attempt a login (from your Redirect URL)which should show the ID provided.
24 August 2023, 15:58
The following steps guide you through creating a custom application integration between Schedule it and Okta for user login authentication.
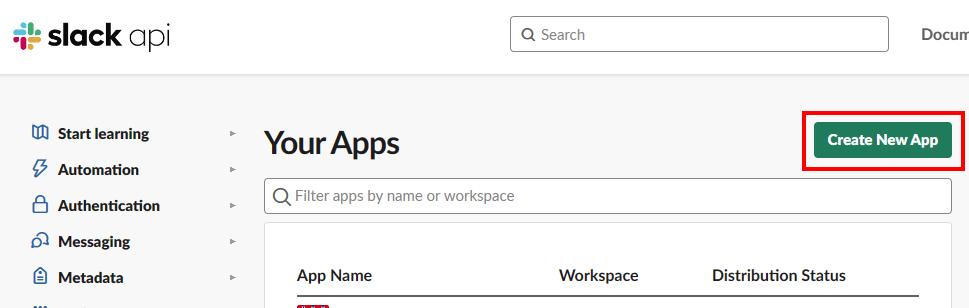
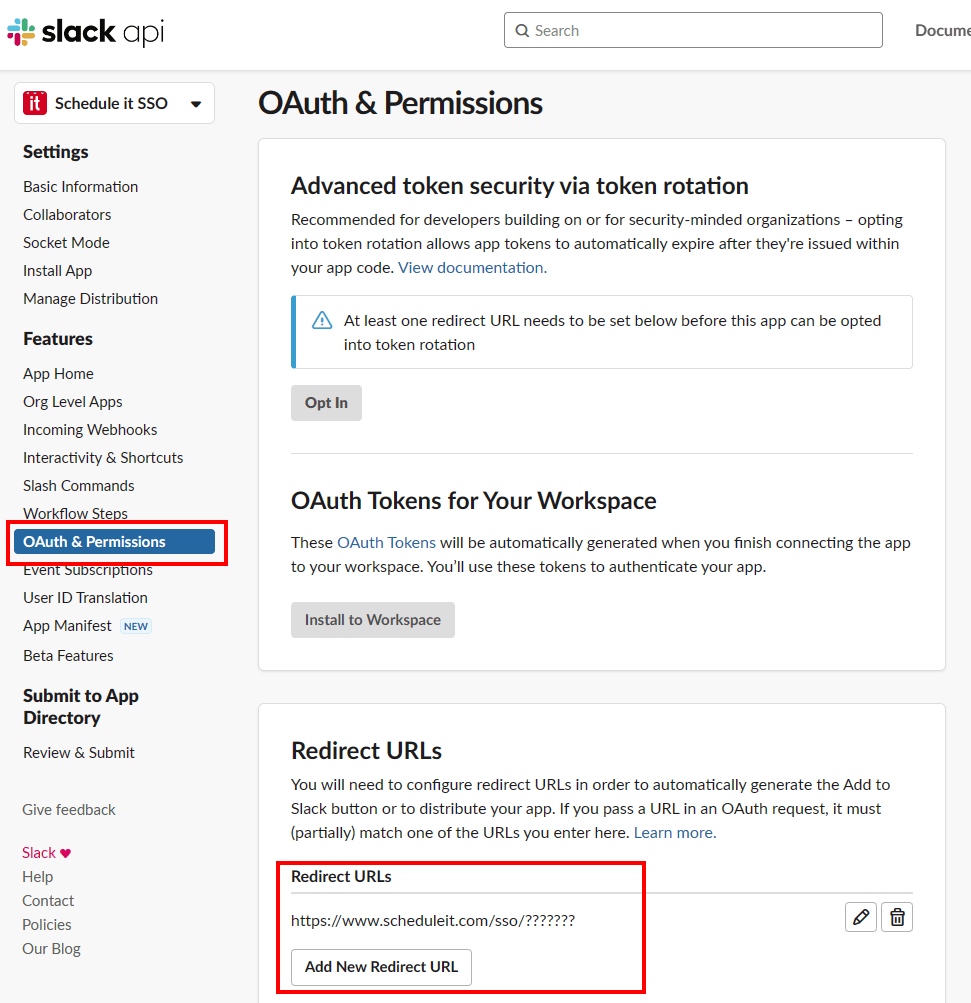
Sign in to the Slack API Console.
From the Schedule it Account Settings > Single Sign On (SSO) page, click the Slack link to populate the SSO form with the initial details.
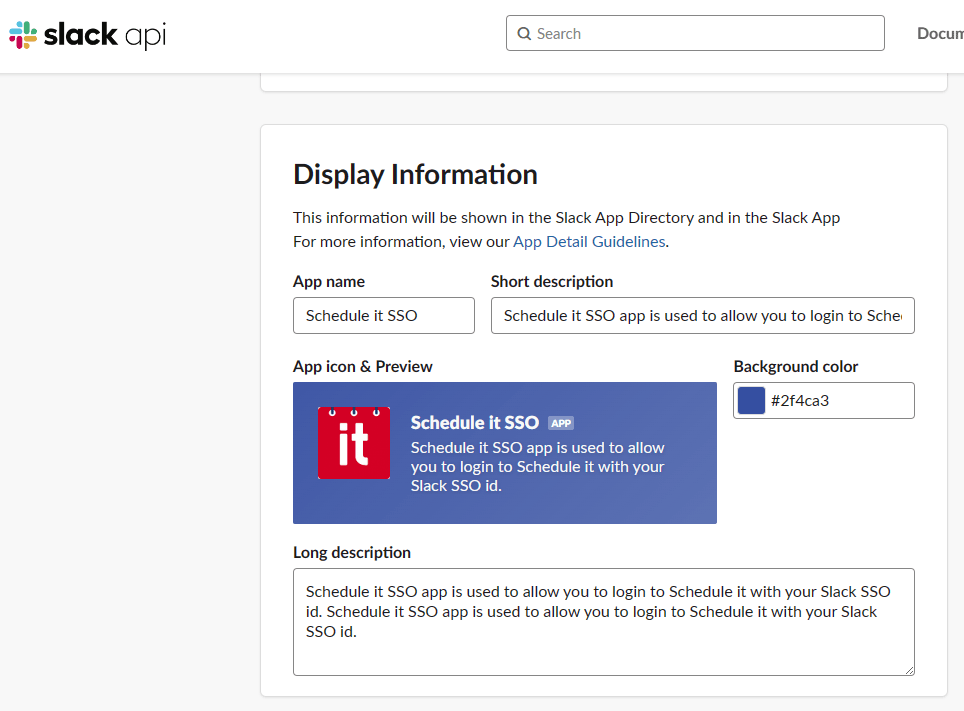
In Slack, click Create New App > From scratch. Enter a name, Schedule it SSO, and choose a workspace where it can be used. Click Create App. Scroll down to App Credentials.
Copy the Slack Client ID and paste into your Schedule it Account Settings > SSO > Client ID. Copy the Slack Client Secret and paste into your Schedule it Account Settings > SSO > Client Secret. Save your Schedule it settings.
In Slack scroll down to Display Information where you must enter a short and long description and add an icon. 
Press Save Changes. On the left select OAuth & Permissions. Add the Redirect URL from your Schedule it Account Settings > SSO. Redirect URL.
Update each of your Schedule it users SSO details to include their SSO ID from your provider.
If you are unsure of the ID provided by your SSO provider, then you can attempt a login (from your Redirect URL)which should show the ID provided.

Sign in to the Slack API Console.
Create a new app integration
If you are unsure of the ID provided by your SSO provider, then you can attempt a login (from your Redirect URL)which should show the ID provided.
26 August 2023, 11:51
The following steps guide you through creating a custom application integration between Schedule it for user login authentication.
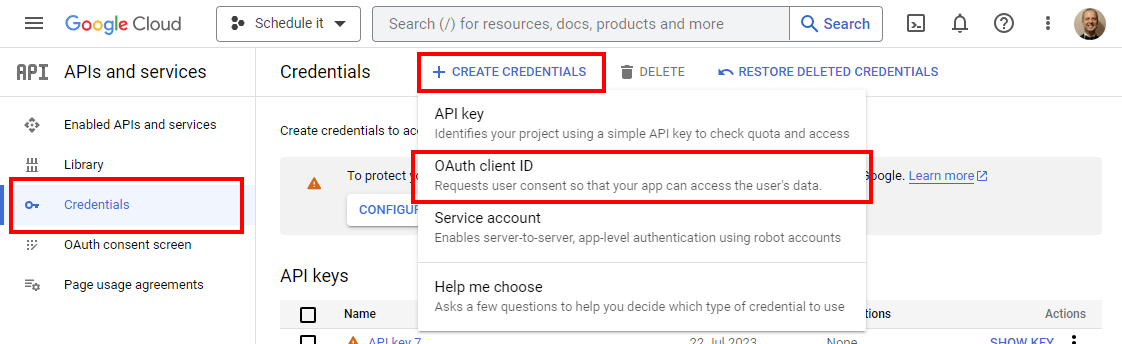
Sign in to the Google portal :
From the Schedule it Account Settings > Single Sign On (SSO) page, click the Azure link to populate the SSO form with the initial details.
In Google select Credentials > Create Credentials > OAuth Client ID Set the Application Type as Web Applications Enter the name, Schedule it SSO, and choose a workspace where it can be used. Add the Redirect URL from your Schedule it Account Settings > SSO > Redirect URL. Click Create.
Copy the Client ID and paste into your Schedule it Account Settings > SSO > Client ID. Copy the Client Secret and paste into your Schedule it Account Settings > SSO > Client Secret. Save your Schedule it settings.
Update each of your Schedule it users SSO details to include their SSO ID from your provider.
If you are unsure of the ID provided by your SSO provider, then you can attempt a login (from your Redirect URL)which should show the ID provided.
Sign in to the Google portal :
Create a new app integration
If you are unsure of the ID provided by your SSO provider, then you can attempt a login (from your Redirect URL)which should show the ID provided.
25 August 2023, 07:27
The following steps guide you through creating a custom application integration between Schedule it for user login authentication.
Help documents from Microsoft.
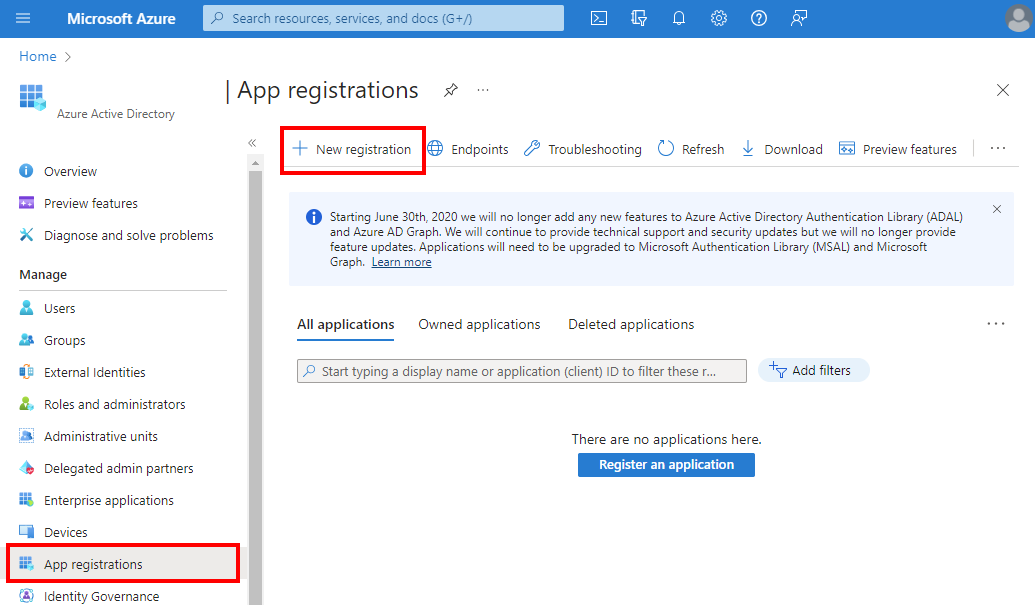
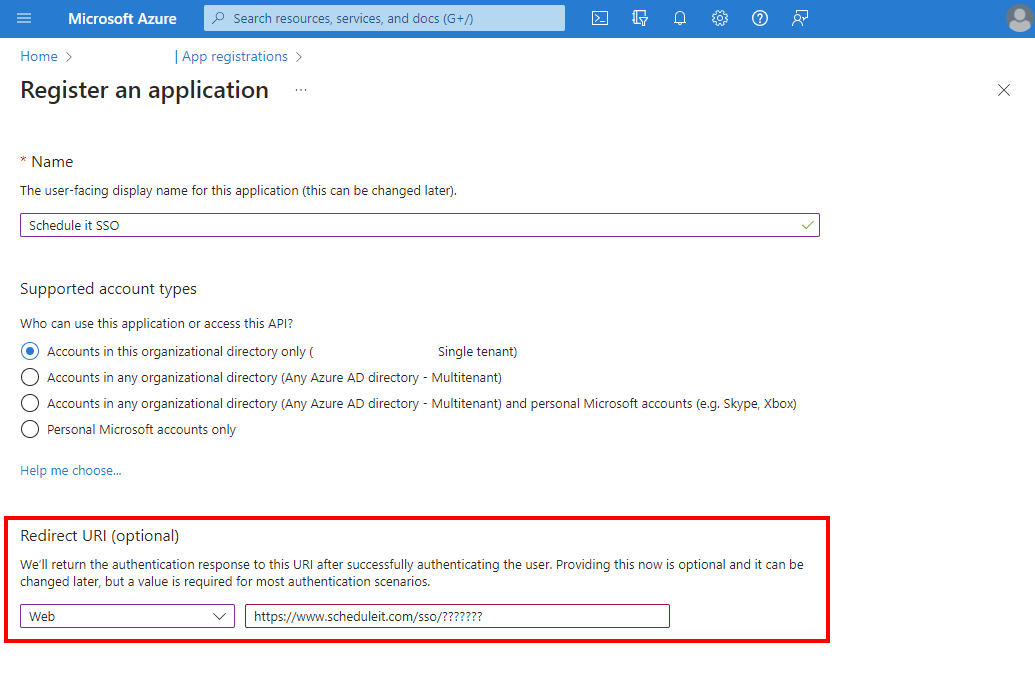
Sign in to the Azure portal.
From the Schedule it Account Settings > Single Sign On (SSO) page, click the Azure link to populate the SSO form with the initial details.
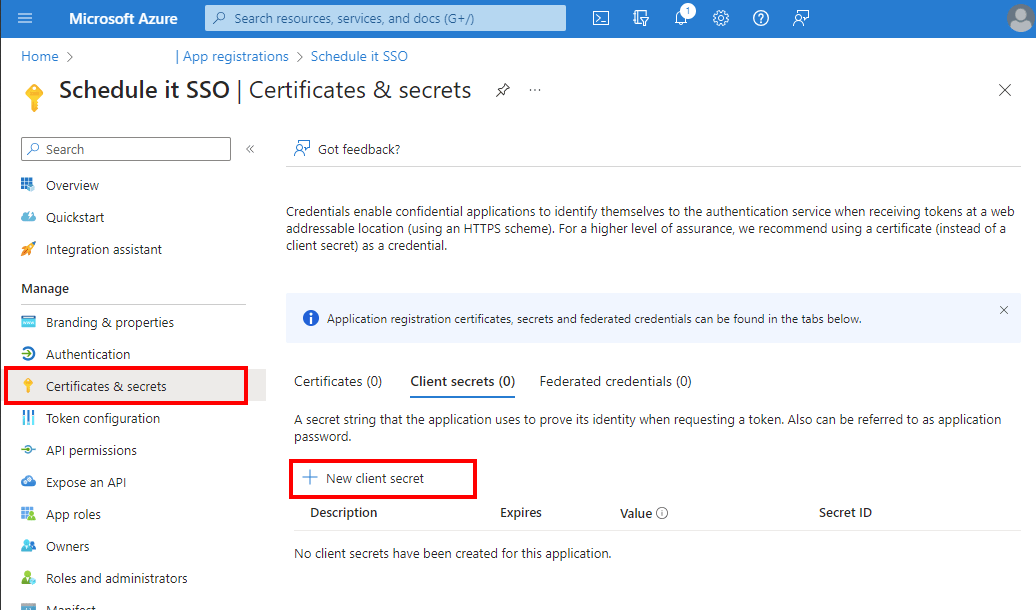
In Azure select Azure Active Directory Select Azure Active Directory > App registrations, and then select + New Registration. Enter the name, Schedule it SSO, and choose a workspace where it can be used. Set the Redirect URL type to Web. Add the Redirect URL from your Schedule it Account Settings > SSO > Redirect URL. Click Register.
Copy the Application (client) ID and paste into your Schedule it Account Settings > SSO > Client ID. Copy the Directory (tenant) ID and paste to replace all the <YOUR_DIRECTORY_TENANT_ID_HERE> tags in your Schedule it Account Settings > SSO
From Certificates & secrets press + New client secret Enter the name Schedule it SSO secret and press Add Copy the secret Value (not the Secret ID) and paste into your Schedule it Account Settings > SSO > Client Secret. Save your Schedule it settings.
Update each of your Schedule it users SSO details to include their SSO ID from your provider. If you are unsure of the ID provided by your SSO provider, then you can attempt a login (from your Redirect URL)which should show the ID provided.
Help documents from Microsoft.
Sign in to the Azure portal.
Create a new app integration
8 June 2021, 10:07
Under the price on our pricing page here is a full list of the differences between each plan.
From your Account Settings you can click the Upgrade Plan button to see the price to upgrade your current plan.
These are just some of the differences between the Startup Plan and the Business Plan...
Startup has:
- no backups, you must do your own each day
- is not GDPR compliant, you cannot store real names or PII data
- uses lower security servers, also no 2FA
- only stores a maximum of 10000 events then you must delete old events
- only support by email, no telephone or live chat
Business has:
- full automatic data backup
- legally GDPR compliant if you need to store any real names, addresses, company details etc.
- can store up to 250000 events
- live support
- custom reports
- Custom form fields in events
- 2 way Outlook and Google sharing
- Access to the API and Integrations
Enterprise has:
- higher event storage
- advanced custom rules and workflows
- batch API request, higher rate limits
To see the upgrade price just press the Upgrade Plan button in your Account Settings page.
14 September 2016, 08:32
Yes we offer a REST API to allow access to the data in your online account. In addition we have Webhooks that can send information to other services based on actions that happen in your account.
We also partner with Zapier to make integration with our API even quicker and easier. Connect to 1000+ of your favorite tools with our Zapier app. Get our Zapier app here.
Within our API we use Hypermedia to allow you to explore the API and its calls. You can use many API browsers to see and interact with the API for your account with tools like Postman. Once you are logged into your account simply start your API browser and point it to https://www.scheduleit.com/api/.
API calls are made via the HTTP methods GET, POST, and DELETE. The responses return status codes indicating success or failure, along with any applicable headers, and JSON representing the affected fields (or nothing) in the message-body.
Mandatory requirement for API access - Error checking
So we can work together to deliver you and all our users a reliable service, a mandatory requirement to access the API is you must include error checking in your scripts and check each response for a response code of 200 (OK), 429 (Wait 1 Minute), 400 or 403 (access denied). Occasionally our system will reply with a 429 response to see if your error checking code is working. Your script must wait one minute before trying again. Failure to do so could results in your API access being blocked, or your account being put on hold. Other error codes may also be returned and your script must track them. If constant errors are returned your script must stop sending requests until the issue is resolved.
Reply code 200 = No issues. Keep posting.
Reply code 400 or 403 = Login or security issue. Stop posting or wait one hour before posting again, and inform your IT to investigate.
Reply code 429 or any other = Wait one minute before posting again.
3 errors (non 200 codes) in a row should also cause your script to stop posting or wait one hour before posting again
If you are using Zapier they also have error handling steps you can use to inform you or pause on errors...
See Zapiers error-handling guide 1
See Zapiers error-handling guide 2
Lookup tables for repetitive searches
Searching for the same data repeatedly can cause API limits and safety alerts to be triggered blocking access. If your scripts perform the same search multiple times you should use lookup tables to temporarily store the results locally for reuse.
If you are using Zapier this page will help: See Zapier support page
Although the connection between you and our servers is encrypted and protected by the SSL layer it is advised not to put your login details as URL parameters where possible. These could be stored in the clear in our server logs as well as being visible to snooping if your SSL connection is not secure.
/api/data set name (returns a simple summery of the top 10 records if no additional query parameters are sent)
Unless specific fields are specified only a summary is returned. You must specify the fields if you need additional record information. Request a single record to see and return ALL fields.
/api/data set name/data record id (returns ALL the available fields of the requested record)
Event search:
Resource search:
Group search:
Polling and scraping:
Polling is when you request a set of records on a repeating time bases. Scraping is when calling for many records one after another to create a final list.
Whilst polling or scraping is not yet banned, it should be used with great caution and must be used correctly to ensure continued API access. Use a single batch/search command to return all the records at once rather than individually.
Polling for all records should never be used and will cause access to your API to be limited or blocked. Occasional polling is allowed to find new or recently updates records. If you are polling ensure your polling time is no more than every 20 minutes depending on the size of the data set returned.
When polling you must query for changed records since your last poll or date, and never repeat requests the same data set. Use search_date_modified to find changed events since your last check. Updating your last check date each time.
Return up to the specified number of records.
limit=search value
POST /api/data set name
DELETE /api/data set name/record id
#api documentation notes spec webhook
We also partner with Zapier to make integration with our API even quicker and easier. Connect to 1000+ of your favorite tools with our Zapier app. Get our Zapier app here.
Within our API we use Hypermedia to allow you to explore the API and its calls. You can use many API browsers to see and interact with the API for your account with tools like Postman. Once you are logged into your account simply start your API browser and point it to https://www.scheduleit.com/api/.
API calls are made via the HTTP methods GET, POST, and DELETE. The responses return status codes indicating success or failure, along with any applicable headers, and JSON representing the affected fields (or nothing) in the message-body.
Mandatory requirement for API access - Error checking
So we can work together to deliver you and all our users a reliable service, a mandatory requirement to access the API is you must include error checking in your scripts and check each response for a response code of 200 (OK), 429 (Wait 1 Minute), 400 or 403 (access denied). Occasionally our system will reply with a 429 response to see if your error checking code is working. Your script must wait one minute before trying again. Failure to do so could results in your API access being blocked, or your account being put on hold. Other error codes may also be returned and your script must track them. If constant errors are returned your script must stop sending requests until the issue is resolved.
Reply code 200 = No issues. Keep posting.
Reply code 400 or 403 = Login or security issue. Stop posting or wait one hour before posting again, and inform your IT to investigate.
Reply code 429 or any other = Wait one minute before posting again.
3 errors (non 200 codes) in a row should also cause your script to stop posting or wait one hour before posting again
If you are using Zapier they also have error handling steps you can use to inform you or pause on errors...
See Zapiers error-handling guide 1
See Zapiers error-handling guide 2
Lookup tables for repetitive searches
Searching for the same data repeatedly can cause API limits and safety alerts to be triggered blocking access. If your scripts perform the same search multiple times you should use lookup tables to temporarily store the results locally for reuse.
If you are using Zapier this page will help: See Zapier support page
Security & Access
Authentication to the API is normally done using HTTP Basic Authentication where your account login (account number_login name) and password are required. The most compelling aspect about HTTP Basic Authentication is that it's simple, and you should of course always use HTTPS when submitting HTTP Basic Authentication credentials.Although the connection between you and our servers is encrypted and protected by the SSL layer it is advised not to put your login details as URL parameters where possible. These could be stored in the clear in our server logs as well as being visible to snooping if your SSL connection is not secure.
cURL
$ch = curl_init('https://www.scheduleit.com/api/');
curl_setopt($curl, CURLOPT_HTTPAUTH, CURLAUTH_BASIC);
curl_setopt($curl, CURLOPT_USERPWD, 'accountnum_username:password');
$output = curl_exec($ch);
curl_close($ch);
$ch = curl_init('https://www.scheduleit.com/api/');
curl_setopt($curl, CURLOPT_HTTPAUTH, CURLAUTH_BASIC);
curl_setopt($curl, CURLOPT_USERPWD, 'accountnum_username:password');
$output = curl_exec($ch);
curl_close($ch);
cURL
$ch = curl_init('https://www.scheduleit.com/api/');
curl_setopt($ch, CURLOPT_HTTPHEADER, array('Authorization:Basic '.base64_encode('accountnum_username:password').''));
$output = curl_exec($ch);
curl_close($ch);
$ch = curl_init('https://www.scheduleit.com/api/');
curl_setopt($ch, CURLOPT_HTTPHEADER, array('Authorization:Basic '.base64_encode('accountnum_username:password').''));
$output = curl_exec($ch);
curl_close($ch);
Workspaces
All API data is retrieved from the main workspace (id=1) by default. If you are using multiple workspaces you will need to add a search query using the workspace ID to retrieve data that is NOT in the main workspace. Workspace IDs are shown next to their name in your Account Settings > Workspaces page.Get resources from the main workspace with the ID 1
/api/resources
/api/resources
Get resources from a workspace with the ID 2
/api/resources?search_workspace=2
/api/resources?search_workspace=2
Retrieving User Information
Data is request via the URL path and additional parameters.URL
https://accountnum_loginname:password@www.scheduleit.com/api/
https://accountnum_loginname:password@www.scheduleit.com/api/
cURL
$ch = curl_init('https://accountnum_loginname:password@www.scheduleit.com/api/');
curl_setopt($ch, CURLOPT_HEADER, 0);
$output = curl_exec($ch);
curl_close($ch);
$ch = curl_init('https://accountnum_loginname:password@www.scheduleit.com/api/');
curl_setopt($ch, CURLOPT_HEADER, 0);
$output = curl_exec($ch);
curl_close($ch);
API ROOT
The root path for all API calls is https://www.scheduleit.com/api/GET
HTTP GET requests are used to retrieve data without directly modifying it, in json format./api/groups
/api/resources
/api/events
/api/labels
/api/resources
/api/events
/api/labels
Unless specific fields are specified only a summary is returned. You must specify the fields if you need additional record information. Request a single record to see and return ALL fields.
Get the ID and Name fields from all your Groups
/api/groups?fields=id,name
/api/groups?fields=id,name
Get the id, name and email addresses from all your Resources
/api/resources?fields=id,name,email
/api/resources?fields=id,name,email
Get the ID, Start and Title from all your Events within the default date range
/api/events?fields=id,date_start,title
/api/events?fields=id,date_start,title
Get ALL fields from Event where the Event ID is 1234
/api/events/1234
/api/events/1234
Get the title of your Events where the Event ID is 123456
/api/events/123456?fields=title
/api/events/123456?fields=title
Search the data sets for multiple records.
Event search:
- search_id=search for multiple ids
- search_title=search text
- search_name=search text
- search_completed=search completed
- search_date_start=search date
- search_date_end=search date
- search_owner=search with tagged resource using resource id
- search_date_modified=(>,<,!) search date (e.g. search_date_modified=>2022-01-31)
- date_range_from=search date
- date_range_to=search date
- search_istask=search for tasks (1 or 0)
- search_isnodate=search for events with no date (1 or 0)
Resource search:
- search_id=search for multiple ids
- search_name=search name
- search_owner=(,!) search within a Group using group id
- search_data1=search details 1
... - search_data10=search details 10
- search_price=(>,<,!) search hourly or fix rate/price (e.g. search_price=>0)
- search_date_modified=(>,<,!) search date (e.g. search_date_modified=>2022-01-31)
Group search:
- search_id=search for multiple ids
- search_name=search name
- search_date_modified=(>,<,!) search date (e.g. search_date_modified=>2022-01-31)
Get any Events linked to a resource with the ID 123, 123 OR 456, and 123 AND 456, and NOT 123 AND NOT 456
/api/events?fields=id&search_owner=123
/api/events?fields=id&search_owner=123,456
/api/events?fields=id&search_owner=$,123,456
/api/events?fields=id&search_owner=!,123,456
/api/events?fields=id&search_owner=123
/api/events?fields=id&search_owner=123,456
/api/events?fields=id&search_owner=$,123,456
/api/events?fields=id&search_owner=!,123,456
Get Events for 2018
/api/events?date_range_from=2018-01-01&date_range_to=2018-12-31
/api/events?date_range_from=2018-01-01&date_range_to=2018-12-31
Get Events where the start date is from 2016-01-01, and where the title contains the word 'test'
/api/events?date_range_from=2016-01-01&date_range_to=2020-01-01&search_title=test
/api/events?date_range_from=2016-01-01&date_range_to=2020-01-01&search_title=test
Get Groups where the ID is greater than 10 but less than 200
/api/groups?search_id=>10,<200
/api/groups?search_id=>10,<200
Polling and scraping:
Polling is when you request a set of records on a repeating time bases. Scraping is when calling for many records one after another to create a final list.
Whilst polling or scraping is not yet banned, it should be used with great caution and must be used correctly to ensure continued API access. Use a single batch/search command to return all the records at once rather than individually.
Polling for all records should never be used and will cause access to your API to be limited or blocked. Occasional polling is allowed to find new or recently updates records. If you are polling ensure your polling time is no more than every 20 minutes depending on the size of the data set returned.
When polling you must query for changed records since your last poll or date, and never repeat requests the same data set. Use search_date_modified to find changed events since your last check. Updating your last check date each time.
Get data that was added or updated after a date, on date, before date, and not on date...
/api/events?search_date_modified=>2022-01-01 (after date)
/api/resources?search_date_modified=>2022-01-01 (after date)
/api/groups?search_date_modified=>2022-01-01 (after date)
Other queries
?search_date_modified=2022-01-01 (on date)
?search_date_modified=>2022-01-01 (after date)
?search_date_modified=>2022-01-01 14:00 (after date and time)
?search_date_modified=<2022-01-01 (before date)
?search_date_modified=!2022-01-01 (not on date)
Return up to the specified number of records.
Get the Name of the first 5 records from your Groups
/api/groups?fields=name&limit=5
/api/groups?fields=name&limit=5
Get the Name and the first 500 records from your Resources
/api/resources?fields=name&limit=500
/api/resources?fields=name&limit=500
POST
HTTP POST requests are used to add or update data to your account. Returned response is in json format.Create a new event by posting to...
/api/events/
/api/events/
Create a new group by posting to...
/api/groups/
/api/groups/
Update an existing event with the ID of 1234
/api/events/1234
/api/events/1234
Add a new Event
cURL
$ch = curl_init();
$fields = array(
'title' => 'the title',
'owner' => '220',
'date_start' => urlencode('2016-09-29 09:00:00'),
'date_end' => urlencode('2016-09-29 17:00:00'),
'notes' => 'the notes',
'custom1' => 'custom 1',
'custom2' => 'custom 2',
'custom3' => 'custom 3',
'custom4' => 'custom 4',
'custom7' => 'custom 7',
'custom8' => 'custom 8',
'custom9' => 'custom 9',
'starticon' => '1',
'color_text' => '#66FF66',
'color_back' => '#FFFFFF',
'priority' => '7',
'completed' => '75'
);
$post_data = '';
foreach($fields as $key => $value) {
$post_data .= $key.'='.$value.'&';;
}
rtrim($post_data, '&');
curl_setopt($ch, CURLOPT_URL, 'https://accountnum_loginname:password@www.scheduleit.com/api/events');
curl_setopt($ch, CURLOPT_POST, true);
curl_setopt($ch, CURLOPT_POSTFIELDS, $post_data);
curl_exec($ch);
Add a new Resource
cURL
$ch = curl_init();
$fields = array(
'name' => 'the resource name',
'owner' => '10,456,789',
'email' => 'fred@example.com',
'color_back' => '#A9f5A9',
'color_text' => '#66FF66',
'color_event_back' => '#FF0000',
'data1' => 'Manager',
'data2' => '',
'data3' => '',
'data4' => '',
'data5' => '',
'data6' => '',
'data7' => '',
'data8' => '',
'data9' => '',
'data10' => '',
'skills' => '123,456,678',
'geonav' => ''
);
$post_data = '';
foreach($fields as $key => $value) {
$post_data .= $key.'='.$value.'&';
}
rtrim($post_data, '&');
curl_setopt($ch, CURLOPT_URL, 'https://accountnum_loginname:password@www.scheduleit.com/api/resources');
curl_setopt($ch, CURLOPT_POST, true);
curl_setopt($ch, CURLOPT_POSTFIELDS, $post_data);
curl_exec($ch);
Add a new Group
cURL
$ch = curl_init();
$fields = array(
'name' => 'the group name',
'color_back' => '#66FF66',
'positionv' => '5',
'min_resources' => '0',
'max_resources' => '0',
'hide_from_main' => '0',
'hide_from_event' => '0'
);
$post_data = '';
foreach($fields as $key => $value) {
$post_data .= $key.'='.$value.'&';
}
rtrim($post_data, '&');
curl_setopt($ch, CURLOPT_URL, 'https://accountnum_loginname:password@www.scheduleit.com/api/groups');
curl_setopt($ch, CURLOPT_POST, true);
curl_setopt($ch, CURLOPT_POSTFIELDS, $post_data);
curl_exec($ch);
DELETE
HTTP DELETE requests are used to delete data from your account. Returned response is in json format.cURL
$ch = curl_init('accountnum_loginname:password@https://www.scheduleit.com/api/events/123456');
curl_setopt($ch, CURLOPT_CUSTOMREQUEST, 'DELETE');
curl_setopt($ch, CURLOPT_POSTFIELDS);
curl_exec($ch);
$ch = curl_init('accountnum_loginname:password@https://www.scheduleit.com/api/events/123456');
curl_setopt($ch, CURLOPT_CUSTOMREQUEST, 'DELETE');
curl_setopt($ch, CURLOPT_POSTFIELDS);
curl_exec($ch);
#api documentation notes spec webhook
10 August 2025, 12:25
Did you know that the average employee in the UK completes only 3 hours work each day, irrespective of how many hours they are in the office. In fact, the longer they spend in the office the further their productivity decreases after 50 hours.
Whilst according to a study by the Harvard Business Review the average business leader works a 72-hour work week. Does this sound familiar?
Productivity in the workplace is a perennial problem no matter the size of the business or organization. There are, however, some things both employers and employees can do to maximise productivity.
In our list of top tips to increase employee and staff productivity are:

Businesses that have a solid onboarding process for new employees improve productivity by more than 70%. Bringing in new employees can be the responsibility of one person e.g. the line manager or a team of people e.g. colleagues, line manager and HR.
Whether you are a small business or a large organization the key is to have a process that includes training, technology and socialising with other employees.

The average worker spends 13 hours each week on emails, making up 28% of the hours at work. New and current employees will benefit from time being set aside for checking, responding to and sending out emails.
This can be scheduled into their weekly work tasks in blocks e.g. 1.5 hours per week or 30 minutes per day, depending on which system suits the business best. Scheduling in this time during the week as a priority also has the benefit of employees not needing to check at home after coming back from work.
Also, make sure emails are addressed to those that need to be in the email rather than sending out blanket emails. Those who are not in the email can use calendars, daily bulletins and schedules to check for important information.

Traditionally, multitasking was a skill to be envied as it meant multiple tasks could be completed at the same time. However, multitasking in the modern era has moved away from classic multitasking and now it often means stopping one task and going onto another task before the previous task is finished, known as interrupted task switching.
This impacts productivity in the workplace by as much as 40% reduction, as well as taking 25 minutes to get back into the task that was previously being worked on.
Try going one week with focusing and being present on the task at hand, e.g. in meetings avoid using phones and laptops and concentrate on participating.
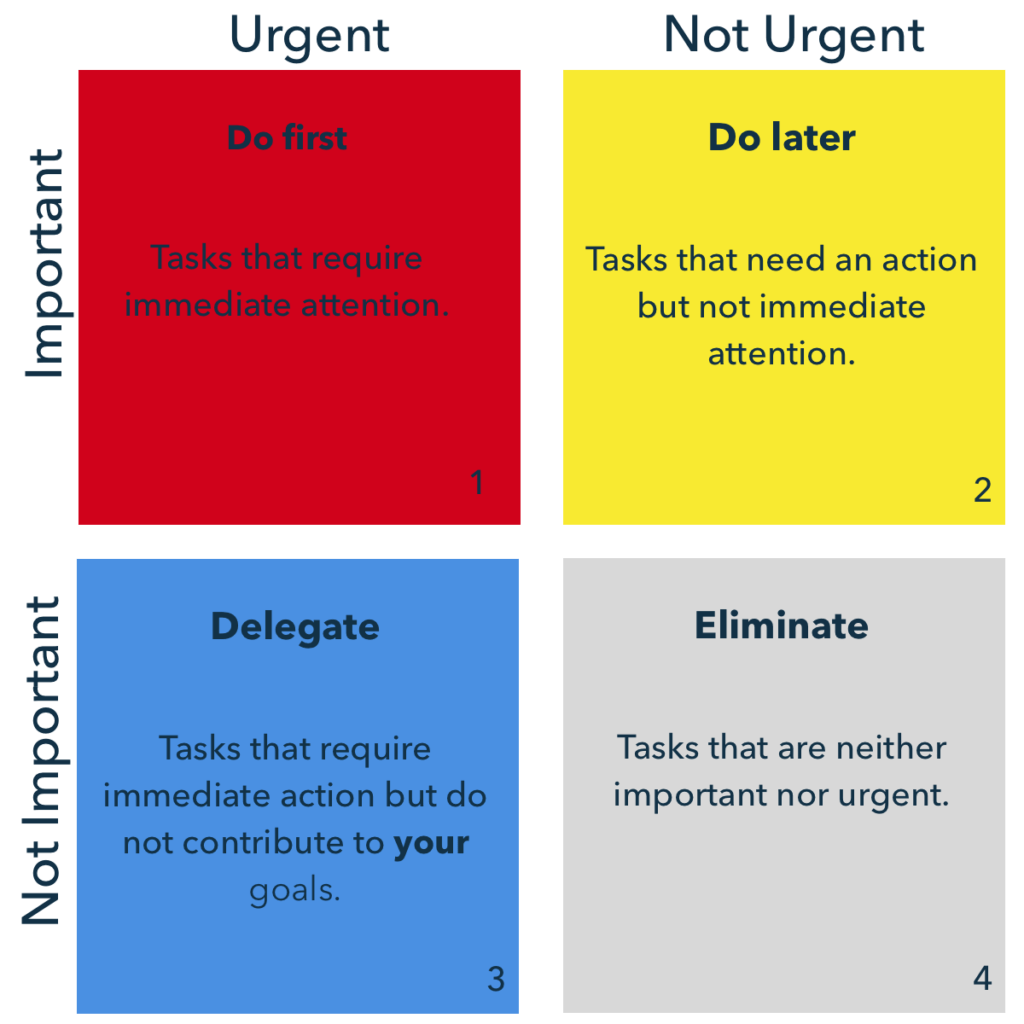
You also want to encourage employees to prioritise these tasks. Using Eisenhower's Urgent/Important Principle to understand the difference between important and urgent tasks is critical. Eisenhower's Urgent/Important Principle helps you quickly identify the activities that you should focus on, as well as the ones you should ignore and we cover it in more detail below.
With an average of 7 distractions per hour or in other words being interrupted every 8 minutes it is becoming increasingly difficult to stay concentrated on work activities, from smart phones to emails our concentration is affected.
The most productive hours of the day are thought to be in the morning generally between 8am and 12 noon, or 11am Monday morning.
This is a good general rule, but we all fall into different categories of early birds, night owls and in-betweeners so work on finding your most productive hours of the day.
Quick win: Figure out when you and your employees concentration peaks and plan the most important activities in this productivity zone.
Stephen Covey said, “The key is not to prioritize what's on your schedule, but to schedule your priorities.”
Effective scheduling of your priorities is a great way to get more done in the time you have, especially since we are not able to add hours to our day to complete work tasks.
Eisenhower created the Urgent-Important Matrix which is a time management system he created when he realised he had two kinds of problems “the urgent and the important.”
Use this system to schedule your work tasks based on whether they are:
Quick win: Delete activities that fall into the unimportant and not urgent category.

Employees know that when they come to work, they are on company time. While employees respect that, they still like to know what is going on, and what they are going to be doing each day.
They like to have access to the information that is important to them, such as what work is planned for them, when they might be required to work overtime, how much vacation time they've accrued. Scheduling software can keep track of such information and offer easy access for employees and planners.
When employees can access tomorrow's or the week's schedule, they know what's planned, and that leads to a feeling of certainty for the future.
If they happen to be assigned to a person, product, or project they don't particularly care for, they have the time to prepare themselves mentally, whereas coming in and finding out can be the beginning of a bad day. Additionally, by knowing what's coming the next day, employees can set up their mind, workplace, equipment and bring the proper tools.
It also shows an element of trust, privacy and autonomy by not having to have someone else look it up with them. If your company allows it, scheduling software can also let employees swap shifts, tasks, and plan their work to accommodate their work and personal lives. Allowing this level of access also eases the burden on managers.
Employees thrive in a well-organized workplace where they have easy access to information that is important to them. Being able to freely check planned work and up coming activities, is highly useful and beneficial to employees and employers alike.
For business leaders, an average of 30% of the week is taken up by tasks that have no or little value. In Eisenhower’s Matrix that is the unimportant but urgent category, these work tasks should be delegated to others, e.g. social media, website maintenance, etc.
Did you know that business leaders and employees who are able to delegating generate 33% more revenue than those who don't.
Quick win: Don't just delegate tasks, give responsibility and authority. Allow others to choose how they will complete the task.
Did you know that the average person uses 13 different time management methods? If this is shocking think about all the different apps, planners, diaries, calendars and computer software that you have encountered in the last few months.
You might be running an app on your phone to manage your time but then when you get into work your computer has software and then in the evening you may have a family calendar to show events and appointments.
Quick win: Simplify. Reduce mental switching costs and the chances of information inconsistencies by choosing one-time management system for work. One that can be used on smart phones, computers and tablets so you can open the same time management software every time.
Whilst according to a study by the Harvard Business Review the average business leader works a 72-hour work week. Does this sound familiar?
Productivity in the workplace is a perennial problem no matter the size of the business or organization. There are, however, some things both employers and employees can do to maximise productivity.
In our list of top tips to increase employee and staff productivity are:
- A solid onboarding process
- Scheduling email time
- Focusing on one task at once
- Find the productivity zone
- Prioritize activities
- Be prepared and informed
- Delegate tasks
- Reduce your management tools
A Solid Onboarding Process
Businesses that have a solid onboarding process for new employees improve productivity by more than 70%. Bringing in new employees can be the responsibility of one person e.g. the line manager or a team of people e.g. colleagues, line manager and HR.
Whether you are a small business or a large organization the key is to have a process that includes training, technology and socialising with other employees.
Schedule Email Time
The average worker spends 13 hours each week on emails, making up 28% of the hours at work. New and current employees will benefit from time being set aside for checking, responding to and sending out emails.
This can be scheduled into their weekly work tasks in blocks e.g. 1.5 hours per week or 30 minutes per day, depending on which system suits the business best. Scheduling in this time during the week as a priority also has the benefit of employees not needing to check at home after coming back from work.
Also, make sure emails are addressed to those that need to be in the email rather than sending out blanket emails. Those who are not in the email can use calendars, daily bulletins and schedules to check for important information.
Focus on One Task at a Time
Traditionally, multitasking was a skill to be envied as it meant multiple tasks could be completed at the same time. However, multitasking in the modern era has moved away from classic multitasking and now it often means stopping one task and going onto another task before the previous task is finished, known as interrupted task switching.
This impacts productivity in the workplace by as much as 40% reduction, as well as taking 25 minutes to get back into the task that was previously being worked on.
Try going one week with focusing and being present on the task at hand, e.g. in meetings avoid using phones and laptops and concentrate on participating.
You also want to encourage employees to prioritise these tasks. Using Eisenhower's Urgent/Important Principle to understand the difference between important and urgent tasks is critical. Eisenhower's Urgent/Important Principle helps you quickly identify the activities that you should focus on, as well as the ones you should ignore and we cover it in more detail below.
Find the Productivity Zone
With an average of 7 distractions per hour or in other words being interrupted every 8 minutes it is becoming increasingly difficult to stay concentrated on work activities, from smart phones to emails our concentration is affected.
The most productive hours of the day are thought to be in the morning generally between 8am and 12 noon, or 11am Monday morning.
This is a good general rule, but we all fall into different categories of early birds, night owls and in-betweeners so work on finding your most productive hours of the day.
Quick win: Figure out when you and your employees concentration peaks and plan the most important activities in this productivity zone.
Prioritize Activities
Stephen Covey said, “The key is not to prioritize what's on your schedule, but to schedule your priorities.”
Effective scheduling of your priorities is a great way to get more done in the time you have, especially since we are not able to add hours to our day to complete work tasks.
Eisenhower created the Urgent-Important Matrix which is a time management system he created when he realised he had two kinds of problems “the urgent and the important.”
Use this system to schedule your work tasks based on whether they are:
- Urgent and important
- Urgent but not important
- Unimportant but urgent
- Unimportant and not urgent
Quick win: Delete activities that fall into the unimportant and not urgent category.
Be Prepared and Informed
Employees know that when they come to work, they are on company time. While employees respect that, they still like to know what is going on, and what they are going to be doing each day.
They like to have access to the information that is important to them, such as what work is planned for them, when they might be required to work overtime, how much vacation time they've accrued. Scheduling software can keep track of such information and offer easy access for employees and planners.
When employees can access tomorrow's or the week's schedule, they know what's planned, and that leads to a feeling of certainty for the future.
If they happen to be assigned to a person, product, or project they don't particularly care for, they have the time to prepare themselves mentally, whereas coming in and finding out can be the beginning of a bad day. Additionally, by knowing what's coming the next day, employees can set up their mind, workplace, equipment and bring the proper tools.
It also shows an element of trust, privacy and autonomy by not having to have someone else look it up with them. If your company allows it, scheduling software can also let employees swap shifts, tasks, and plan their work to accommodate their work and personal lives. Allowing this level of access also eases the burden on managers.
Employees thrive in a well-organized workplace where they have easy access to information that is important to them. Being able to freely check planned work and up coming activities, is highly useful and beneficial to employees and employers alike.
Delegate Tasks
For business leaders, an average of 30% of the week is taken up by tasks that have no or little value. In Eisenhower’s Matrix that is the unimportant but urgent category, these work tasks should be delegated to others, e.g. social media, website maintenance, etc.
Did you know that business leaders and employees who are able to delegating generate 33% more revenue than those who don't.
Quick win: Don't just delegate tasks, give responsibility and authority. Allow others to choose how they will complete the task.
Reduce your Management Tools
Did you know that the average person uses 13 different time management methods? If this is shocking think about all the different apps, planners, diaries, calendars and computer software that you have encountered in the last few months.
You might be running an app on your phone to manage your time but then when you get into work your computer has software and then in the evening you may have a family calendar to show events and appointments.
Quick win: Simplify. Reduce mental switching costs and the chances of information inconsistencies by choosing one-time management system for work. One that can be used on smart phones, computers and tablets so you can open the same time management software every time.
3 July 2025, 11:02
Staff Scheduling Software for Small Business
6 January 2013, 12:05
Below is a quick introduction into our drag and drop scheduling software. If you have problems viewing this video you can also view it at the main YouTube website by clicking this link.
2 January 2013, 12:05
Setup a Synchronised Connection
This topic covers the feature for synchronising your local and online database.
The information below is for setting the desktop software to synchronise with and online account for remote users. A direct connection is also possible but not discussed in this topic. Please note your desktop database will be upload to your cloud account on our servers. If you have multiple desktop clients, you must choose 1 to do the syncing. Never sync from more than the one nominated PC.
1, If you don't have it - Download our latest desktop software from here (to be up-to-date).
2, If you don't have an online account - Signup and create an online account from here.
3, If you don't have Schedule It installed - Install the desktop software.
4, Start the desktop software and open your existing desktop database or start a new project (file database) including the sample data. You can also add your own data at this point.
5, From the menu Tools/Options/Internet Web/Web Synchronisation setting, enter your online login details (your login is your account number and username with a slash in the middle e.g. 12345/fred) which will have been emailed to you when you created your online account. Then press 'Test' to confirm the connection.
On the same settings page you can also set a timer to auto sync, there are also options to 'Auto Mark Events for sharing' and 'Queue events for future syncing' which you should tick.
Then press OK to save the new options.
6, Select from the menu Tools/Web Synchronisation to open the synchronisation window. You will be prompted to upload your desktop data to your new online account, Select YES to upload your desktop data and replace all your online data.
Thats it.
If you did not enable the option 'Auto Mark Events for sharing' mentioned above, then you will need to tick the 'Share Online' box in the event window to send or update the event online.
If you did not set the 'auto sync timer' mentioned above, then you will need to start a sync from the menu Tools/Web Synchronisation.
Note: As you change and update groups, resources and users these are NOT automatically sent you must choose to upload these changes from the Search window by finding them and choosing to 'Send All Online' with all found results for your groups, resources and users.
Web synchronisation for the first time
When you make your first Web Synchronisation from the Tools menu of the desktop software you have the prompt to clear the online database and upload all your desktop data to your online account. After confirming this action all your desktop data is sent online and your online and desktop database are connected. Only future events will be sent online, historical events can be sent manually if required.
Synchronising events
Events are marked to be sent online if the 'Share Event Online' tick box is enabled in the event, OR you choose to mark every event automatically by enabling the option 'Automatically mark new events for future sharing online' in menu Tools/Options/Internet/Web Sync. If the event could not be sent immediately you can later synchronize any outstanding event changes from the menu Tools/Web Sync, or by setting the auto sync timer.
To send historical events, or any events not sent previously, to your online account press the main Search icon on the toolbar to open the Search Window, choose a date range of events that you want to send, then press Search, you can then see the events you wish to send, then from Options button choose 'With ALL results' > 'Send to Web server'.
Uploading users, group and resources
After your initial synchronization, Users, Groups and Resources are NOT sent automatically they must be sent manually. Press the main Search icon on the toolbar to open the Search Window, select the tab Users, Groups or Resources, then press Search, you can then see the items you wish to send, then from Options button choose 'With ALL results' > 'Send to Web server'. This allows you to be selective about the data that is stored online. You can also choose to remove existing online items no longer needed, at the time of uploading.
Disconnect/Reset cloud account
If you ever need to delete all your online data and replace it with your desktop data you can do this anytime. Whilst you are logged in to your online account, as an administrator, with a browser, the Account Settings > Advanced Settings page shows a check box marked 'Disconnect this online database from your synchronized desktop database'. Checking this box and pressing Update Account will separate your online database from your desktop database. Performing a desktop Web Synchronisation from the Tools menu will again prompt you as if your online account is new giving you the option to upload and replace all data again.
Online login not working and message 'Online user limit reached/exceeded'
If you receive the message that your online user limit has been reached then you account has more user names trying to access your account than the number of licenses that have been purchased. Please see this FAQ.
13 May 2018, 07:57
NOTE: DESKTOP VERSION REPLACED IN 2023 WITH SCHEDULE IT ONLINE
Both our desktop scheduling software and online scheduling service have many common features but there are some differences.
The online service is run on our servers on the Internet and accessed via a browser on any device, or our mobile apps from the various app stores. We backup, manage and look after your database.
The desktop software is installed on your Windows PC, or in a Windows VM on a Mac or Linux computer. You manage your local database and any SQL servers needed.
Some Online only features include:
We manage all backups and access to your online database
Access using a phone, tablet or desktop browser, and our mobile apps
Task and ToDo type bookings
Unlimited color markers on an event/task
Upload documents online for remote access
Formatting and styling of the event and tasks notes
Dedicate graphical dashboard
Advanced reports including the ability to use formulas
Use of our mobile phone and tablet apps
Access anywhere with an Internet connection (offline too)
User activity and location tracking
Messaging between users
A number of graphical enhancements including resource photos
2 way iCal calendar syncing
Map view to show Users, Resources and Events
Live collaboration using messages and comments
Email alerts and invitations with external respondents
Kanban Board view
Vertical Timeline View
Some Desktop (discontinued) only features include:
Use your own local MySQL or MSSQL database
Ability to access multiple local databases you store
Parent/Child relationships between events
Insert/bump for double booked events
Unlimited activity log history
NOTE: This is not a definitive list so please contact us if a feature is important for you, to be sure its in the version you need.
Both our desktop scheduling software and online scheduling service have many common features but there are some differences.
The online service is run on our servers on the Internet and accessed via a browser on any device, or our mobile apps from the various app stores. We backup, manage and look after your database.
The desktop software is installed on your Windows PC, or in a Windows VM on a Mac or Linux computer. You manage your local database and any SQL servers needed.
Some Online only features include:
Some Desktop (discontinued) only features include:
NOTE: This is not a definitive list so please contact us if a feature is important for you, to be sure its in the version you need.
1 September 2025, 20:03
Small businesses face the challenge of juggling multiple tasks, managing people and clients, and all whilst striving for growth and success. Service scheduling software is the game-changing tool designed to streamline your operations and improve your efficiency.
Imagine being able to automate appointments, manage staff schedules, and track customer interactions, all in one place. With the right software, you can free up precious time, enhance customer satisfaction, and ultimately drive growth.
This ultimate guide will walk you through the essential features to look for in service scheduling software, the best options available, and how to implement this powerful tool effectively. Mastering service scheduling can be your secret weapon to winning in a competitive market. We dive deep into transforming your workflow and supercharging your success!
For small business operations, the need for efficiency and streamlined processes has never been more crucial. Small business owners and its staff often wear multiple hats, juggling everything from customer service to inventory management. This multitasking can become overwhelming, leading to missed appointments, scheduling conflicts, and ultimately, dissatisfied customers. Service scheduling software provides the solution to these pain points, offering a centralized system to manage appointments, staff schedules, and customer interactions seamlessly.
One of the primary reasons small businesses need service scheduling software is to save time. Manual scheduling can be a time-consuming process, often requiring back-and-forth communication with customers and staffs. With so many changes and updates to be tracked and made, service scheduling software can help make this process clearer, quicker and easier. This not only reduces the burden on your staff but also minimizes the risk of human error, ensuring that appointments are accurately recorded and managed.
Furthermore, service scheduling software enhances customer satisfaction. In today's digital age, customers expect convenience and efficiency. Providing them with the ability to book appointments online, receive reminders, and easily reschedule if necessary meets these expectations and improves their overall experience with your business. Happy customers are more likely to return and recommend your services to others, driving growth and success for your business.

When selecting service scheduling software for your small business, it is essential to consider the features that will best meet your needs. Here are a list of the top 3 features we consider as critical:
One of the most critical features is an intuitive user interface. The software must be easy to navigate. A user-friendly interface ensures that appointments can be seen, booked, managed, and modified without any hassle, reducing the learning curve and increasing adoption rates.
Another vital feature is integration capabilities. Your scheduling software should seamlessly integrate with other tools and systems you currently use, such as customer relationship management (CRM) software, payment processing systems, and email marketing platforms. Integration ensures that all your business operations are interconnected, providing a holistic view of your customer interactions and streamlining your workflow.
Additionally, look for software that offers robust reporting and analytics features. These tools allow you to track key metrics such as appointment frequency, staff utilization, and customer satisfaction. By analyzing this data, you can identify trends, optimize your scheduling practices, and make informed decisions to enhance your business operations. Reporting and analytics are powerful tools that can drive continuous improvement and ensure you are meeting your business goals.
The advantages of implementing service scheduling software in your small business are many. Firstly, it significantly enhances operational efficiency. With easy and efficient scheduling, your staff can focus on more value-added tasks rather than spending time on administrative duties. This leads to increased productivity and a more streamlined workflow, ultimately boosting your bottom line.
Moreover, service scheduling software provides valuable insights into your business operations. By analyzing data on appointment trends, customer preferences, and staff performance, you can make data-driven decisions to optimize your services. This can lead to better resource allocation, improved staff scheduling, and a more tailored approach to meeting your customers' needs. Ultimately, these insights can drive growth and give you a competitive edge in the market.
Choosing the right scheduling software for your small business involves evaluating your specific needs and comparing them against the features offered by various solutions. Start by identifying your primary requirements. Do you need a simple tool for managing appointments, or do you require advanced features like payment processing and CRM integration? Understanding your needs will help narrow down your options.
Next, consider the scalability of the software. As your business grows, your scheduling needs may evolve. Ensure that the software you choose can accommodate an increasing number of appointments, staff members, and customers. Scalability is crucial for long-term success, as it allows you to expand your operations without having to switch to a new system.
Lastly, take advantage of free trials and demos. Many scheduling software providers offer trial periods or demo versions of their products. Use these opportunities to test the software and assess its usability, features, and integration capabilities. Involve your staff in the evaluation process to gather feedback and ensure that the chosen software meets everyone's needs. By conducting thorough research and testing, you can make an informed decision and select the best scheduling software for your business.
Integrating service scheduling software with your existing systems is a critical step to ensure a seamless workflow. Start by identifying the systems and tools that your business currently uses, such as CRM software, email marketing platforms, and payment processing systems. The goal is to create a cohesive ecosystem where data flows seamlessly between different applications, eliminating manual data entry and reducing the risk of errors.
One of the most common integrations is with CRM software. By integrating your scheduling software with your CRM, you can ensure that customer information is automatically updated with appointment details. This provides a comprehensive view of customer interactions and enables personalized communication. For instance, you can send targeted email campaigns based on customers' booking history, enhancing customer engagement and loyalty.
Implementing service scheduling software successfully requires careful planning and execution. Start by setting clear goals and objectives for what you want to achieve with the software. This could include reducing appointment no-shows, improving staff productivity, or enhancing customer satisfaction. Having specific goals will guide your implementation process and help measure success.
Training your staff is another crucial step. Ensure that everyone who will be using the software receives comprehensive training on its features and functionalities. Provide resources such as user manuals, video tutorials, and support from the software provider. Encouraging your staff to familiarize themselves with the software will increase their confidence and competence, leading to smoother adoption and utilization.
Despite the numerous benefits, implementing service scheduling software can come with its own set of challenges. One common issue is resistance to change. Staff members who are accustomed to traditional scheduling methods may be hesitant to adopt new technology. To address this, involve them in the decision-making process and provide ample training and support. Highlight the benefits of the software and how it will make their tasks easier, fostering a positive attitude towards the change.
Another challenge is ensuring data accuracy and synchronization. Integrating multiple systems can sometimes lead to data discrepancies or synchronization issues. To mitigate this, choose software that offers robust integration capabilities and regularly syncs data across platforms. Conduct periodic audits to ensure data consistency and address any discrepancies promptly. Clear communication and collaboration between your IT team and software provider can also help resolve technical issues efficiently.
In conclusion, service scheduling software is a powerful tool that can transform the way small businesses operate. By managing staff schedules, and enhancing customer interactions, it streamlines your workflow and drives efficiency. The key to successful implementation lies in choosing the right software, integrating it with existing systems, and following best practices for adoption.
Looking ahead, several trends are shaping the future of service scheduling software. One such trend is the increasing use of artificial intelligence (AI) and machine learning. These technologies can analyze appointment data to predict trends, optimize scheduling, and provide personalized recommendations. For example, AI can suggest the best times for appointments based on past booking patterns, improving resource utilization and customer satisfaction.
Another emerging trend is the integration of mobile capabilities. With the rise of mobile technology, staff expect to see, update and manage their schedules on-the-go. Additionally, mobile notifications and reminders can further reduce no-shows and enhance communication.
As technology continues to evolve, service scheduling software will become even more sophisticated, offering advanced features and integrations. Staying informed about these trends and continuously evaluating your scheduling needs will ensure that your business remains competitive and successful. Embrace the power of service scheduling software, and unlock new opportunities for growth and efficiency in your small business.
Imagine being able to automate appointments, manage staff schedules, and track customer interactions, all in one place. With the right software, you can free up precious time, enhance customer satisfaction, and ultimately drive growth.
This ultimate guide will walk you through the essential features to look for in service scheduling software, the best options available, and how to implement this powerful tool effectively. Mastering service scheduling can be your secret weapon to winning in a competitive market. We dive deep into transforming your workflow and supercharging your success!
Why Small Businesses Need Service Scheduling Software
For small business operations, the need for efficiency and streamlined processes has never been more crucial. Small business owners and its staff often wear multiple hats, juggling everything from customer service to inventory management. This multitasking can become overwhelming, leading to missed appointments, scheduling conflicts, and ultimately, dissatisfied customers. Service scheduling software provides the solution to these pain points, offering a centralized system to manage appointments, staff schedules, and customer interactions seamlessly.
One of the primary reasons small businesses need service scheduling software is to save time. Manual scheduling can be a time-consuming process, often requiring back-and-forth communication with customers and staffs. With so many changes and updates to be tracked and made, service scheduling software can help make this process clearer, quicker and easier. This not only reduces the burden on your staff but also minimizes the risk of human error, ensuring that appointments are accurately recorded and managed.
Furthermore, service scheduling software enhances customer satisfaction. In today's digital age, customers expect convenience and efficiency. Providing them with the ability to book appointments online, receive reminders, and easily reschedule if necessary meets these expectations and improves their overall experience with your business. Happy customers are more likely to return and recommend your services to others, driving growth and success for your business.
Key Features to Look for in Scheduling Software
When selecting service scheduling software for your small business, it is essential to consider the features that will best meet your needs. Here are a list of the top 3 features we consider as critical:
Benefits of Using Service Scheduling Software
The advantages of implementing service scheduling software in your small business are many. Firstly, it significantly enhances operational efficiency. With easy and efficient scheduling, your staff can focus on more value-added tasks rather than spending time on administrative duties. This leads to increased productivity and a more streamlined workflow, ultimately boosting your bottom line.
Moreover, service scheduling software provides valuable insights into your business operations. By analyzing data on appointment trends, customer preferences, and staff performance, you can make data-driven decisions to optimize your services. This can lead to better resource allocation, improved staff scheduling, and a more tailored approach to meeting your customers' needs. Ultimately, these insights can drive growth and give you a competitive edge in the market.
How to Choose the Right Scheduling Software for Your Business
Choosing the right scheduling software for your small business involves evaluating your specific needs and comparing them against the features offered by various solutions. Start by identifying your primary requirements. Do you need a simple tool for managing appointments, or do you require advanced features like payment processing and CRM integration? Understanding your needs will help narrow down your options.
Next, consider the scalability of the software. As your business grows, your scheduling needs may evolve. Ensure that the software you choose can accommodate an increasing number of appointments, staff members, and customers. Scalability is crucial for long-term success, as it allows you to expand your operations without having to switch to a new system.
Lastly, take advantage of free trials and demos. Many scheduling software providers offer trial periods or demo versions of their products. Use these opportunities to test the software and assess its usability, features, and integration capabilities. Involve your staff in the evaluation process to gather feedback and ensure that the chosen software meets everyone's needs. By conducting thorough research and testing, you can make an informed decision and select the best scheduling software for your business.
Integrating Service Scheduling Software with Existing Systems
Integrating service scheduling software with your existing systems is a critical step to ensure a seamless workflow. Start by identifying the systems and tools that your business currently uses, such as CRM software, email marketing platforms, and payment processing systems. The goal is to create a cohesive ecosystem where data flows seamlessly between different applications, eliminating manual data entry and reducing the risk of errors.
One of the most common integrations is with CRM software. By integrating your scheduling software with your CRM, you can ensure that customer information is automatically updated with appointment details. This provides a comprehensive view of customer interactions and enables personalized communication. For instance, you can send targeted email campaigns based on customers' booking history, enhancing customer engagement and loyalty.
Best Practices for Implementing Scheduling Software
Implementing service scheduling software successfully requires careful planning and execution. Start by setting clear goals and objectives for what you want to achieve with the software. This could include reducing appointment no-shows, improving staff productivity, or enhancing customer satisfaction. Having specific goals will guide your implementation process and help measure success.
Training your staff is another crucial step. Ensure that everyone who will be using the software receives comprehensive training on its features and functionalities. Provide resources such as user manuals, video tutorials, and support from the software provider. Encouraging your staff to familiarize themselves with the software will increase their confidence and competence, leading to smoother adoption and utilization.
Common Challenges and Solutions in Service Scheduling
Despite the numerous benefits, implementing service scheduling software can come with its own set of challenges. One common issue is resistance to change. Staff members who are accustomed to traditional scheduling methods may be hesitant to adopt new technology. To address this, involve them in the decision-making process and provide ample training and support. Highlight the benefits of the software and how it will make their tasks easier, fostering a positive attitude towards the change.
Another challenge is ensuring data accuracy and synchronization. Integrating multiple systems can sometimes lead to data discrepancies or synchronization issues. To mitigate this, choose software that offers robust integration capabilities and regularly syncs data across platforms. Conduct periodic audits to ensure data consistency and address any discrepancies promptly. Clear communication and collaboration between your IT team and software provider can also help resolve technical issues efficiently.
Future Trends in Service Scheduling Software
In conclusion, service scheduling software is a powerful tool that can transform the way small businesses operate. By managing staff schedules, and enhancing customer interactions, it streamlines your workflow and drives efficiency. The key to successful implementation lies in choosing the right software, integrating it with existing systems, and following best practices for adoption.
Looking ahead, several trends are shaping the future of service scheduling software. One such trend is the increasing use of artificial intelligence (AI) and machine learning. These technologies can analyze appointment data to predict trends, optimize scheduling, and provide personalized recommendations. For example, AI can suggest the best times for appointments based on past booking patterns, improving resource utilization and customer satisfaction.
Another emerging trend is the integration of mobile capabilities. With the rise of mobile technology, staff expect to see, update and manage their schedules on-the-go. Additionally, mobile notifications and reminders can further reduce no-shows and enhance communication.
As technology continues to evolve, service scheduling software will become even more sophisticated, offering advanced features and integrations. Staying informed about these trends and continuously evaluating your scheduling needs will ensure that your business remains competitive and successful. Embrace the power of service scheduling software, and unlock new opportunities for growth and efficiency in your small business.
6 August 2023, 19:26
For small business, effective time management is crucial for success. Small business owners often wear multiple hats, juggling various responsibilities, including managing employees, handling customer inquiries, and overseeing day-to-day operations.
One significant challenge they face is efficient scheduling, which can directly impact productivity, customer satisfaction, and overall growth. This is where scheduling software comes into play. In this comprehensive blog, we will explore the numerous benefits of scheduling software for small businesses and highlight how it can contribute to their growth and success.
Simplified Shift Management - Scheduling software streamlines the process of creating and managing employee shifts and work patterns. It allows small business owners to quickly assign work, avoid double-bookings, and maintain optimal staffing levels.
Real-Time Updates - With scheduling software, employees can receive real-time updates about their work, including changes or additions, reducing miscommunications and last-minute surprises.
Self-Service Features - Many scheduling tools offer self-service features, enabling employees to request time-off, swap shifts, and update their availability. This empowers them and reduces administrative burden.
Availability Management - Scheduling software helps small businesses ensure adequate staffing during peak hours, guaranteeing excellent customer service and avoiding long wait times.
Appointment Booking - For service-based businesses, scheduling software enables customers to book or request appointments online, providing convenience and improving customer satisfaction.
Automated Reminders - Scheduling software can send automated reminders to customers about upcoming appointments, reducing no-shows and improving overall customer experience.
Efficient Time Management - With automated scheduling, small business owners save valuable time that can be redirected towards strategic planning and business growth.
Reduced Overtime Costs - Scheduling software helps optimize employee schedules, minimizing overtime expenses and improving cost efficiency.
Minimized Scheduling Errors - By automating the process, the risk of manual errors in scheduling is significantly reduced, preventing costly mistakes.
Fair Distribution of Work - Scheduling software ensures fair distribution of work, preventing employee burnout and contributing to a healthier work-life balance.
Employee Empowerment - Self-service features in scheduling software give employees more control over their schedules, increasing job satisfaction and engagement.
Resource Forecasting - Scheduling software often includes forecasting capabilities that help small businesses anticipate peak periods and allocate resources accordingly.
Flexible Adjustments - When faced with unexpected changes in demand, scheduling software allows businesses to quickly adjust staff schedules to meet evolving needs.
Overtime Management - Scheduling software can help small businesses monitor and manage employee work hours to ensure compliance with overtime regulations.
Rest Breaks and Shift Patterns - With scheduling software, businesses can enforce rest break requirements and create compliant shift patterns to avoid legal issues.
Seamless Payroll Processing - Many scheduling software solutions integrate with payroll systems, simplifying the process of calculating employee wages based on worked hours.
HR Data Centralization - Integrating scheduling software with HR systems allows for centralized employee data, making it easier to manage personnel records and work-related information.
Reduced Administrative Tasks - Automating scheduling processes allows small business owners to focus on core operations and strategic planning, promoting business growth.
Improved Task Allocation - By matching employee skills and preferences to specific shifts, scheduling software optimizes task allocation, leading to increased productivity.
Data-Driven Insights - Scheduling software often includes reporting and analytics features that provide valuable data on employee performance, scheduling patterns, and business trends.
Informed Decision Making - Business owners can use the insights derived from scheduling software to make data-driven decisions that drive growth and efficiency.
Adapting to Growth - Scheduling software is scalable, accommodating the needs of small businesses as they expand and hire more employees.
Multiple Locations - For businesses with multiple locations, scheduling software centralizes scheduling management, streamlining operations across different sites.
Scheduling software has become an invaluable tool for small businesses seeking to optimize their operations, enhance employee satisfaction, and drive growth. By streamlining employee scheduling, improving customer service, saving time and costs, and ensuring compliance with labor laws, scheduling software empowers small business owners to focus on strategic goals and maximize productivity.
Additionally, the integration with payroll and HR systems, real-time reporting, and scalability features make scheduling software an essential investment for small businesses aiming to thrive in today's competitive market. Embracing scheduling software is not only a smart business move but also a catalyst for long-term success and sustainable growth.
For more information on choosing the right software read our blog on 12 Top Tips for Choosing the Right Scheduling Software.
One significant challenge they face is efficient scheduling, which can directly impact productivity, customer satisfaction, and overall growth. This is where scheduling software comes into play. In this comprehensive blog, we will explore the numerous benefits of scheduling software for small businesses and highlight how it can contribute to their growth and success.
1. Streamlined Employee Scheduling
2. Enhanced Customer Service
3. Time and Cost Savings
4. Work-Life Balance for Employees
5. Optimized Resource Allocation
6. Compliance and Labor Law Adherence
7. Integration with Payroll and HR Systems
8. Increased Productivity and Efficiency
9. Real-Time Reporting and Analytics
10. Scalability and Flexibility
Scheduling software has become an invaluable tool for small businesses seeking to optimize their operations, enhance employee satisfaction, and drive growth. By streamlining employee scheduling, improving customer service, saving time and costs, and ensuring compliance with labor laws, scheduling software empowers small business owners to focus on strategic goals and maximize productivity.
Additionally, the integration with payroll and HR systems, real-time reporting, and scalability features make scheduling software an essential investment for small businesses aiming to thrive in today's competitive market. Embracing scheduling software is not only a smart business move but also a catalyst for long-term success and sustainable growth.
For more information on choosing the right software read our blog on 12 Top Tips for Choosing the Right Scheduling Software.
Still need help? Contact Us

Join Us - Live Webinar
...
Close
Help Topics
Search
Contact Us