
New/Latest Activity
16 February 2024, 10:16
Workspaces are still in beta - This means we are still developing and adding the full feature set.
Use workspaces to create separate work areas for different divisions or departments within your organisation where data separation is needed.
The top level in your account is the main workspace. Within each workspace you can add groups, resources and other information that is only visible in that workspace.
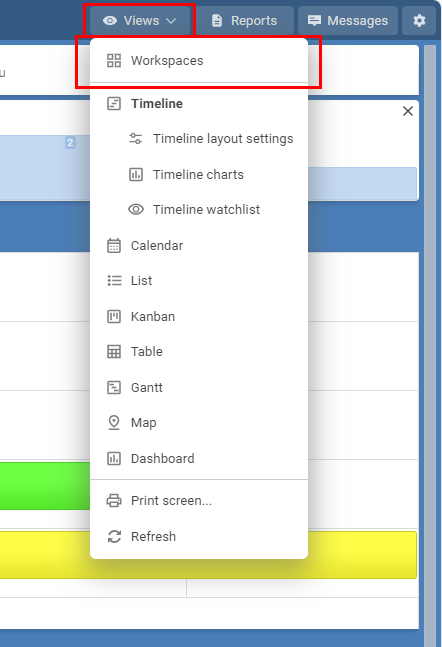
From your Account Settings > Workspaces page you can add new and manage existing workspaces.
Every group, resource, filter, report, template and event created within a workspace are only visible when that workspace is being used.
User access
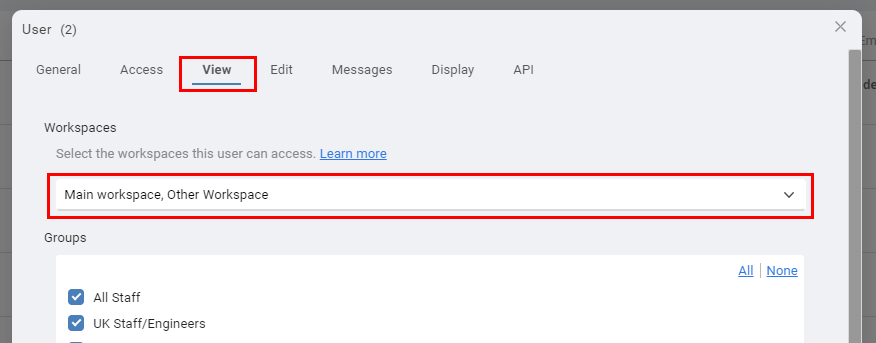
Within the view permissions tab of each user you can choose which workspaces each user can access.
Information that is unique to each workspace :
Groups
Resources
Resource Labels
Events
Filters
Reports
Templates
Special Days
Use workspaces to create separate work areas for different divisions or departments within your organisation where data separation is needed.
The top level in your account is the main workspace. Within each workspace you can add groups, resources and other information that is only visible in that workspace.
From your Account Settings > Workspaces page you can add new and manage existing workspaces.
Every group, resource, filter, report, template and event created within a workspace are only visible when that workspace is being used.
User access
Within the view permissions tab of each user you can choose which workspaces each user can access.
Information that is unique to each workspace :
Groups
Resources
Resource Labels
Events
Filters
Reports
Templates
Special Days
26 September 2024, 07:33
Web browsers, by default, remove background colors when printing. Unfortunately, this can't be overridden by our software or any other website. You change the setting in the browser to print background colors and images.
The settings can vary by browser but most have settings to enable printing to color, and to include background images/graphics, both of which will need to be enabled.
Chrome Browser : Open Chrome > Click Print > In the printer dialog set color option to 'color', and enable 'Background Graphics'
Edge Browser : Open Edge > Click Print > In the printer More Settings option, tick the option for background images
Internet Explorer (IE) Browser : Open IE > Gear Button > Print > Page Setup > Check 'Print background colors and images'. In older versions of IE, from the File menu > Page Setup > Check 'Print background colors and images'.
#Print,color,colour
26 September 2024, 07:32
Printing the Schedule in color not black and white
26 June 2025, 15:12
With more and more using 'Schedule it' as a CRM, or just needing a central place to find, manage, and track engagement with your resources, we have added the Resource Directory/Hub.
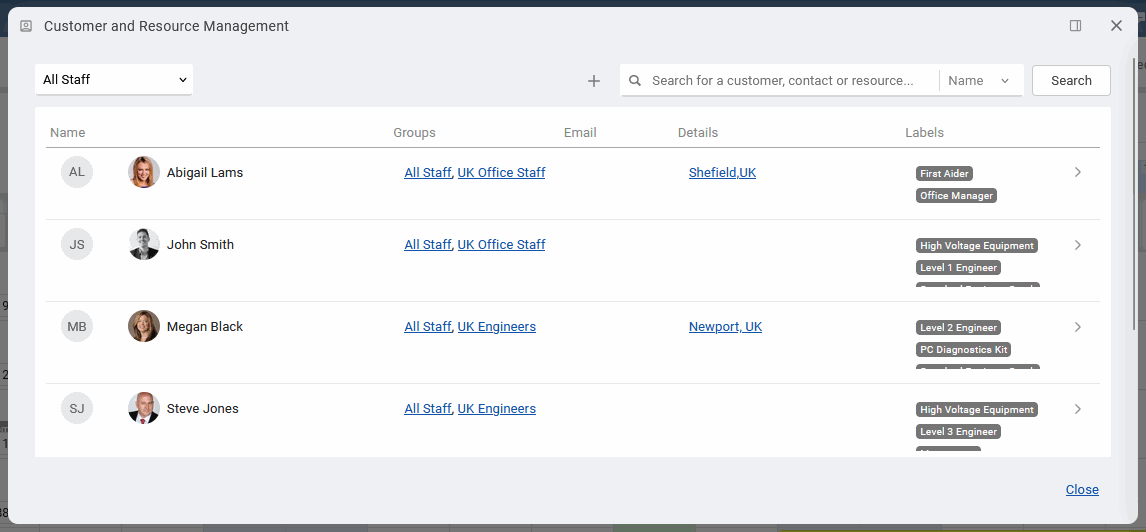
The Resource Directory/Hub centralizes access to all your customers, contacts, employees, projects, equipment and other resources into a single location to help you quickly find, get information on, or update them as needed. It gives quick and easy access for daily users without the need to access the advanced admin tools.
Use notes to keep track of your interaction with customers and clients. Adding a note to a resource automatically updates the resource's "Last Noted" date helping you track and sort by recent activity and engagement date.
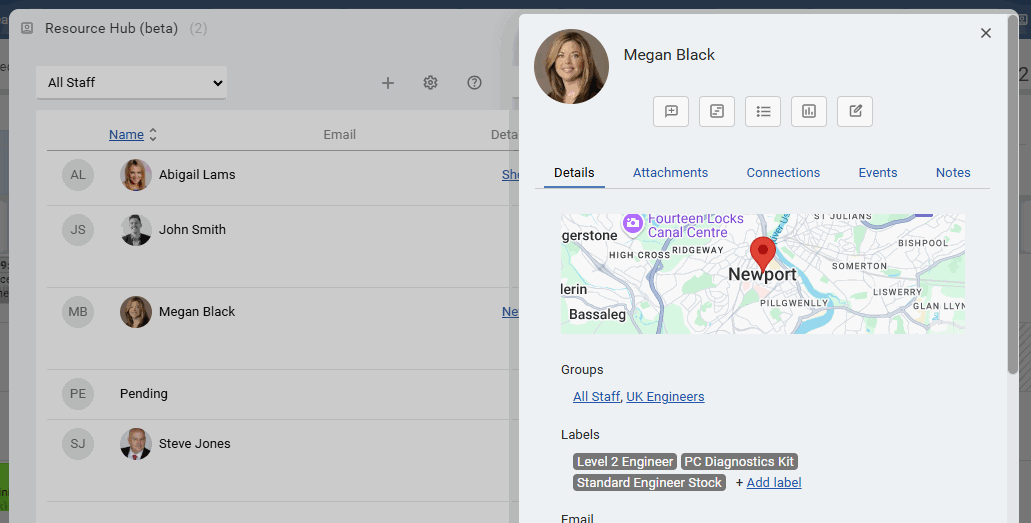
Clicking a resource will open an information panel to show extra details like their attachments, connections, recent events booked against them and various statistics. From the information panel you can perform quick actions like adding a new task or event, emailing or calling, or edit their information in your database.
The Resource Directory/Hub centralizes access to all your customers, contacts, employees, projects, equipment and other resources into a single location to help you quickly find, get information on, or update them as needed. It gives quick and easy access for daily users without the need to access the advanced admin tools.
Use notes to keep track of your interaction with customers and clients. Adding a note to a resource automatically updates the resource's "Last Noted" date helping you track and sort by recent activity and engagement date.
Clicking a resource will open an information panel to show extra details like their attachments, connections, recent events booked against them and various statistics. From the information panel you can perform quick actions like adding a new task or event, emailing or calling, or edit their information in your database.
7 March 2017, 20:24
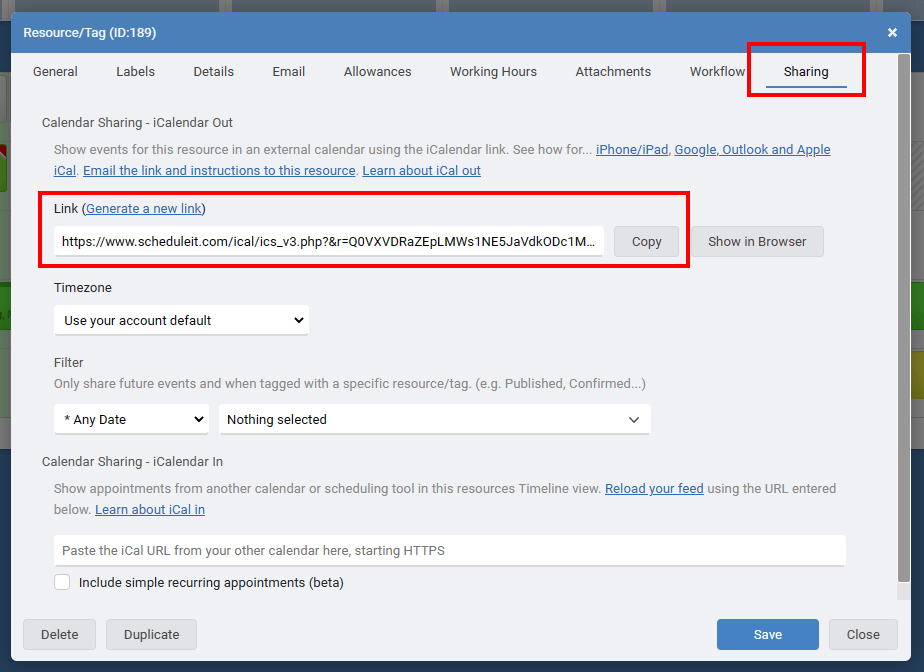
Do you want to view your events in another calendar like Microsoft Outlook, Google Calendar, Apple Calendar, or on a simple webpage? Schedules can be shared and viewed remotely for each individual resource, or all resources, in any other calendar tool that support iCalendar. Any changes to the resources schedule will be automatically updated in the remote calendar.
Note: Whilst our iCal feed is updated and live, Microsoft, Google, Apple and other calendar providers decide on how often they want to check our feed for any updates, which can take a few hours in some cases. 15 to 30 minutes is a typical update frequency.
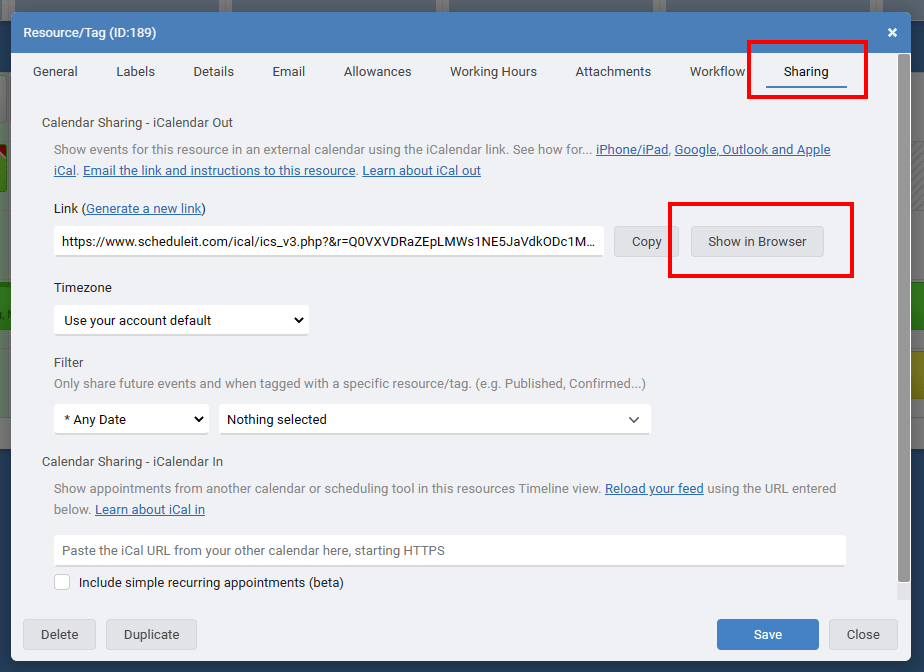
Each resource can also view their events via a webpage. Click Show in Browser and copy the URL if you are going to give it to others to use for viewing.
Note: The older version 1 iCal links includes a hash of the password and permissions of the User that is logged in and supplying the iCal link. Changing the password for this User will stop any previous iCal feeds from working created by this user.
Note: Our iCal feeds will show future events, and a short term historical list. 7 days of historical events is the default, with a 250 event limit, but contact us for details on increasing the historical period.
Add the iCal link to view your Schedule It events in your:
Outlook Online
Outlook Desktop
Google Calendar or Android Device
iPhone or iPad
If you have problems viewing this video you can also view it on YouTube by clicking this link.

On your Android device, you may have to clear the existing calendars and re-sync the data for a new calendar to show up.
Settings / Applications / Manage Applications / Calendar -> Clear Data
then Settings / Applications / Manage Applications / Calendar Storage -> Clear Data
Wait a few minutes and you should be able to see the new calendar. If it does the new calendar does not show up, also do the following:
Settings / Accounts & sync -> select your account, uncheck the 'Sync Calendar' option
Wait a few minutes and re-check the Sync Calendar option to see
If you subscribed to Schedule It by adding as an Internet Calendar, then we update the link live and instantly but we have no control over how often your calendar wants to check for the changes. In our link we ask your calendar to refresh its stored information at least once per hour.
Unfortunately Google doesn't refresh its calendar subscriptions in real time like Apple iCal, Microsoft Outlook, and most others do, and there's no way to force a refresh of a subscribed calendar in Google, you just need to wait for them. Google has stated that they refresh calendar feeds 'every few hours' but in our experience it's a good bit less often than that initially. For your first update this can be overnight, but many report this gets quicker and quicker as they see the file is being updating regularly. To reload a feed during testing you can unsubscribe from the file, then subscribe again adding a random number to the end of the link each time so Google thinks its a new file.
Notes: The number of shared calendars that can be created is a ratio of the number of licenses you have and the account type, e.g. With 1 Business Plan license you can share 6 of your resources publicly. (Startup = 3:1, Business = 6:1, Enterprise = 12:1). Only 1 week of historical events and future events are exported, and up to a maximum number of events based on the maximum feed size permitted.
Note: Whilst our iCal feed is updated and live, Microsoft, Google, Apple and other calendar providers decide on how often they want to check our feed for any updates, which can take a few hours in some cases. 15 to 30 minutes is a typical update frequency.
Share selected resources
You can share events for specific resources using a resources own iCalendar link. From the Account Settings menu in the top right, choose Account Settings, then Groups and Resources. Click the Resource you want to share, then from the Sharing tab you can copy the iCalendar Link, then add to it in your favourite calendar tool.Each resource can also view their events via a webpage. Click Show in Browser and copy the URL if you are going to give it to others to use for viewing.
Share all resources
You can share your entire account using your accounts iCalendar link. From the Account menu in the top right, choose Account Settings, then iCalendar. There you can copy the iCalendar Link, then add to it in your favourite calendar tool.Note: The older version 1 iCal links includes a hash of the password and permissions of the User that is logged in and supplying the iCal link. Changing the password for this User will stop any previous iCal feeds from working created by this user.
Note: Our iCal feeds will show future events, and a short term historical list. 7 days of historical events is the default, with a 250 event limit, but contact us for details on increasing the historical period.
Add the iCal link to view your Schedule It events in your:
Outlook Online
Outlook Desktop
Google Calendar or Android Device
iPhone or iPad
If you have problems viewing this video you can also view it on YouTube by clicking this link.
Viewing in Outlook Online
From the Add Calendar menu in Outlook online, choose From Internet, then paste the link given by Schedule It for your chosen schedule.Viewing in Desktop Outlook
Right click Other Calendars, From the options choose Add Calendar, then From Internet, then paste the link given by Schedule It for your chosen schedule.Viewing in Google Calendar or on any Android Device
You need to login to your Google calendar with your browser and add the Schedule It link to your account, it will then automatically appear and be available on your Android device. From the Other Calendars menu in Google Calendar, choose Add by URL, then paste the link given by Schedule It for your chosen schedule.Viewing in Apple iCal
Adding subscribed calendars to Android
On your Android device, you may have to clear the existing calendars and re-sync the data for a new calendar to show up.
Settings / Applications / Manage Applications / Calendar -> Clear Data
then Settings / Applications / Manage Applications / Calendar Storage -> Clear Data
Wait a few minutes and you should be able to see the new calendar. If it does the new calendar does not show up, also do the following:
Settings / Accounts & sync -> select your account, uncheck the 'Sync Calendar' option
Wait a few minutes and re-check the Sync Calendar option to see
Refreshing your Google/Outlook Calendar
If you subscribed to Schedule It by adding as an Internet Calendar, then we update the link live and instantly but we have no control over how often your calendar wants to check for the changes. In our link we ask your calendar to refresh its stored information at least once per hour.
Unfortunately Google doesn't refresh its calendar subscriptions in real time like Apple iCal, Microsoft Outlook, and most others do, and there's no way to force a refresh of a subscribed calendar in Google, you just need to wait for them. Google has stated that they refresh calendar feeds 'every few hours' but in our experience it's a good bit less often than that initially. For your first update this can be overnight, but many report this gets quicker and quicker as they see the file is being updating regularly. To reload a feed during testing you can unsubscribe from the file, then subscribe again adding a random number to the end of the link each time so Google thinks its a new file.
Notes: The number of shared calendars that can be created is a ratio of the number of licenses you have and the account type, e.g. With 1 Business Plan license you can share 6 of your resources publicly. (Startup = 3:1, Business = 6:1, Enterprise = 12:1). Only 1 week of historical events and future events are exported, and up to a maximum number of events based on the maximum feed size permitted.
19 October 2020, 12:35
When it comes to making a decision about which scheduling software to choose, software review websites can be a useful part of your decision-making process. Comparison sites allow you to see most of the top solutions in one place. You can also compare specific capabilities.
However, there are many websites to choose from. Type ‘best scheduling software’ into Google and you will get plenty of answers. Review websites can be really helpful, but it’s important to know how independent reviews are.
Looking for actual testimonials from users in similar industries to yours can be the most influential. Here are some of the software review sites that you might want to look at during your scheduling software search:
Capterra does list all vendors, not just those that pay, so that you can make the best-informed choice. The trick is to look at the ‘Sort by’ box on the right hand side of the screen after you have made your search. The default setting it to show Sponsored (i.e. paid for) results first. Changing this to ‘Highest rated’ may give you a more helpful list. Always bear in mind the number of reviews and specification though.
A piece of software might have amazing reviews, but if it’s only from a few people or doesn’t quite offer the functions you need, such as all-device access, then you will need to keep looking.
They offer ‘unfiltered reviews’ from peers who use similar solutions and product rankings aggregated from peer reviews and social data. Search filters allow you to choose between the highest rated, easiest to use and Free or Paid for options. You can also look by size of company, languages supported and deployment, such as On-Prem or Cloud.
Their drop down filters enable you to quickly access software solutions suitable for your industry or used by companies with a similar number of employees to your own. Consider related searches to scheduling like Project Management, as these may offer suitable options as well.
Depending on your requirements, you might want to search for Resource Management Software or Employee Scheduling Software and look for companies displaying their ‘Top rated’ badge. They say their ratings are based on overall product performance and free from any bias. They take into account reviews and ratings, social media buzz, online presence and other relevant information.
If you’re still trying to narrow down which scheduling software or resource management software is right for your business then please chat live, email us at support@scheduleit.com or call us on +44 (0)1924 600 603. We will be happy to answer your questions, as well as organise a no-obligation free trial for you, so you can experience the benefits for yourself. Or start your 14-day free trial yourself in just 17 seconds, with no credit card required, by following this link.
However, there are many websites to choose from. Type ‘best scheduling software’ into Google and you will get plenty of answers. Review websites can be really helpful, but it’s important to know how independent reviews are.
Looking for actual testimonials from users in similar industries to yours can be the most influential. Here are some of the software review sites that you might want to look at during your scheduling software search:
1. Capterra
With more than one million verified reviews published to the site, and thousands more added each month, Capterra claims to offer the ‘most robust, user-driven perspective on software in the world’. Capterra is free to use, though they do say that Software companies pay Capterra when they receive web traffic and sales opportunities.Capterra does list all vendors, not just those that pay, so that you can make the best-informed choice. The trick is to look at the ‘Sort by’ box on the right hand side of the screen after you have made your search. The default setting it to show Sponsored (i.e. paid for) results first. Changing this to ‘Highest rated’ may give you a more helpful list. Always bear in mind the number of reviews and specification though.
A piece of software might have amazing reviews, but if it’s only from a few people or doesn’t quite offer the functions you need, such as all-device access, then you will need to keep looking.
2. G2
G2 aims to cut the time you spend researching software and make purchasing business technology ‘as easy as buying consumer products’.They offer ‘unfiltered reviews’ from peers who use similar solutions and product rankings aggregated from peer reviews and social data. Search filters allow you to choose between the highest rated, easiest to use and Free or Paid for options. You can also look by size of company, languages supported and deployment, such as On-Prem or Cloud.
3. Software Advice
Software Advice allows you to connect with an Advisor to help you with your software search. It also features Buyers Guides and ‘Front runners’ which are based on recent reviews.Their drop down filters enable you to quickly access software solutions suitable for your industry or used by companies with a similar number of employees to your own. Consider related searches to scheduling like Project Management, as these may offer suitable options as well.
4. Software World
Review sites like Software World are packed with trending software and real-time reviews. These B2B review sites segregate software ‘on the basis of value, cost- efficacy, accessibility, conductivity, and collaboration’.Depending on your requirements, you might want to search for Resource Management Software or Employee Scheduling Software and look for companies displaying their ‘Top rated’ badge. They say their ratings are based on overall product performance and free from any bias. They take into account reviews and ratings, social media buzz, online presence and other relevant information.
If you’re still trying to narrow down which scheduling software or resource management software is right for your business then please chat live, email us at support@scheduleit.com or call us on +44 (0)1924 600 603. We will be happy to answer your questions, as well as organise a no-obligation free trial for you, so you can experience the benefits for yourself. Or start your 14-day free trial yourself in just 17 seconds, with no credit card required, by following this link.
26 June 2025, 15:12
Resource Hub - Customer and Resource Management
28 August 2018, 19:33
Make important information standout, add images, links and to-do lists.
Schedule It Online, and our mobile apps, uses simple extra characters to give you an easy way to denote rich content such as bold/italic items, numbered and bulleted lists, headers, and images. Click your notes to edit them, click the 'Preview Notes' button to finish editing to see how the formatted notes will be seen.
This type of plain text formatting is called Markdown and allows you to quickly write rich content. It is an incredibly powerful writing tool which will allow you to write rich content far faster than almost any other method. It is also readable to others with any other software or device that may not support other methods of formatting.
Your notes can look like this...
Add Headings...
Create text lists...
- first item
- second item
- and more...
Create dropdown lists...
| col1 | col2 | col3 |
| data1 | data2 | data3 |
this is someClickable links and images too... https://www.scheduleit.com?markdown_example
quoted text

Above the notes area are a number of icons to add the formatting for you but you can also type it manually.
| Style | Key | If you type | You will see | ||||||
|---|---|---|---|---|---|---|---|---|---|
| Italic | * | this is how to *italicize this* text | this is how to italicize this text | ||||||
| Bold | ** | you can **bold text** too | you can bold text too | ||||||
| Italic & bold | *** | have ***Italic & bold*** | have Italic & bold | ||||||
| Strike-through | ~~ | ~~this is crossed out~~ | |||||||
| Headings | # | # a big heading | a big heading | ||||||
| ## | ## a smaller heading | a smaller heading | |||||||
| ### | ### heading | heading | |||||||
| Table | || | || col1 | col2 | col3 || || data1 | data2 | data3 || |
| ||||||
| Text list | - | - list item | |||||||
| Dropdown list | - [[]] | - [L-1] Option1, Option2, Option3 | |||||||
| Quotation | > | > indented text | indented text | ||||||
| Checkbox | - [ ] | - [ ] still to do | still to do | ||||||
| Checkbox ticked | - [x] | - [x] this is done | this is done | ||||||
| Line | --- | --- | |||||||
| Clickable link | https://www.google.com | https://www.google.com | |||||||
| Show an image | [url] |  | |
Using checkboxes to create task lists inside your events
Type this simple text...
Tasks to do:
- [x] Order form received
- [ ] Order checked **(Important)**
- [ ] Order Sent
- [x] Order form received
- [ ] Order checked **(Important)**
- [ ] Order Sent
And get these clickable boxes and formatting
Tasks to do:
14 August 2017, 19:58
We have a video coming soon...
To import EVENTS into your online account go to the Settings menu (Top Right) then choose Import. In the import window you can then paste your data, or open your CSV, iCal, or VCS file, then choose which of your data columns match with the fields in your online account.
Each line of your import file or text is an event. Each event needs at least a start and end date/time. E.g.
2023-01-29 09:00,2023-01-30 17:00, Some title, John Smith
You must select a default resource to import your events into. This is only used as a fall back in case the importer cannot find the resource names in your file to know where the events should go.
5 June 2017, 09:07
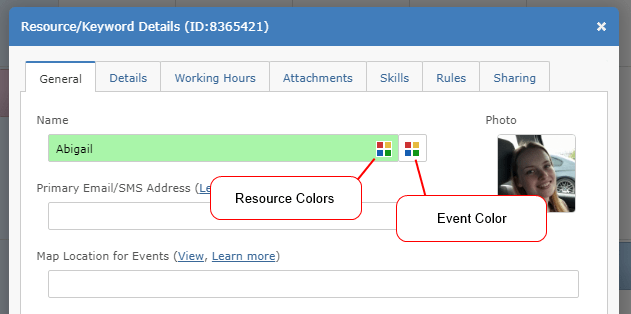
Events can be colored in a number of ways to help you quickly see its status or condition. Its background color, foreground color, and the inclusion of colored notch can all be set.
- You can show the background color for your resources/keywords as small bars with or without the resource name, at the top of your events. This allows multiple different colored markers on a single event. Hovering over the event shows the bars and the resource/word you associated with that color. Note that resources with a background color of white will not be shown at the start of an event.
You can have an unlimited number of resources/keywords that can color your events and these can help you track different status like Confirmed, Paid, Cancelled, Busy, Free, Vacation, Holiday, Sickness, Call Out, Breakdown, Service, Training etc.
- Within an event you can press the color icon next to the title to manually change the background and text color of the event. As this is a manual process you have no way to see what that color represents. We recommend adding a resource/keyword that describes what the color means, like the word 'Confirmed', and within that resource set the 'Event Color Option' (from the second color icon next to the title) to the colors you want the event to take when this is selected. Now you no longer need to manually pick an event color as its set automatically for you.
- You can also create a template event. Marking an event as a template means you can use it in the future to create copies with all the same preset resources, colors and other additional information. See this FAQ on how to create a template.

If you do not wish to use colors and dont want the see them in your event you can set the resource background to white or unselect 'Resource Colors' from the Layout menu in your Timeline view.
#color,colour,marker,style
- You can show the background color for your resources/keywords as small bars with or without the resource name, at the top of your events. This allows multiple different colored markers on a single event. Hovering over the event shows the bars and the resource/word you associated with that color. Note that resources with a background color of white will not be shown at the start of an event.
You can have an unlimited number of resources/keywords that can color your events and these can help you track different status like Confirmed, Paid, Cancelled, Busy, Free, Vacation, Holiday, Sickness, Call Out, Breakdown, Service, Training etc.
- Within an event you can press the color icon next to the title to manually change the background and text color of the event. As this is a manual process you have no way to see what that color represents. We recommend adding a resource/keyword that describes what the color means, like the word 'Confirmed', and within that resource set the 'Event Color Option' (from the second color icon next to the title) to the colors you want the event to take when this is selected. Now you no longer need to manually pick an event color as its set automatically for you.
- You can also create a template event. Marking an event as a template means you can use it in the future to create copies with all the same preset resources, colors and other additional information. See this FAQ on how to create a template.
If you do not wish to use colors and dont want the see them in your event you can set the resource background to white or unselect 'Resource Colors' from the Layout menu in your Timeline view.
#color,colour,marker,style
24 August 2023, 10:02
The following steps guide you through creating a custom application integration between Schedule it and Okta for user login authentication.
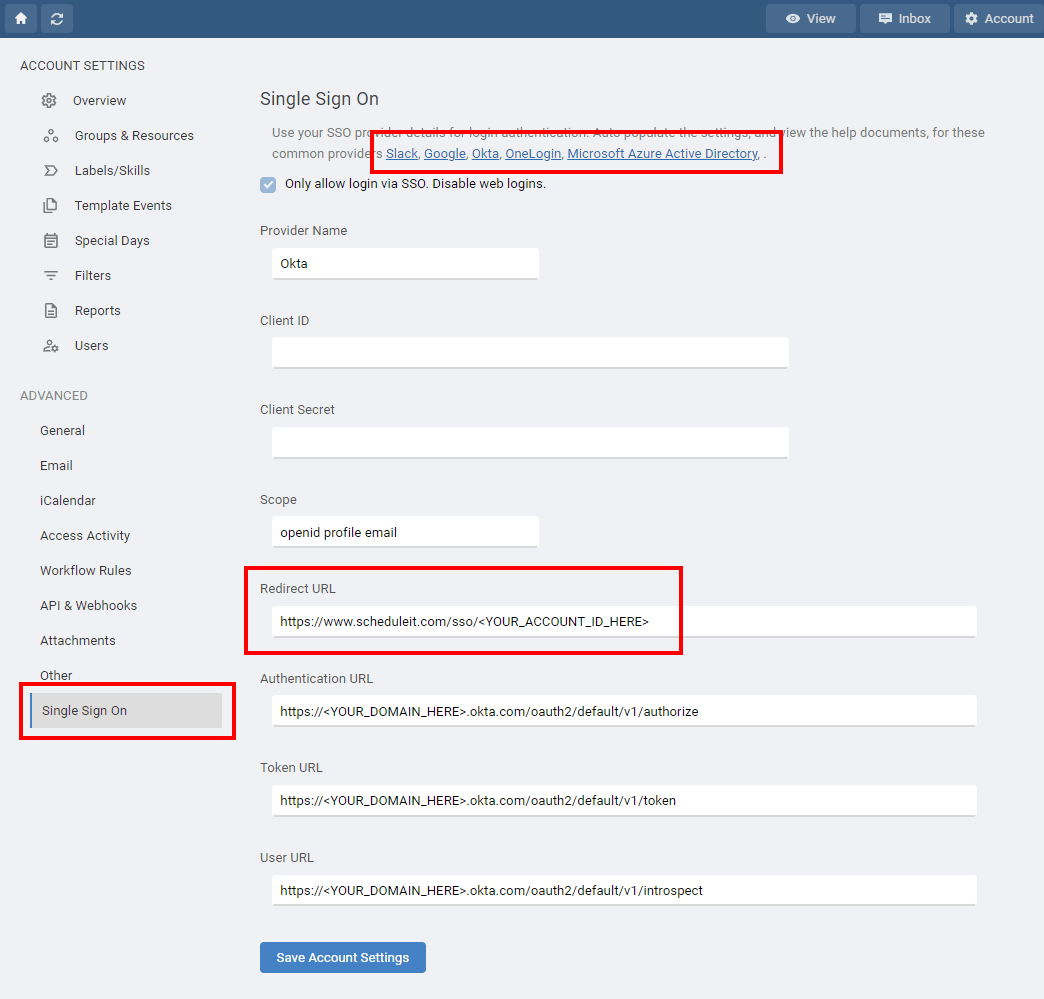
From Schedule it Account Settings > Single Sign On (SSO) page, click the Okta link to populate the SSO form with the initial details. Change all the <YOUR_DOMAIN_HERE> tags for your Okta domain.
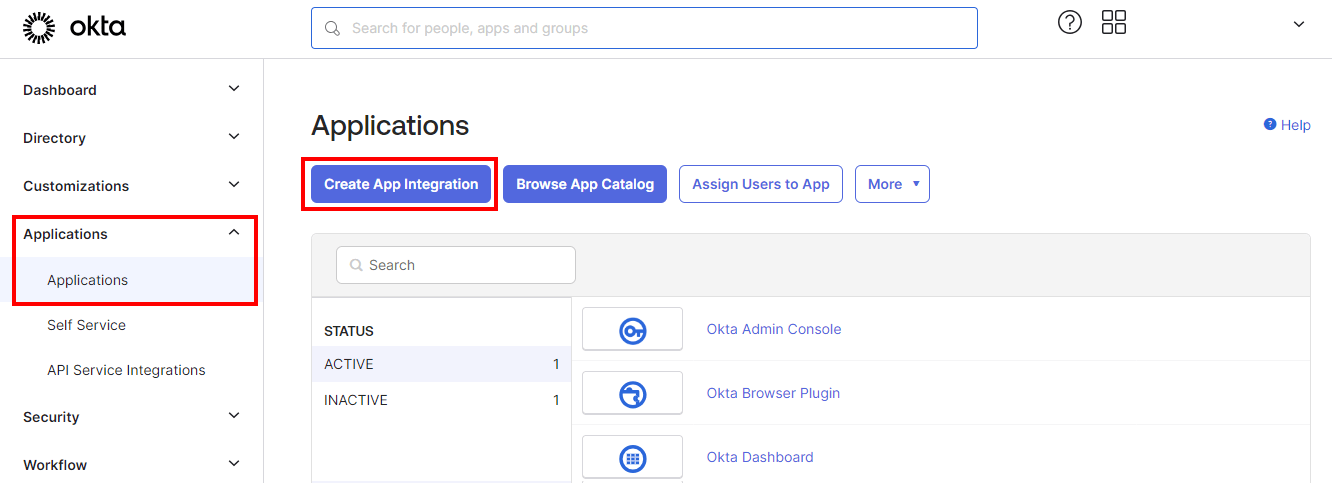
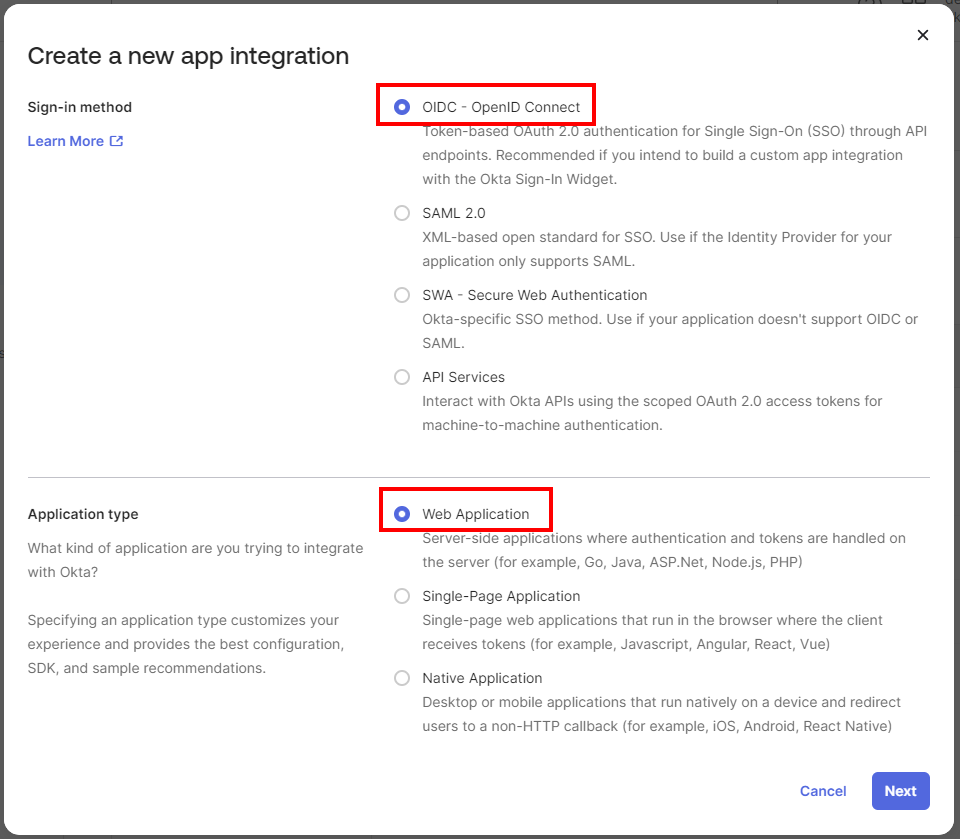
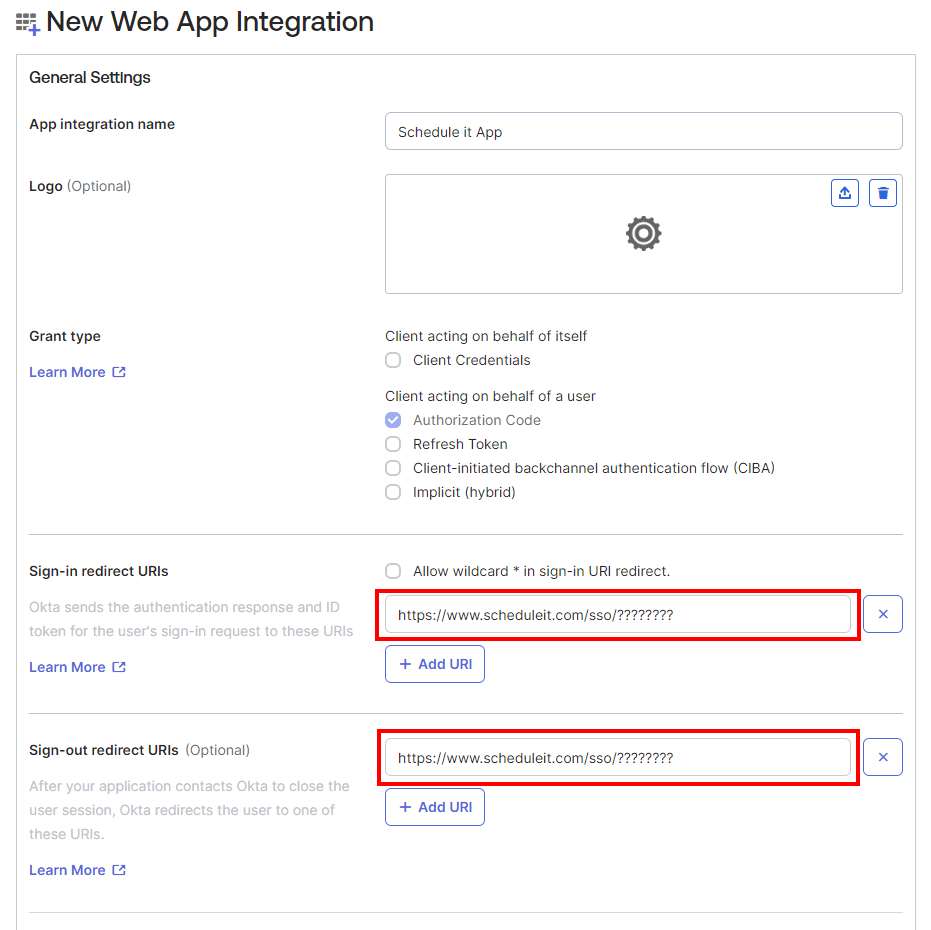
In the Okta Console, click Applications > Create App Integration. Select OIDC - OpenID Connect as the Sign-in method. Select Web Application. Click Next.
In Sign-in redirect URIs, paste the Redirect URL from your Schedule it Account Settings > SSO > Redirect URL. In Sign-out redirect URIs, paste the Redirect URL from your Schedule it Account Settings > SSO > Redirect URL. Download and add the Schedule it logo to your app so its easy for your users to recognise it. 
Click Save.
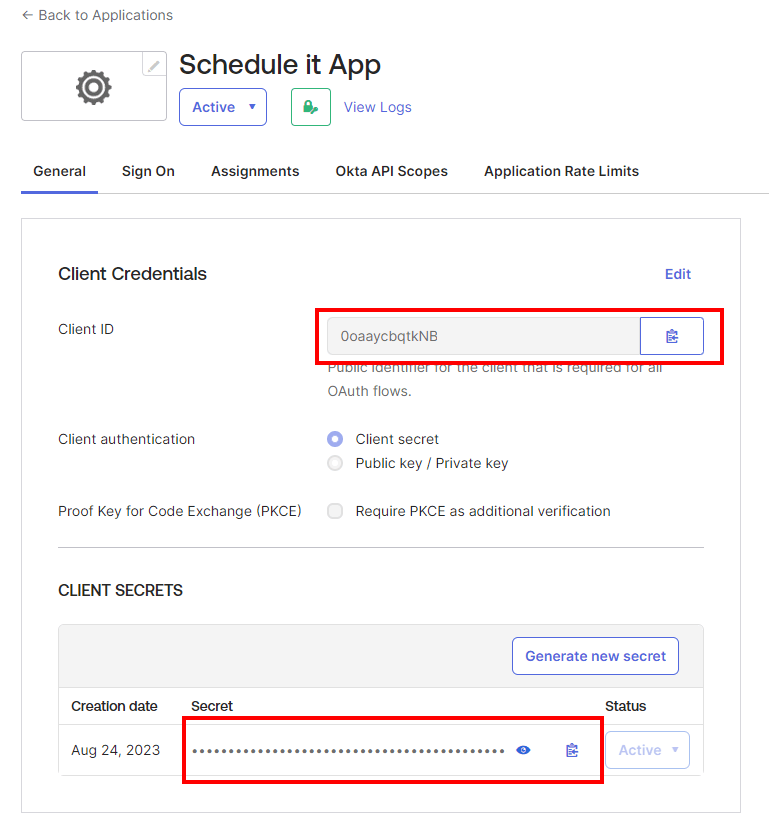
Copy the Okta Client ID and paste into your Schedule it Account Settings > SSO > Client ID. Copy the Okta Client Secret and paste into your Schedule it Account Settings > SSO > Client Secret. Save your Schedule it settings.
Update each of your Schedule it users SSO details to include their SSO ID from your provider.
If you are unsure of the ID provided by your SSO provider, then you can attempt a login (from your Redirect URL)which should show the ID provided.
Create a new app integration
If you are unsure of the ID provided by your SSO provider, then you can attempt a login (from your Redirect URL)which should show the ID provided.
24 August 2023, 15:58
The following steps guide you through creating a custom application integration between Schedule it and Okta for user login authentication.
Sign in to the Slack API Console.
From the Schedule it Account Settings > Single Sign On (SSO) page, click the Slack link to populate the SSO form with the initial details.
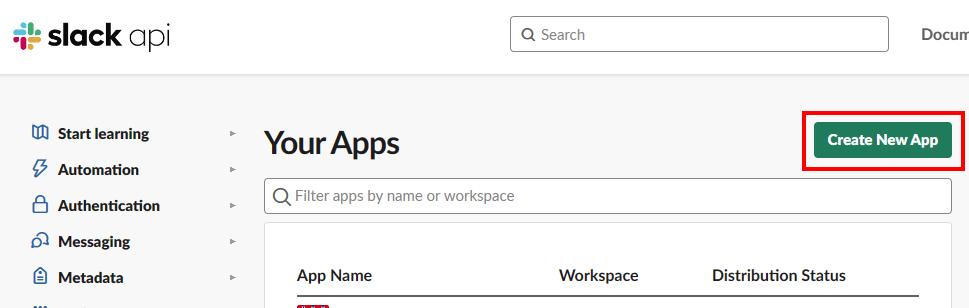
In Slack, click Create New App > From scratch. Enter a name, Schedule it SSO, and choose a workspace where it can be used. Click Create App. Scroll down to App Credentials.
Copy the Slack Client ID and paste into your Schedule it Account Settings > SSO > Client ID. Copy the Slack Client Secret and paste into your Schedule it Account Settings > SSO > Client Secret. Save your Schedule it settings.
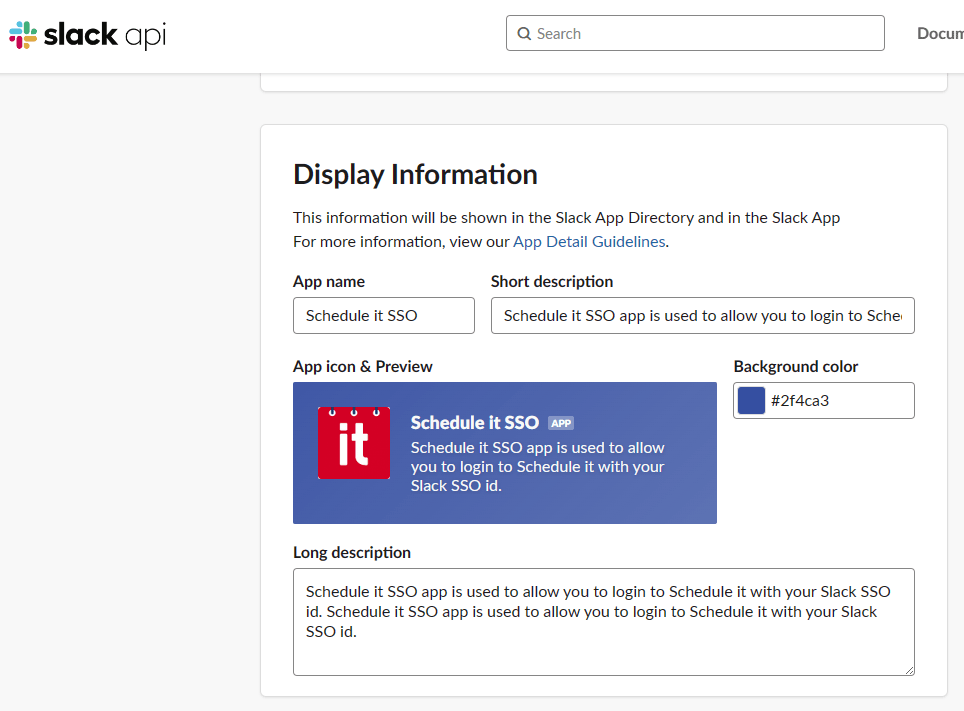
In Slack scroll down to Display Information where you must enter a short and long description and add an icon. 
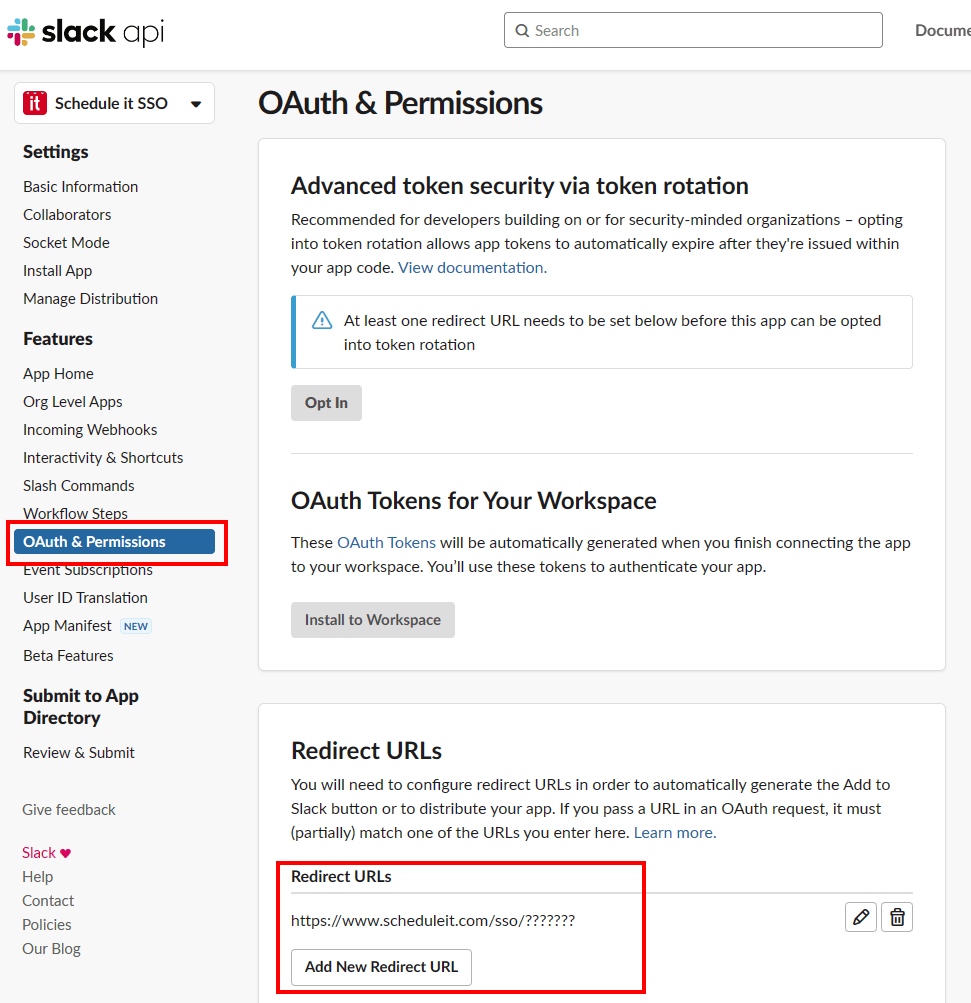
Press Save Changes. On the left select OAuth & Permissions. Add the Redirect URL from your Schedule it Account Settings > SSO. Redirect URL.
Update each of your Schedule it users SSO details to include their SSO ID from your provider.
If you are unsure of the ID provided by your SSO provider, then you can attempt a login (from your Redirect URL)which should show the ID provided.

Sign in to the Slack API Console.
Create a new app integration
If you are unsure of the ID provided by your SSO provider, then you can attempt a login (from your Redirect URL)which should show the ID provided.
26 August 2023, 11:51
The following steps guide you through creating a custom application integration between Schedule it for user login authentication.
Sign in to the Google portal :
From the Schedule it Account Settings > Single Sign On (SSO) page, click the Azure link to populate the SSO form with the initial details.
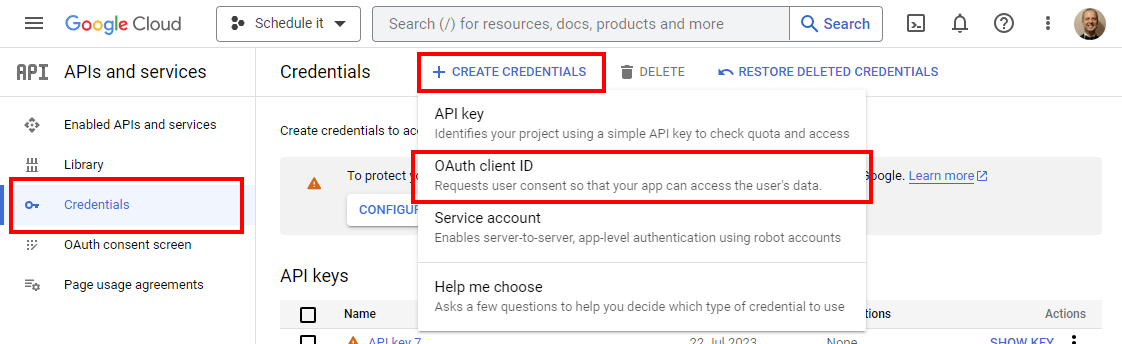
In Google select Credentials > Create Credentials > OAuth Client ID Set the Application Type as Web Applications Enter the name, Schedule it SSO, and choose a workspace where it can be used. Add the Redirect URL from your Schedule it Account Settings > SSO > Redirect URL. Click Create.
Copy the Client ID and paste into your Schedule it Account Settings > SSO > Client ID. Copy the Client Secret and paste into your Schedule it Account Settings > SSO > Client Secret. Save your Schedule it settings.
Update each of your Schedule it users SSO details to include their SSO ID from your provider.
If you are unsure of the ID provided by your SSO provider, then you can attempt a login (from your Redirect URL)which should show the ID provided.
Sign in to the Google portal :
Create a new app integration
If you are unsure of the ID provided by your SSO provider, then you can attempt a login (from your Redirect URL)which should show the ID provided.
25 August 2023, 07:27
The following steps guide you through creating a custom application integration between Schedule it for user login authentication.
Help documents from Microsoft.
Sign in to the Azure portal.
From the Schedule it Account Settings > Single Sign On (SSO) page, click the Azure link to populate the SSO form with the initial details.
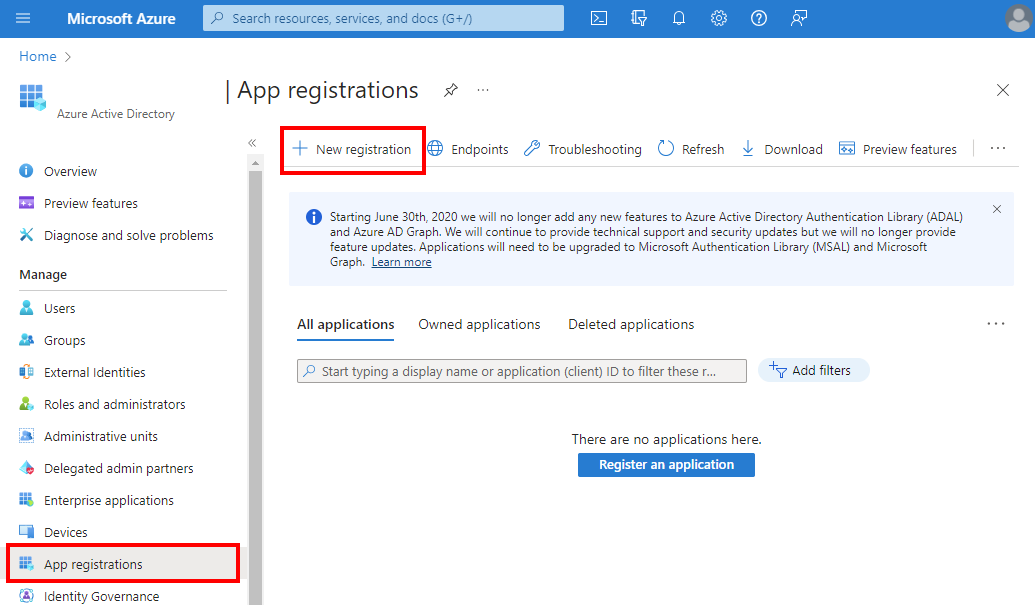
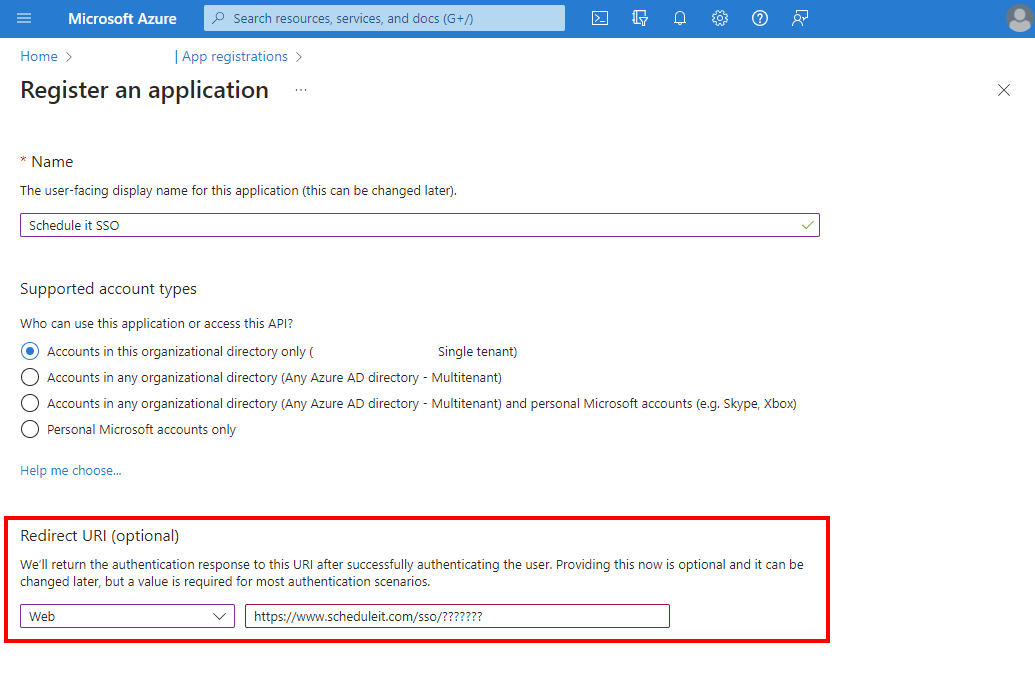
In Azure select Azure Active Directory Select Azure Active Directory > App registrations, and then select + New Registration. Enter the name, Schedule it SSO, and choose a workspace where it can be used. Set the Redirect URL type to Web. Add the Redirect URL from your Schedule it Account Settings > SSO > Redirect URL. Click Register.
Copy the Application (client) ID and paste into your Schedule it Account Settings > SSO > Client ID. Copy the Directory (tenant) ID and paste to replace all the <YOUR_DIRECTORY_TENANT_ID_HERE> tags in your Schedule it Account Settings > SSO
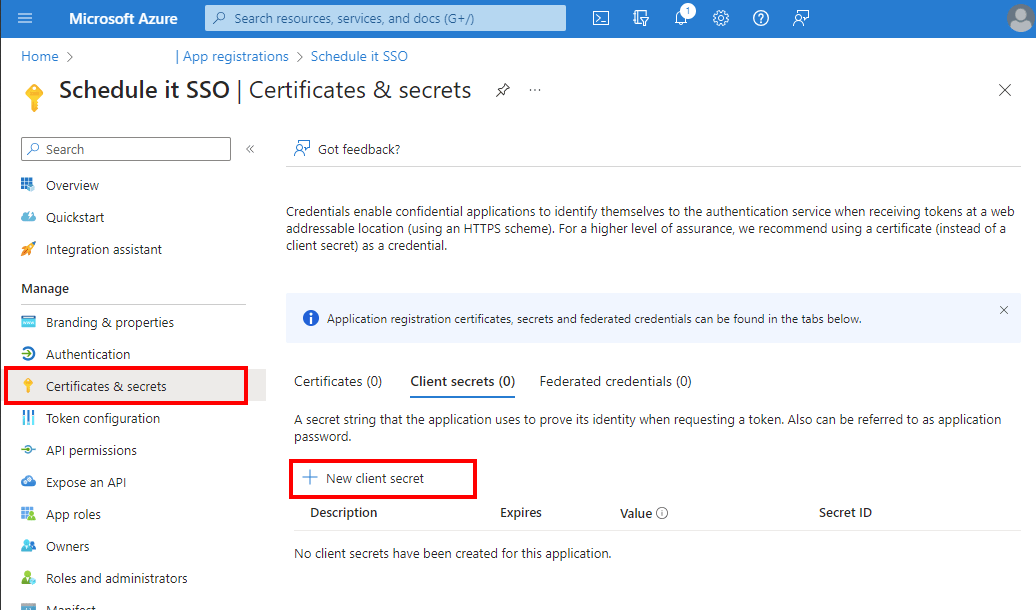
From Certificates & secrets press + New client secret Enter the name Schedule it SSO secret and press Add Copy the secret Value (not the Secret ID) and paste into your Schedule it Account Settings > SSO > Client Secret. Save your Schedule it settings.
Update each of your Schedule it users SSO details to include their SSO ID from your provider. If you are unsure of the ID provided by your SSO provider, then you can attempt a login (from your Redirect URL)which should show the ID provided.
Help documents from Microsoft.
Sign in to the Azure portal.
Create a new app integration
8 June 2021, 10:07
Under the price on our pricing page here is a full list of the differences between each plan.
From your Account Settings you can click the Upgrade Plan button to see the price to upgrade your current plan.
These are just some of the differences between the Startup Plan and the Business Plan...
Startup has:
- no backups, you must do your own each day
- is not GDPR compliant, you cannot store real names or PII data
- uses lower security servers, also no 2FA
- only stores a maximum of 10000 events then you must delete old events
- only support by email, no telephone or live chat
Business has:
- full automatic data backup
- legally GDPR compliant if you need to store any real names, addresses, company details etc.
- can store up to 250000 events
- live support
- custom reports
- Custom form fields in events
- 2 way Outlook and Google sharing
- Access to the API and Integrations
Enterprise has:
- higher event storage
- advanced custom rules and workflows
- batch API request, higher rate limits
To see the upgrade price just press the Upgrade Plan button in your Account Settings page.
Still need help? Contact Us

Join Us - Live Webinar
...
Close
Help Topics
Search
Contact Us