
New/Latest Activity
17 April 2022, 14:41
It is possible to create a number of different types of relationships between your events. Linked events are great to create a simple link between events, quickly find and switch between them, and edit them all at once. Linked events can also be used as a multi event template. Parent Child Events are great when the order of events is important and some should not start before preceding events have finished. Under the Flow tab of any event you can choose to view or update the linked, parent and child events.
Clicking + Add event can add a new copy of the current event to the linked set, then modify it where needed, or choose to add from the last few events you have recently copied or viewed. Clicking Repeat in any event will create a set of repeating events that will automatically be in a linked set so all events can be viewed or edited at once.
Parent Event - By choosing a Parent Event, the event you are viewing becomes a Child to that parent. Each event can only have one parent. Parent events will block child events from starting until the parent is complete. It is not possible to move a child event to start before the end date of its parent (unless either event is marked as 100% completed).
Child Events - By adding a Child Event, the event you are viewing becomes a Parent to that child event. Child events cannot be moved to start before the end date of its parent (unless either event is marked as 100% completed). A parent can have multiple child events.
Clicking + Add parent or + Add child can add a new copy of the current event as a parent or child, then modify it where needed, or choose to add from the last few events you have recently copied or viewed.
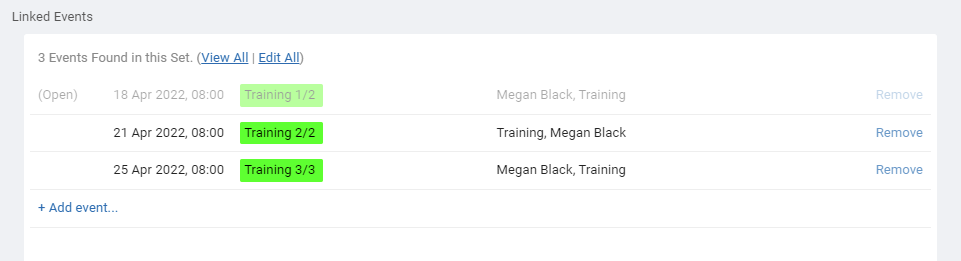
Linked Events
Linked events are the most basic type of relationship. Changing one event has no effect on the other events. In the schedule view you can click an event and choose Select Multiple which can automatically select all future linked events so they can be moved or edited together. You can also click Edit All in the flow tab. Click any event in the list to open and view that event. Clicking Remove on the right of any linked event will remove it from the linked set.Clicking + Add event can add a new copy of the current event to the linked set, then modify it where needed, or choose to add from the last few events you have recently copied or viewed. Clicking Repeat in any event will create a set of repeating events that will automatically be in a linked set so all events can be viewed or edited at once.
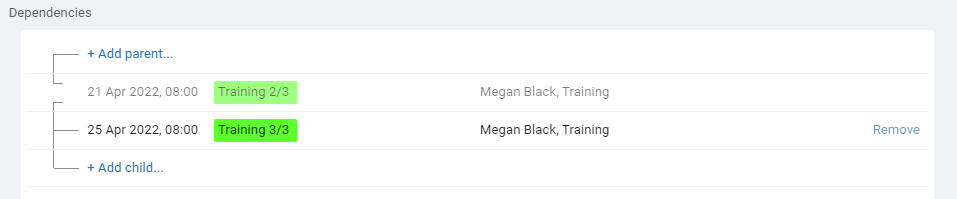
Dependencies
Using Event dependencies you can set events as waiting on other events and define the order they must be done.Parent Event - By choosing a Parent Event, the event you are viewing becomes a Child to that parent. Each event can only have one parent. Parent events will block child events from starting until the parent is complete. It is not possible to move a child event to start before the end date of its parent (unless either event is marked as 100% completed).
Child Events - By adding a Child Event, the event you are viewing becomes a Parent to that child event. Child events cannot be moved to start before the end date of its parent (unless either event is marked as 100% completed). A parent can have multiple child events.
Clicking + Add parent or + Add child can add a new copy of the current event as a parent or child, then modify it where needed, or choose to add from the last few events you have recently copied or viewed.
7 December 2022, 09:51
Search and Filter are powerful tools to help you manage your schedule view, but they work differently:
Search helps you find specific events anywhere. Filter helps you narrow your current view to focus on a subset of events and resources.
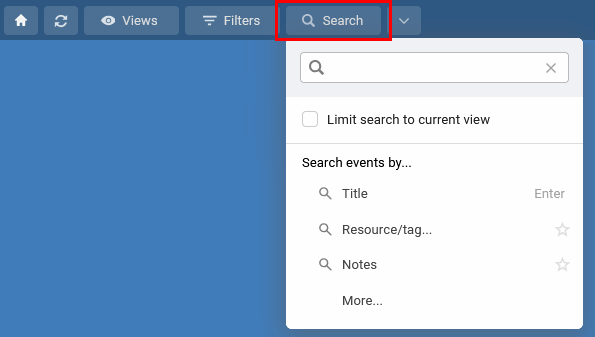
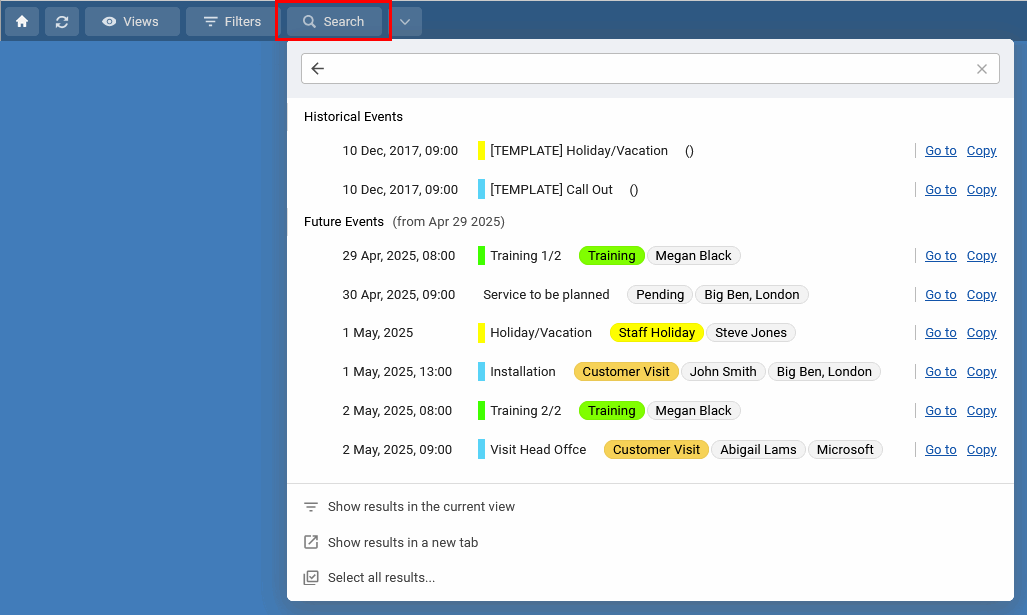
Purpose: To find something specific when you know what you're looking for. How it Works: Search looks through all information in the schedule, regardless of the view you're currently on or any filters you've applied. Results: Search results appear in a separate list or popup. This means your current schedule view remains unchanged, allowing you to easily view or edit results without losing your place. How to Use: Click the Search icon, enter keywords (like a name, shift type, or location), and choose which field to search within.
Purpose: To reduce clutter and focus on a specific group of items. How it Works: Filters start with the view you are currently seeing. It then hides any events or resources that do not meet the rules you define in the filter settings. Results: Your main schedule view is updated immediately to show only the items that pass the filter. How to Use: Click the Filters icon, enter keywords for the criteria you want to use (like Name, Skill, Location, Event Type, Status), and select the value you want to see. Or open the Advanced Filter to set multiple criteria and values.
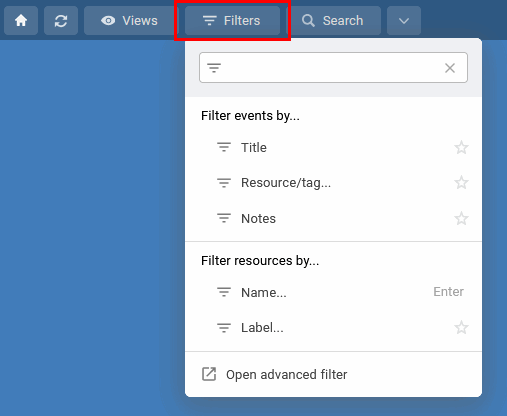
Click for more details on the advanced filter.
Search
Use Search to quickly locate specific events within your entire schedule database.Filter
Use Filters to refine your current schedule view, displaying only the events and resources that match criteria you set.Click for more details on the advanced filter.
2 August 2023, 15:09
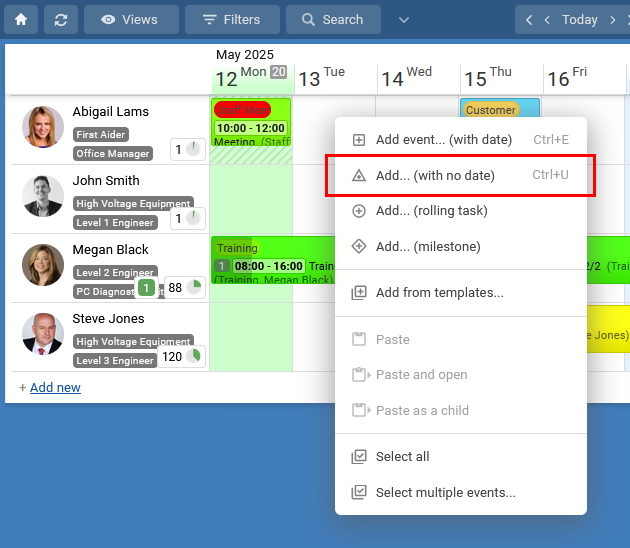
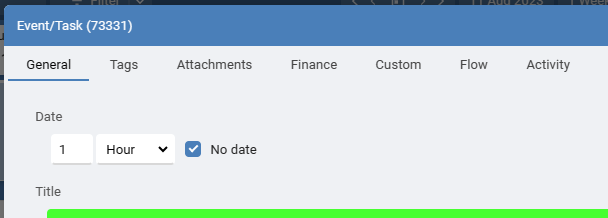
Create events that do not need or have a specific date assigned. Use them for notes, a store of prepaid client visits, potential bookings, or finalized events that are scheduled only when needed. No date events have a duration but no start date/time and can be seen and edited from the Undated page, Timeline Watchlist, or at the top of the List View. At any time an undated event can be changed to an event with a date and added to the schedule.
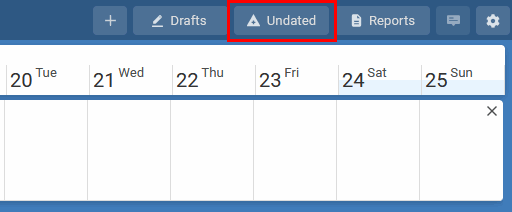
Show all events with no date using the Undated option on the toolbar.
When in the Timeline view, turn on the Watchlist from the View menu then select the filter 'Events with No Date', to see all no date events in a list on the right.
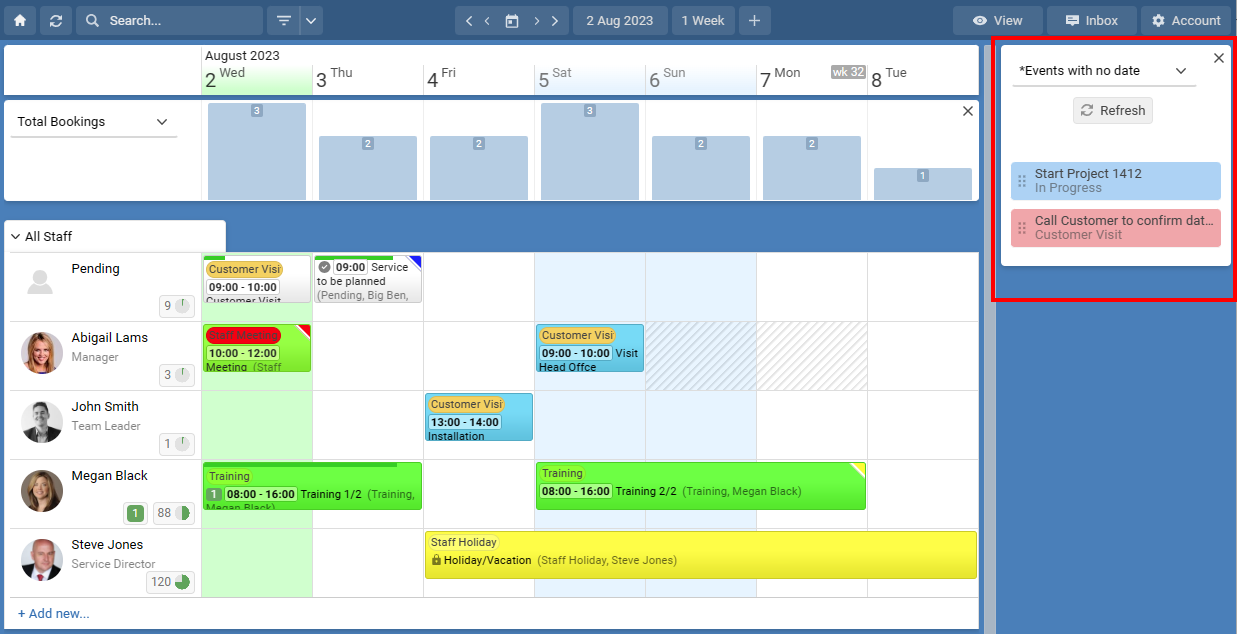
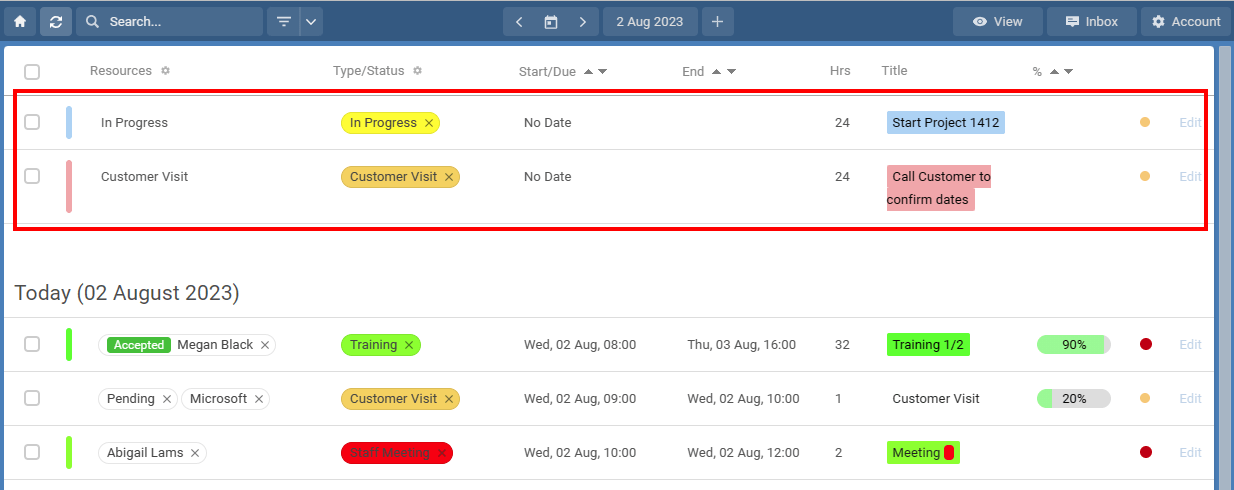
Or from the View menu choose List View where all events with no date can be shown.
[undated,no date,unscheduled]
Show all events with no date using the Undated option on the toolbar.
When in the Timeline view, turn on the Watchlist from the View menu then select the filter 'Events with No Date', to see all no date events in a list on the right.
Or from the View menu choose List View where all events with no date can be shown.
[undated,no date,unscheduled]
24 August 2023, 10:02
The following steps guide you through creating a custom application integration between Schedule it and Okta for user login authentication.
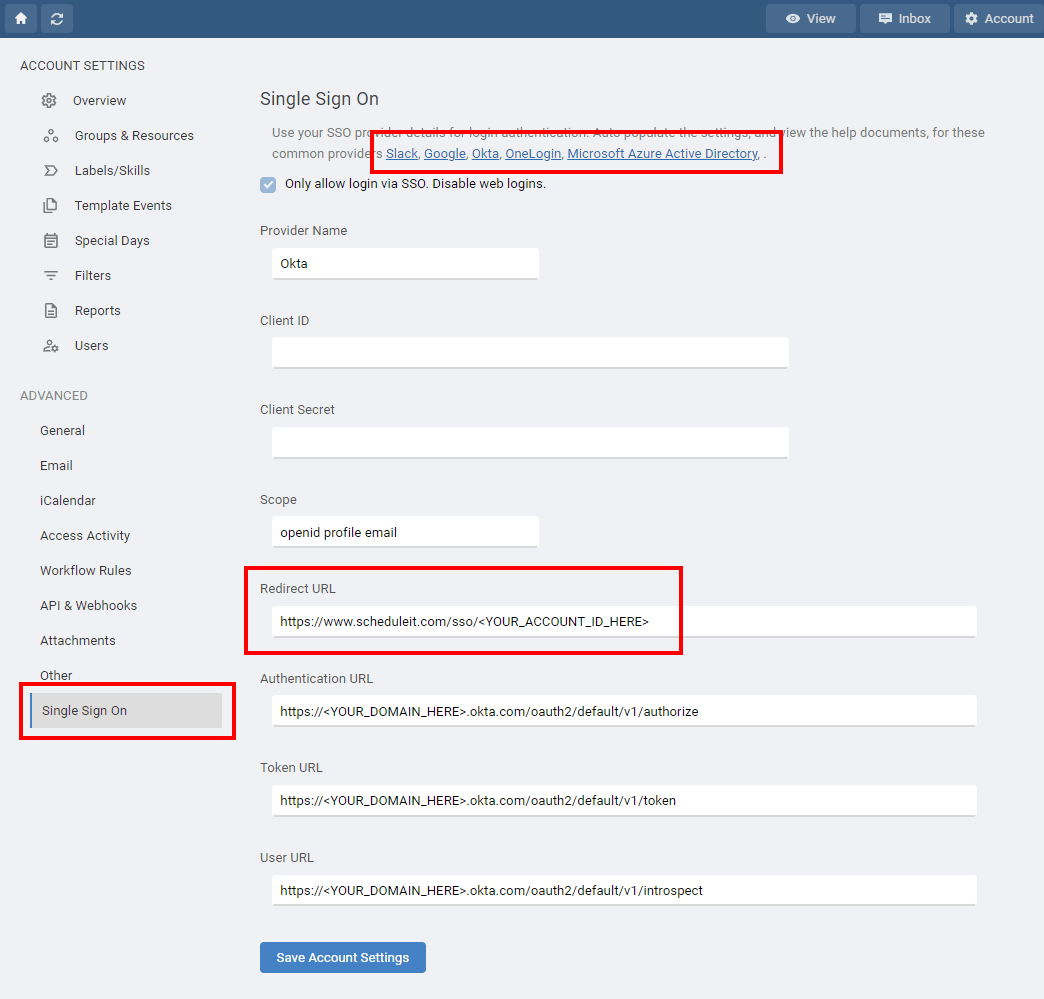
From Schedule it Account Settings > Single Sign On (SSO) page, click the Okta link to populate the SSO form with the initial details. Change all the <YOUR_DOMAIN_HERE> tags for your Okta domain.
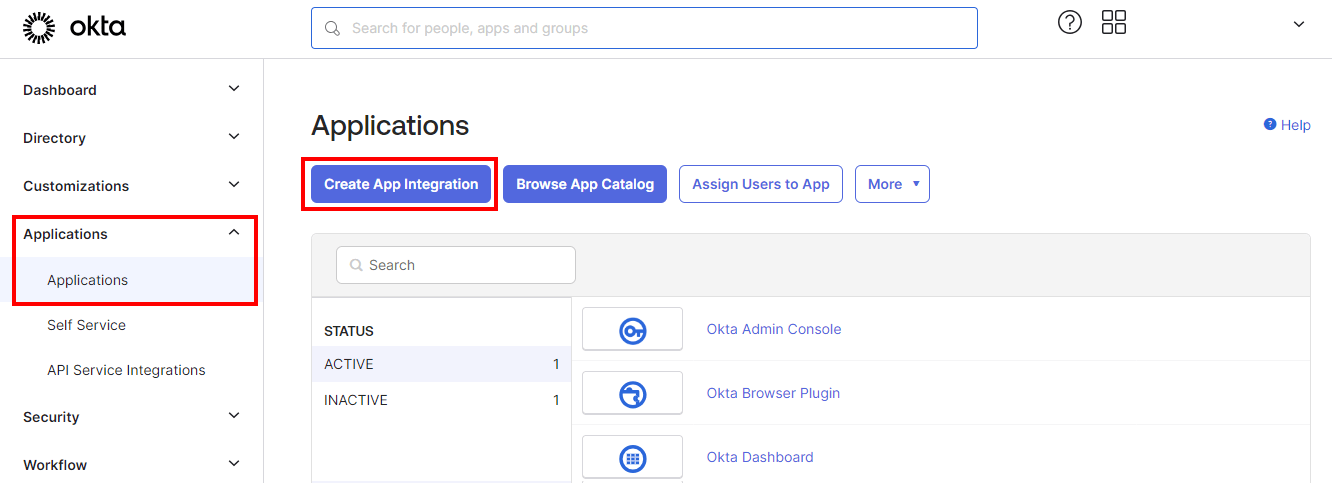
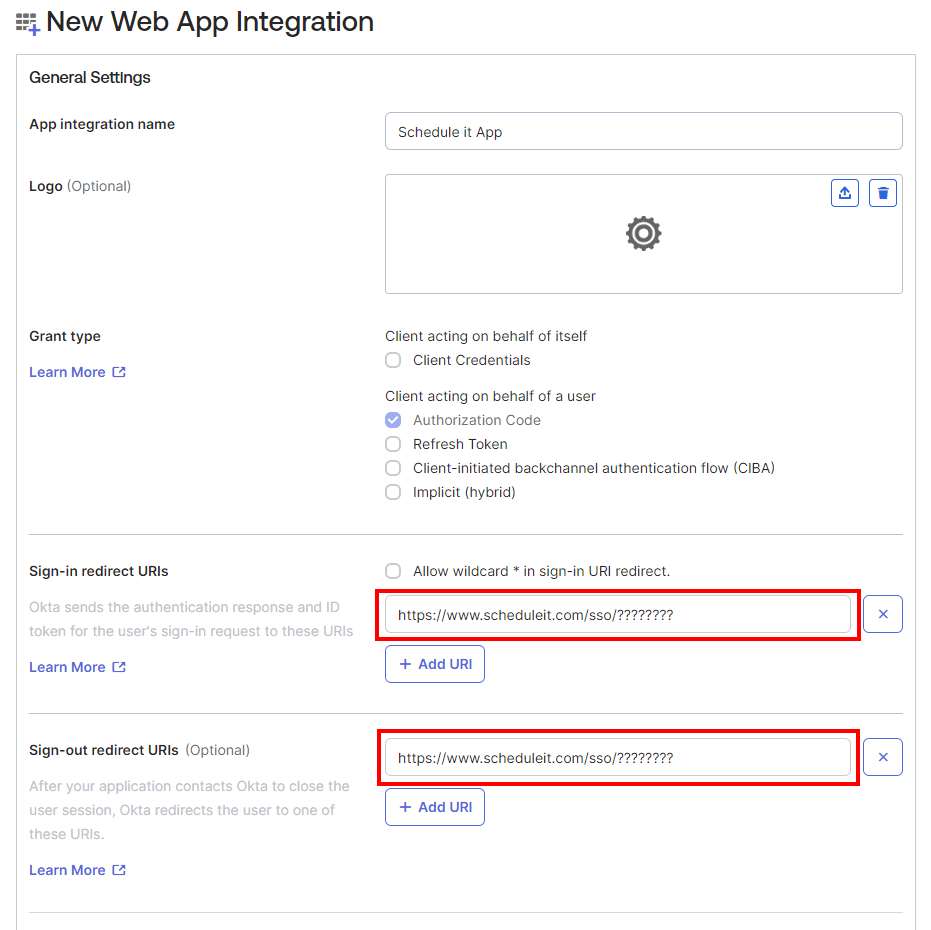
In the Okta Console, click Applications > Create App Integration. Select OIDC - OpenID Connect as the Sign-in method. Select Web Application. Click Next.
In Sign-in redirect URIs, paste the Redirect URL from your Schedule it Account Settings > SSO > Redirect URL. In Sign-out redirect URIs, paste the Redirect URL from your Schedule it Account Settings > SSO > Redirect URL. Download and add the Schedule it logo to your app so its easy for your users to recognise it. 
Click Save.
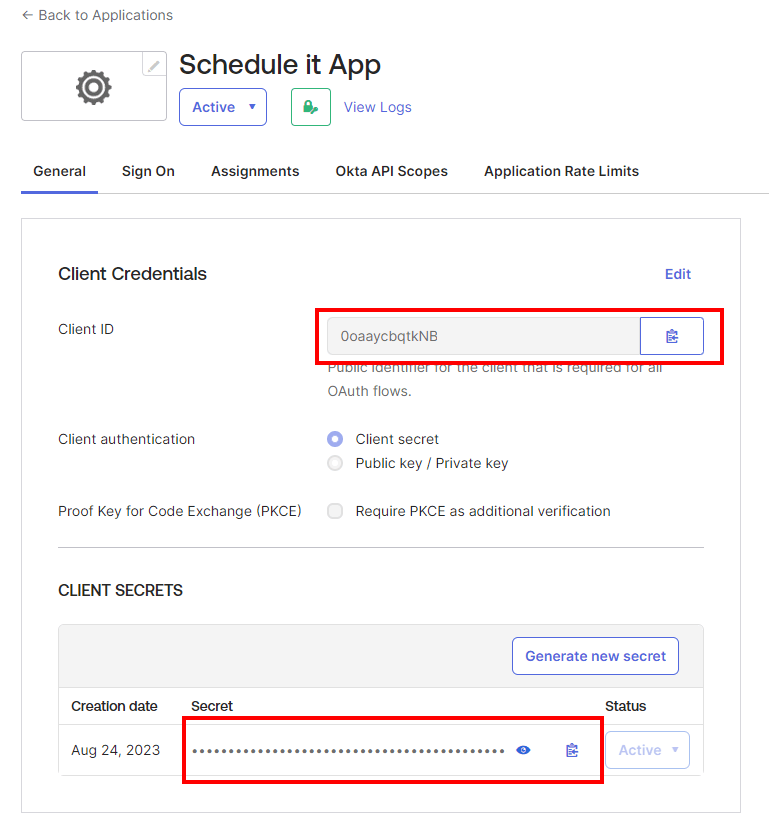
Copy the Okta Client ID and paste into your Schedule it Account Settings > SSO > Client ID. Copy the Okta Client Secret and paste into your Schedule it Account Settings > SSO > Client Secret. Save your Schedule it settings.
Update each of your Schedule it users SSO details to include their SSO ID from your provider. If you are unsure of the ID provided by your SSO provider, then you can attempt a login (from your Redirect URL)which should show the ID provided.
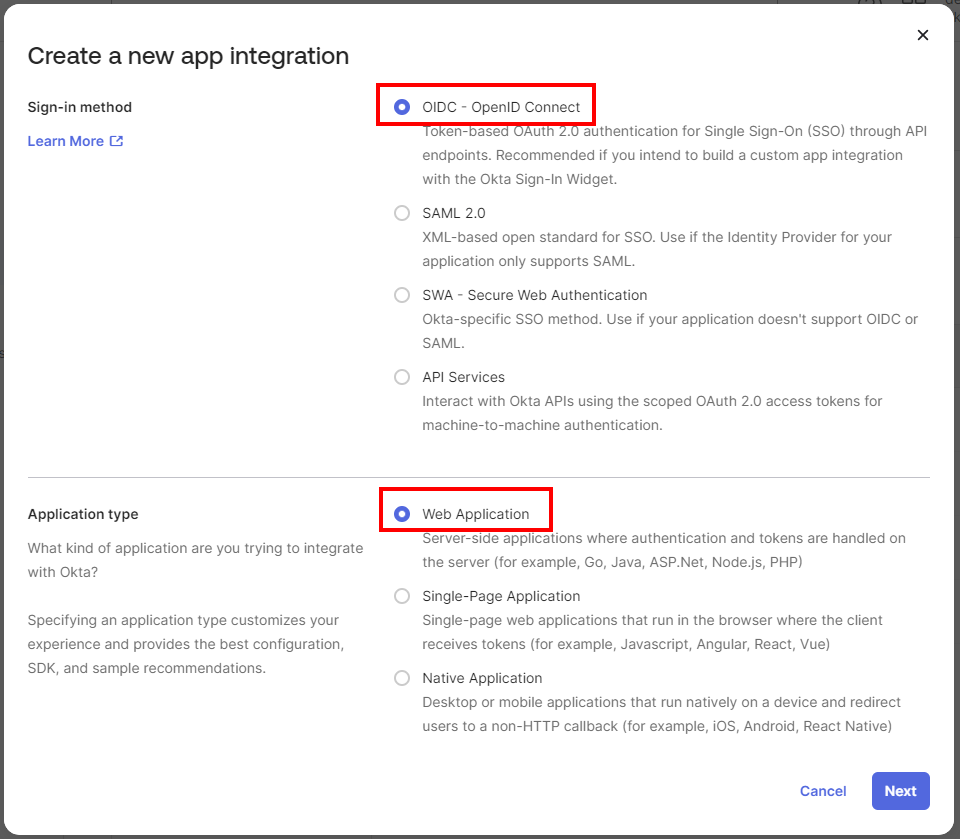
Create a new app integration
18 October 2023, 14:58
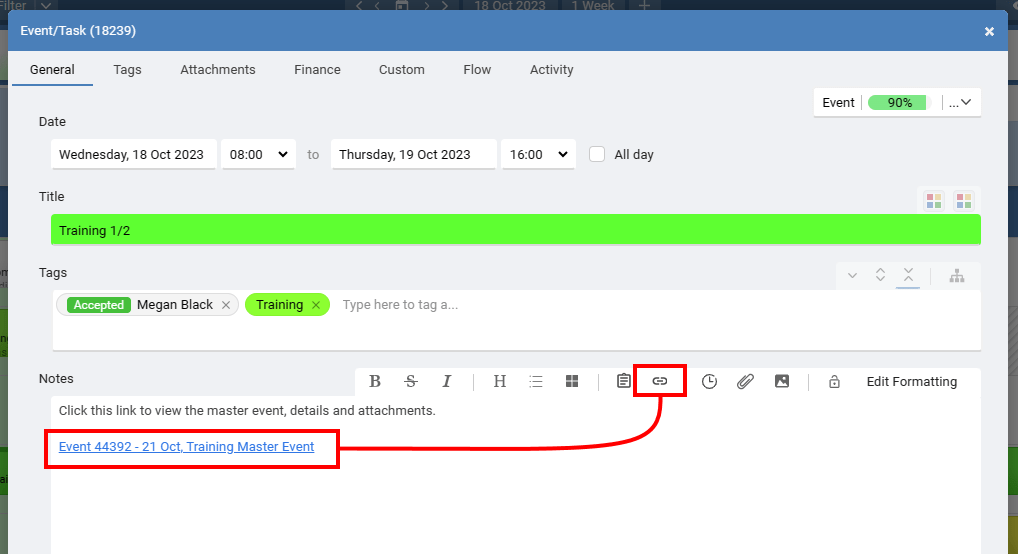
Sometimes events relate to, or need information from other events. It is possible using the Insert link option to insert a clickable link into the notes of any event that when clicked will instantly open the linked event for viewing.
Why link to other events?
Keep all the notes and attachments in a main event and link to it from other sub-events. Quickly access other stages of a project/job by creating links between them. Add links to previous events for a specific task or visit so they can be viewed without having to search for them. View a complete summary of all notes from all linked events without having to open each individually.
Simply opening any event, or copying any event, will add it to a short list for selection. When using the Insert link icon you can pick an event from the shortlist and a clickable link will be created. For example, open or save a new event, then open or create another event and the link for the first is ready to be inserted if needed.
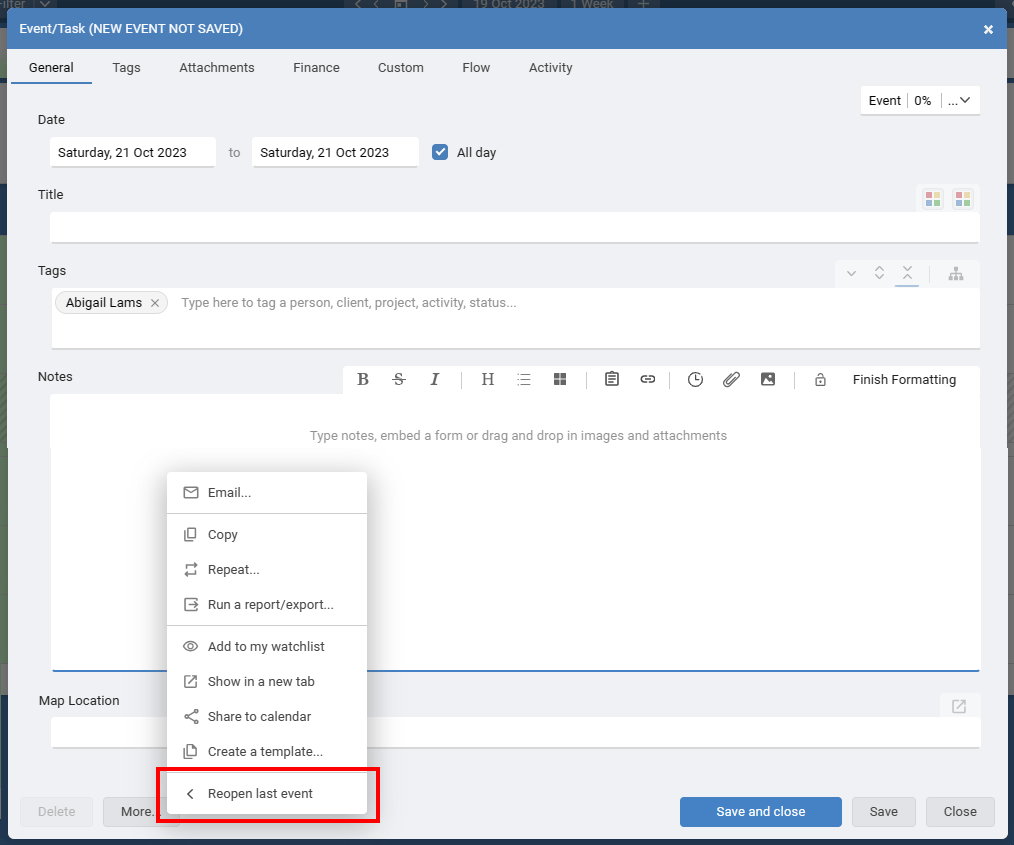
If you click a link to a different event you can always go back by choosing Reopen last event from the More options.
Why link to other events?
Simply opening any event, or copying any event, will add it to a short list for selection. When using the Insert link icon you can pick an event from the shortlist and a clickable link will be created. For example, open or save a new event, then open or create another event and the link for the first is ready to be inserted if needed.
If you click a link to a different event you can always go back by choosing Reopen last event from the More options.
16 February 2024, 10:16
Workspaces are still in beta - This means we are still developing and adding the full feature set.
Use workspaces to create separate work areas for different divisions or departments within your organisation where data separation is needed.
The top level in your account is the workspace. Within each workspace you can add groups, resources and other information that is only visible in that workspace.
Every group, resource, filter, report, template and event created within a workspace are only visible when their workspace is selected.
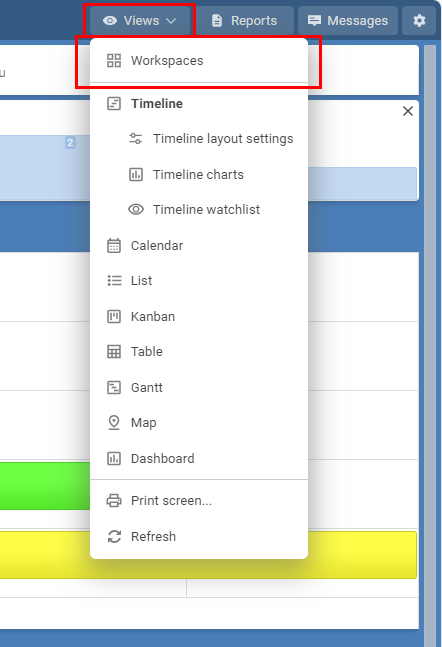
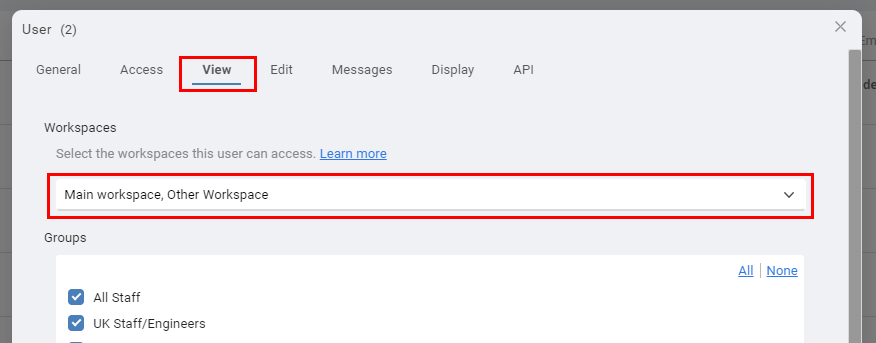
User access
Within the view permissions of each user you can choose which workspaces the user can access.
Information that is unique to each workspace :
Groups
Resources
Resource Labels
Events
Filters
Reports
Templates
Special Days
Use workspaces to create separate work areas for different divisions or departments within your organisation where data separation is needed.
The top level in your account is the workspace. Within each workspace you can add groups, resources and other information that is only visible in that workspace.
Every group, resource, filter, report, template and event created within a workspace are only visible when their workspace is selected.
User access
Within the view permissions of each user you can choose which workspaces the user can access.
Information that is unique to each workspace :
Groups
Resources
Resource Labels
Events
Filters
Reports
Templates
Special Days
27 September 2024, 16:41
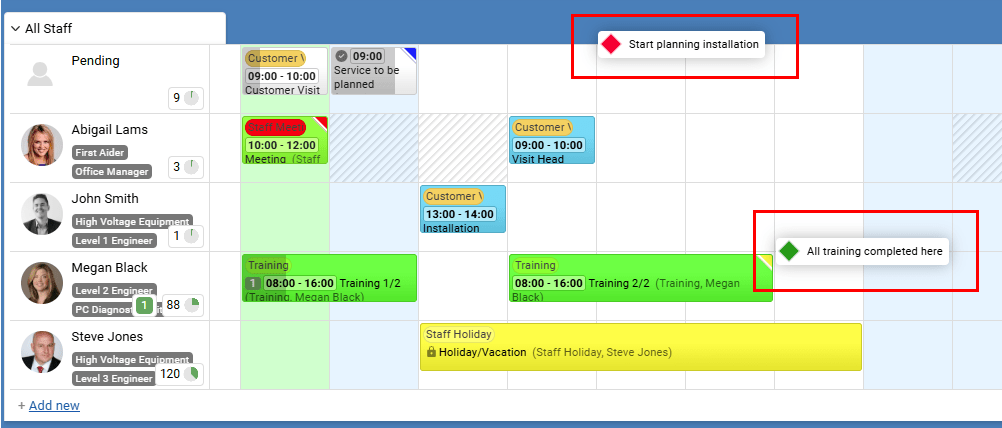
Milestones are key moments in time that are fixed and have no duration. They show specific points in your planning and schedule that mark important dates, stages and events using colored triangles. They highlight a change, key date or deadline to help all users focus towards a common goal. They can act as a signpost to help guide users to the next major milestone and show the progress of work completed so far.
When adding a milestone you can set the color and a title that is shown when hovering over the icon in the schedule. Update its percentage competed value to show, and inform others, of the milestone progress.
Using Milestones
Milestones can be used to notify a lead or manager that a collection of events and subtasks have been completed without them needing to be informed of the progress of each individual event or subtask. A milestone only report gives a high level overview of the overall progress of a project, or schedule of works, without the need to see every event or task that makes up the entire plan. Create a resource row at the top of your schedule where you can place and view all milestones together for a great plan and progress overview. Filters can be used to filter in or out any milestone events should you want to include or exclude them from your views and reports.
Milestone Examples
Show the start of a project or a set of related events Show when a project or a set of related events must be completed Date for a progress review The end of a phase of planning When critical documents need to be received/finalised
When adding a milestone you can set the color and a title that is shown when hovering over the icon in the schedule. Update its percentage competed value to show, and inform others, of the milestone progress.
Using Milestones
Milestone Examples
11 March 2025, 15:53
Groups and resources are normally sorted alphabetically or manual set at the account level. But there are times when you have a list of resources and prefer a different sort order, or a dynamic sort order based on some value.
Sorting by 'Earliest event start' will put the resource at top who's events start first. Resources with events that start later are shown lower down. This is great for Project resources where the most current project is shown first, and projects that start later in the year are lower.
Resources can also be sorted by the 'Number of days busy' or the 'Number of events booked'. This means you can always have the busy or under utilized resources at the top which helps you quickly see who needs more work ensuring an even distribution where needed.

Sorting Groups
Sorting groups by the name or color allows you to keep groups of similar types together. For example you may have many staff groups and color them all yellow, and all your various equipment groups colored blue. Sorting groups by color will keep the staff and equipment groups together.Sorting Resources
Sorting resources by color allows you to keep groups of similar resources together inside a master group. For example you may have many a single All Staff group which includes Managers and Admins. Coloring each person with a color matching their role allows you to group by color and therefore role.Sorting by 'Earliest event start' will put the resource at top who's events start first. Resources with events that start later are shown lower down. This is great for Project resources where the most current project is shown first, and projects that start later in the year are lower.
Resources can also be sorted by the 'Number of days busy' or the 'Number of events booked'. This means you can always have the busy or under utilized resources at the top which helps you quickly see who needs more work ensuring an even distribution where needed.
18 March 2025, 07:49
The purpose of saving as a draft is to preserve incomplete work so you can return to it later and continue editing, or try out scheduling ideas before publishing. Drafts are not visible to other users and do not trigger any notifications or double booking checks until they are published.
Saving as a draft is useful when you need to:
Resume work later: You can come back and finish what you started at a more convenient time. Gather more information: You can leave the event to verify details or gather more information before completing. Switch between tasks: You can save an event and then switch to another without losing your progress. Experiment: Experiment without affecting the live schedule, crucial for trying out new staffing levels, configurations, or covering potential absences. Demand planning Evaluate different scenarios (e.g., a sudden increase in demand, an unexpected staff absence) and develop solutions within the draft before publishing the changes.
Creating a draft, and publishing
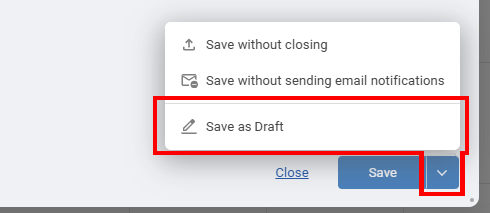
When saving an event, choose 'Save as draft' from the save menu. Once the event is ready for publishing click the 'Save' button again to publish.
Viewing your drafts
Your draft events can be accessed using the drafts icon on the top right toolbar or by clicking in the schedule and selecting "Add from draft...". Once a draft is saved and published it is no longer a draft.
Let us know how you would like it to work so we can be sure to include those options in the full feature release.
Saving as a draft is useful when you need to:
Creating a draft, and publishing
When saving an event, choose 'Save as draft' from the save menu. Once the event is ready for publishing click the 'Save' button again to publish.
Viewing your drafts
Your draft events can be accessed using the drafts icon on the top right toolbar or by clicking in the schedule and selecting "Add from draft...". Once a draft is saved and published it is no longer a draft.
Let us know how you would like it to work so we can be sure to include those options in the full feature release.
7 April 2025, 17:40
Save a filter or view when it is something you use often. You can then quickly apply it without needing to manually select the criteria or view settings each time.
Saved Filters
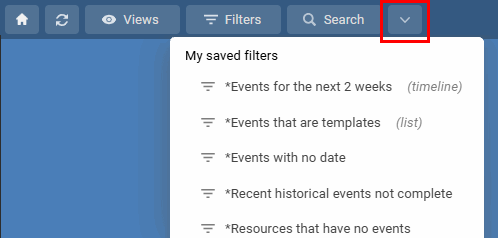
These let you narrow down the information you see in your current view by applying a filter. Think of it as showing only the items you're interested in right now. Use filters to temporarily focus on specific data within your views. They only affect what you see at that moment, and apply to any active view. To save a filter, open the Advanced Filter, set your filter criteria then choose Save in the bottom left.Saved Views
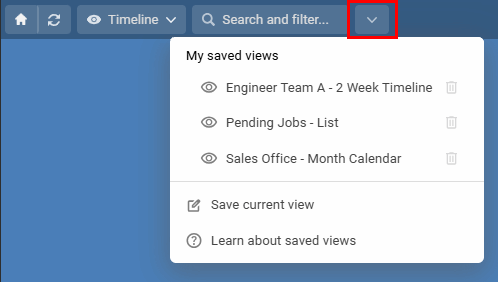
These are more comprehensive than a saved filter. They remember a specific way you've set up your schedule view, including which groups are open, any filters you've applied, the number of days or weeks being shown, and how the information is sorted. It's like saving a complete snapshot of a your view. Save views to quickly switch between departments, teams, or selected resources for reporting and analysis. To save a view once you have it showing as you need, choose Save View in the Views menu. 26 May 2025, 17:22
Timeline View
In the Timeline view, events for a resource are typically displayed on a single horizontal line. When events overlap in time, they are automatically stacked vertically within the resource's row space to show the conflict.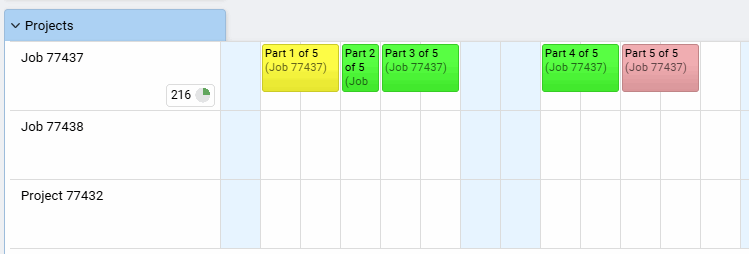
Gantt View
The Gantt view shows each event on its own line. This vertical spacing helps you quickly see how many events are planned for a resource based on the height of its row. It's often the preferred view for planning projects.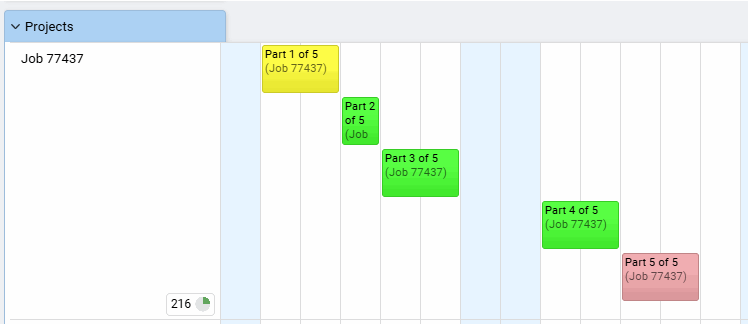
22 August 2019, 16:25
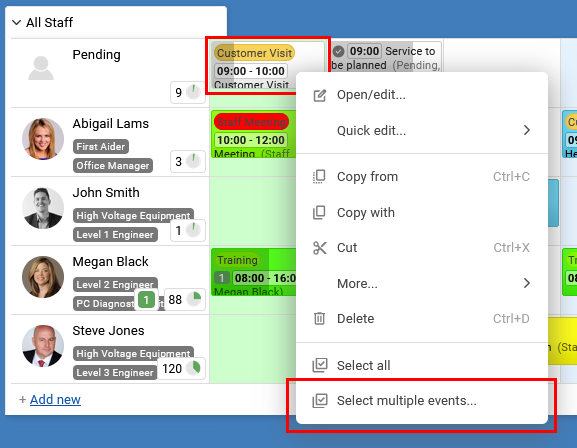
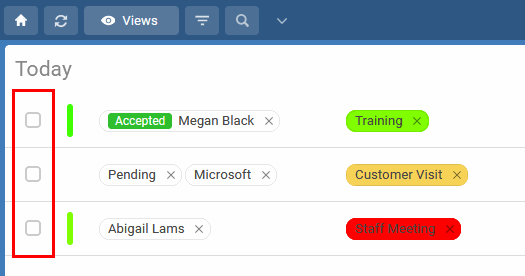
Click the first event you want to edit, to add more to your selection choose Select multiple events... a menu of preset event selections can be chosen or skipped. You can also now click other events to add or remove them from your selection. You can also use the CTRL key whilst clicking events to select multiple events manually. Using the List View you can use the checkboxes on the left to select multiple events to edit at once. For events added using the repeat function, you can open any of them and click the Flow tab to batch select and edit all of them.
Clicking an event to start the batch selection:
Using the List View check boxes to batch select:
Once your selection is complete you can choose Edit, Delete, or many other actions from the batch selection bar, or use drag and drop to move all the selected events.
[batch, multiple, at once, together]
1 July 2014, 09:32
If you are using subscription calendars from Schedule it, or you wish to link your online Schedule it account, you can use the steps below to open them on your iPhone or iPad. For more details on subscription calendars in Schedule it see this FAQ.
1 - Tap Settings
2 - Accounts & Passwords
3 - Subscribed Calendars
4 - Add Account
1 - Launch the Settings app on your iPhone or iPad.
2 - Tap on Mail, Contacts, Calendars.
3 - Tap on Add Account.
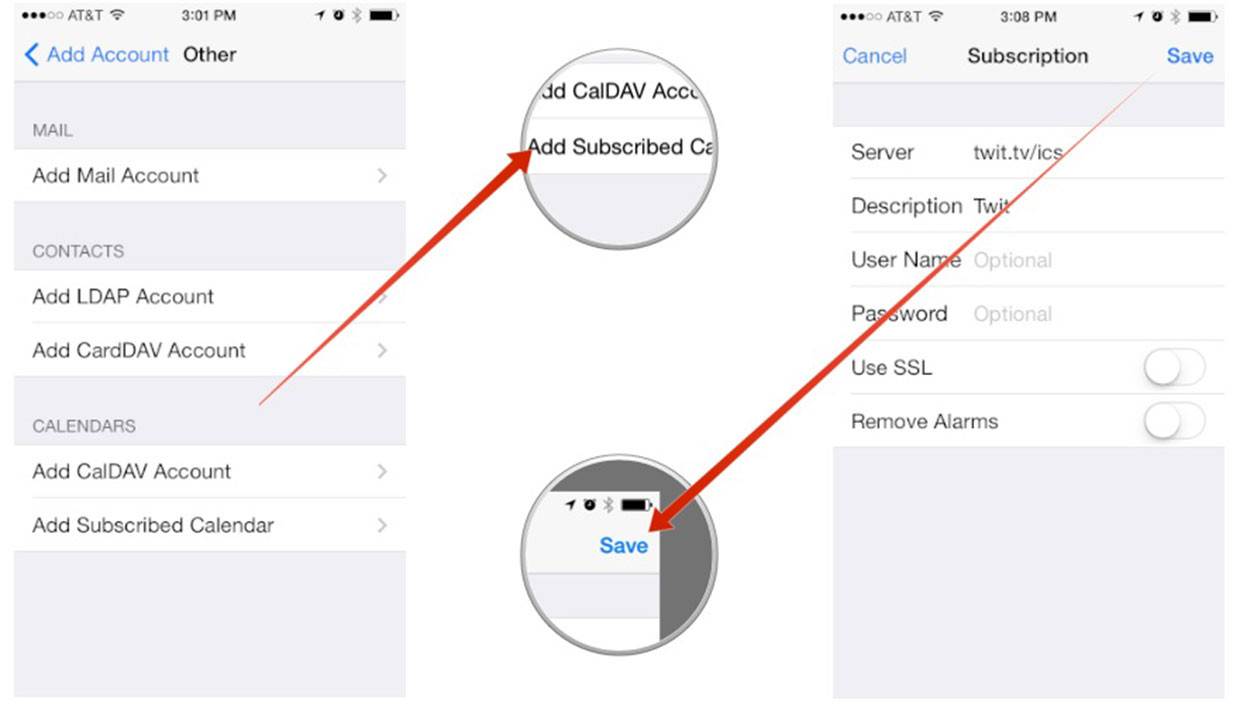
4 - Tap on Other.
5 - Tap on Add Subscribed Calendar under the Other section.
6 - Enter or copy the location of the shared calendar from Schedule it. From your online Settings page, when logged into your online account with a browser, you can get the shared calendar link of any Resource or User by clicking Edit Resources, or Edit Users, then pressing the 'Shared Calendar' tab. Click here to login now
7 - Tap Save.
That's it, the chosen resource Schedule it Calendar will now show up in the Calendar app.
In iOS
1 - Tap Settings
2 - Accounts & Passwords
3 - Subscribed Calendars
4 - Add Account
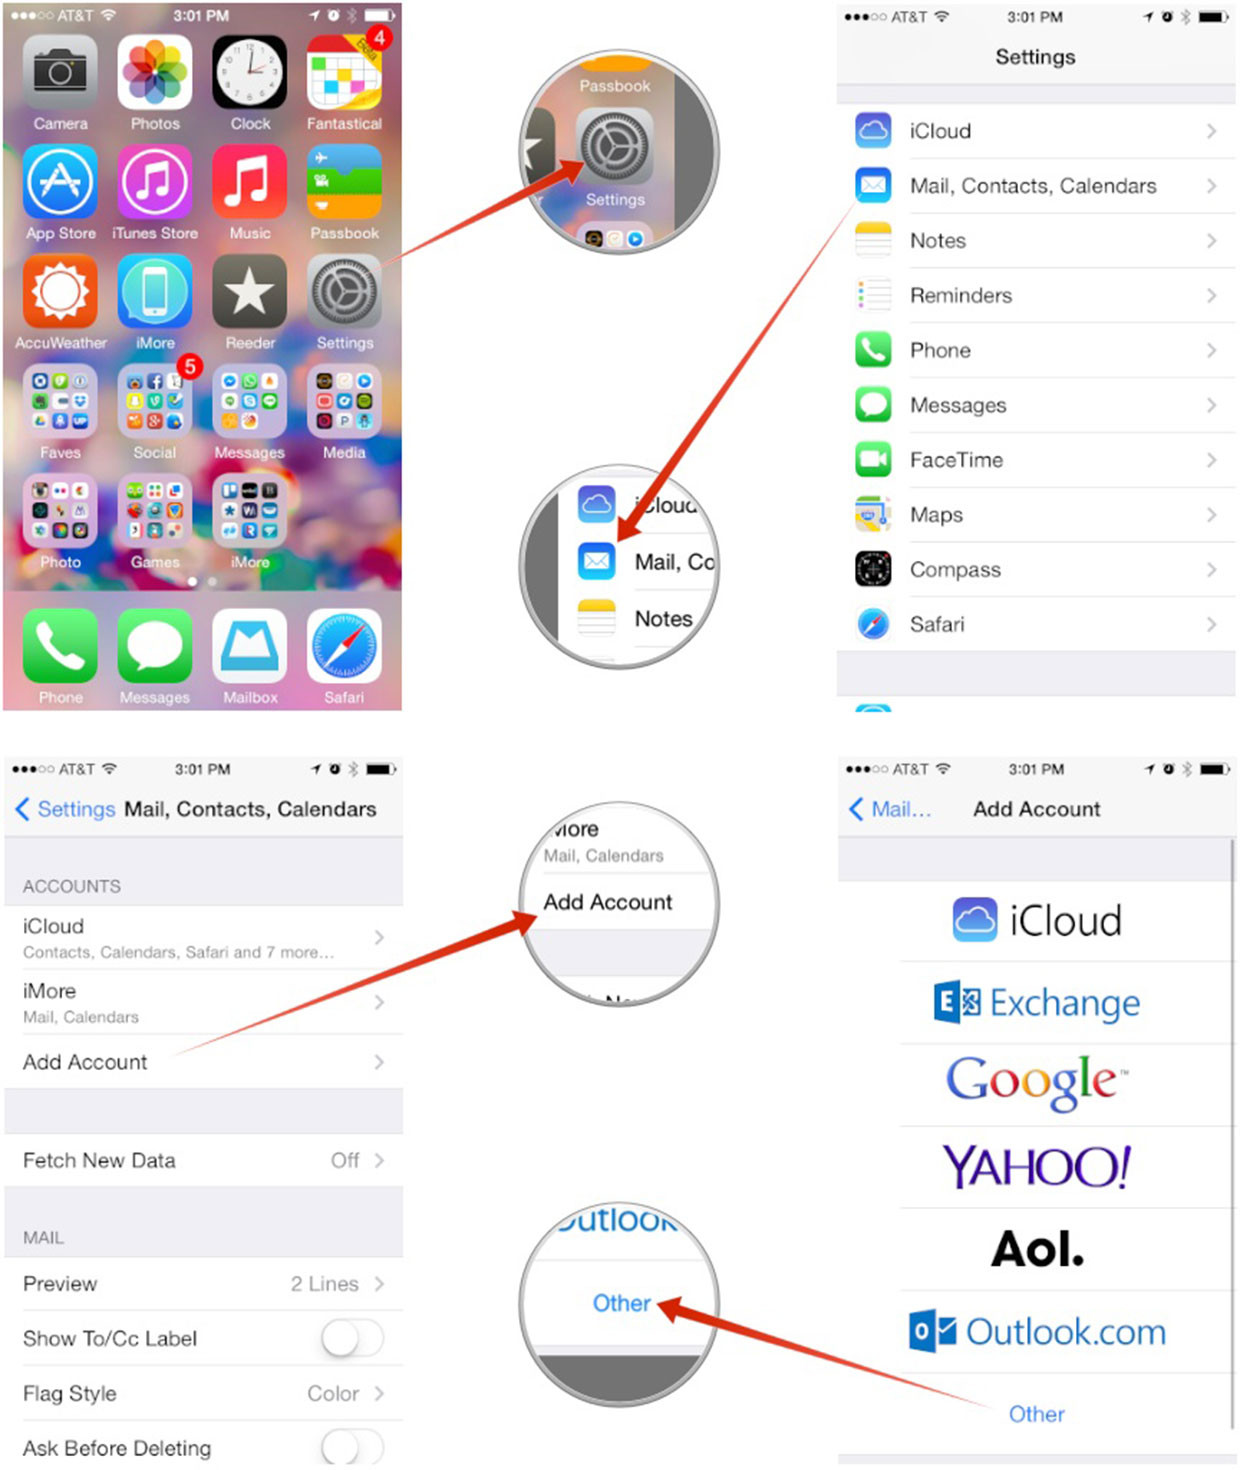
For Older Version of IOS
1 - Launch the Settings app on your iPhone or iPad.
2 - Tap on Mail, Contacts, Calendars.
3 - Tap on Add Account.
4 - Tap on Other.
5 - Tap on Add Subscribed Calendar under the Other section.
6 - Enter or copy the location of the shared calendar from Schedule it. From your online Settings page, when logged into your online account with a browser, you can get the shared calendar link of any Resource or User by clicking Edit Resources, or Edit Users, then pressing the 'Shared Calendar' tab. Click here to login now
7 - Tap Save.
That's it, the chosen resource Schedule it Calendar will now show up in the Calendar app.
4 December 2016, 20:12
Events with a Start and End Date : Events with a fixed Start Date and End Date only move when you change them.
Events with a Start and Duration : Events with a fixed Start Date and End Date set by a duration only move when you change them.
No Date/Undated : Events with no date (undated or unscheduled) are for information that does not have a specific date or time assigned. Use them for notes, a store of prepaid client visits, potential bookings, or finalized events that are scheduled only when needed. These not visible in any time based views but can be seen by choosing 'Undated' on the toolbar, or in the List View and the Watch List. where you can drag into your timeline. You can also filter for No Planned Date events to view them in your List View.
Rolling Tasks with a Due Date : Tasks with a Due Date. Once they pass their due date they are automatically moved/rollover to the next day if not complete.
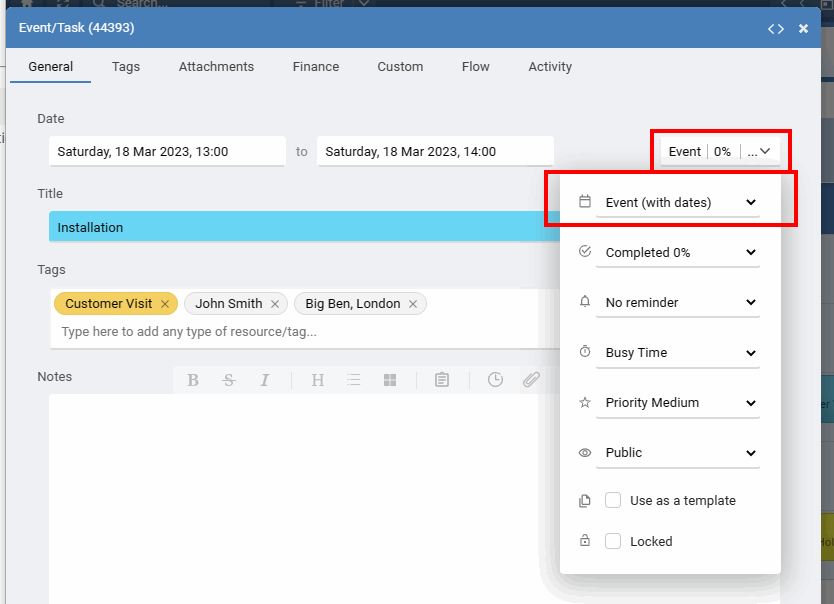
To quickly add a new Event or Task, click any empty space in your schedule and choose to add an Event or a Task. When you have the Event/Task window open you can also change from an Event to Task or a No date booking using the drop down menu next to the date.
How to add a new Task with a Due Date?
Tasks appear just like Events, slotted in at the date and time you set them for. But unlike Events, a Task won't disappear when the day is over. Tasks have a due date, and incomplete tasks are automatically carried over to the next day until you mark them as complete. For example, if you create a task to call a client or submit a report, you'll see the task each day, in your today, until it's completed, delete it, or you move it to a future date.To add a Task, click any day in your schedule just as you would to add an event, but choose the add a Task option.
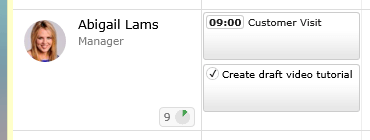
How do I recognise Tasks from regular Events?
Tasks show with other Events in your schedule. You can identify them with the small task/todo tick icon.
How do I dismiss Tasks?
You just set the percent completed value to 100%.
What will happen if I don’t mark the Task as done?
If a Task isn't completed by its due date, it will be moved in your schedule to the next day.
#todo , to-do , task , list, undated, unscheduled
7 March 2017, 20:24
Do you want to view your events in another calendar like Microsoft Outlook, Google Calendar, Apple Calendar, or on a simple webpage? Schedules can be shared and viewed remotely for each individual resource, or all resources, in any other calendar tool that support iCalendar. Any changes to the resources schedule will be automatically updated in the remote calendar.
Note: Whilst our iCal feed is updated and live, Microsoft, Google, Apple and other calendar providers decide on how often they want to check our feed for any updates, which can take a few hours in some cases. 15 to 30 minutes is a typical update frequency.
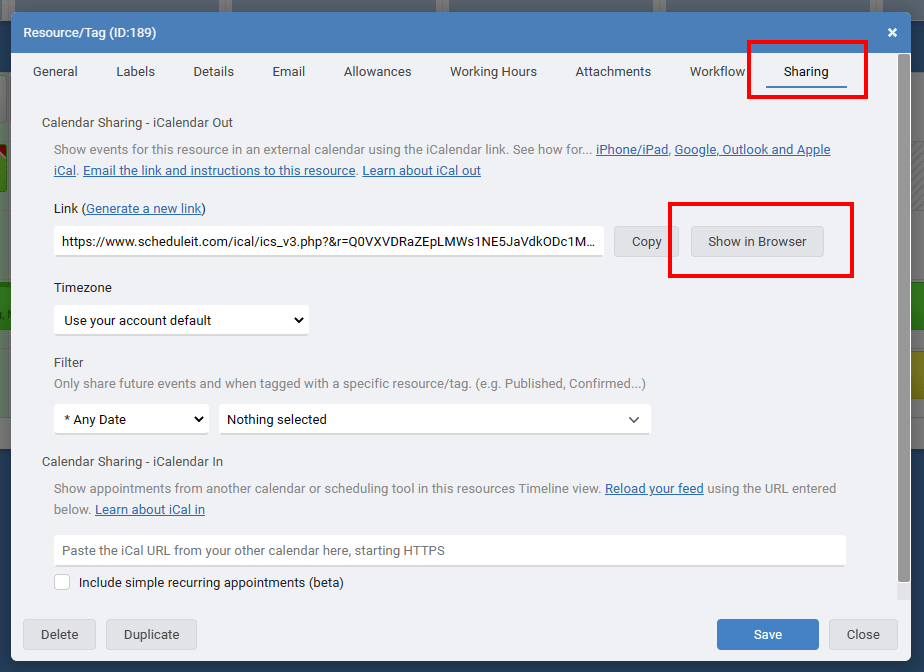
Each resource can also view their events via a webpage. Click Show in Browser and copy the URL if you are going to give it to others to use for viewing.
Note: The older version 1 iCal links includes a hash of the password and permissions of the User that is logged in and supplying the iCal link. Changing the password for this User will stop any previous iCal feeds from working created by this user.
Note: Our iCal feeds will show future events, and a short term historical list. 7 days of historical events is the default, with a 250 event limit, but contact us for details on increasing the historical period.
Add the iCal link to view your Schedule It events in your:
Outlook Online
Outlook Desktop
Google Calendar or Android Device
iPhone or iPad
If you have problems viewing this video you can also view it on YouTube by clicking this link.

On your Android device, you may have to clear the existing calendars and re-sync the data for a new calendar to show up.
Settings / Applications / Manage Applications / Calendar -> Clear Data
then Settings / Applications / Manage Applications / Calendar Storage -> Clear Data
Wait a few minutes and you should be able to see the new calendar. If it does the new calendar does not show up, also do the following:
Settings / Accounts & sync -> select your account, uncheck the 'Sync Calendar' option
Wait a few minutes and re-check the Sync Calendar option to see
If you subscribed to Schedule It by adding as an Internet Calendar, then we update the link live and instantly but we have no control over how often your calendar wants to check for the changes. In our link we ask your calendar to refresh its stored information at least once per hour.
Unfortunately Google doesn't refresh its calendar subscriptions in real time like Apple iCal, Microsoft Outlook, and most others do, and there's no way to force a refresh of a subscribed calendar in Google, you just need to wait for them. Google has stated that they refresh calendar feeds 'every few hours' but in our experience it's a good bit less often than that initially. For your first update this can be overnight, but many report this gets quicker and quicker as they see the file is being updating regularly. To reload a feed during testing you can unsubscribe from the file, then subscribe again adding a random number to the end of the link each time so Google thinks its a new file.
Notes: The number of shared calendars that can be created is a ratio of the number of licenses you have and the account type, e.g. With 1 Business Plan license you can share 6 of your resources publicly. (Startup = 3:1, Business = 6:1, Enterprise = 12:1). Only 1 week of historical events and future events are exported, and up to a maximum number of events based on the maximum feed size permitted.
Note: Whilst our iCal feed is updated and live, Microsoft, Google, Apple and other calendar providers decide on how often they want to check our feed for any updates, which can take a few hours in some cases. 15 to 30 minutes is a typical update frequency.
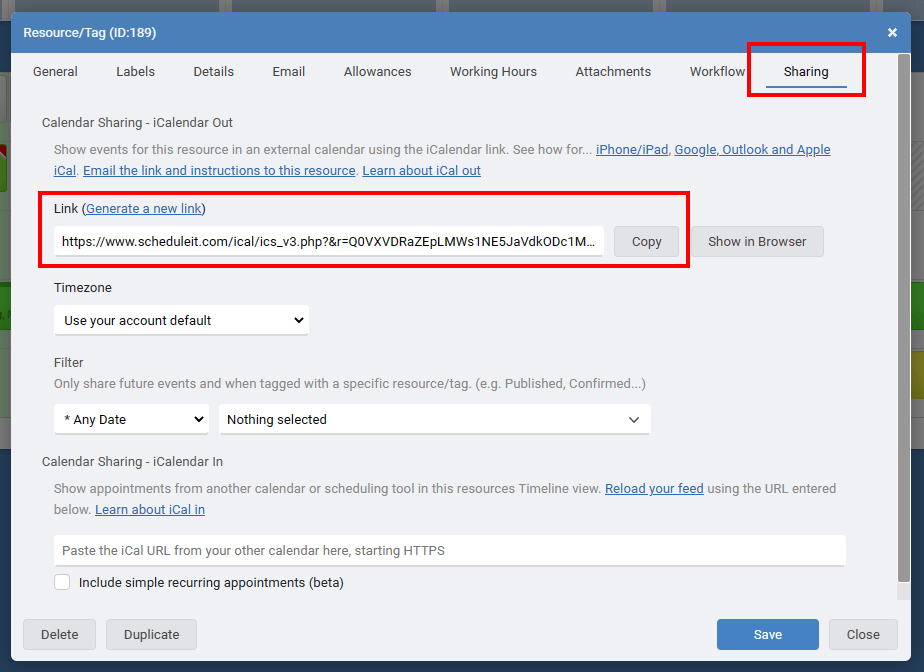
Share selected resources
You can share events for specific resources using a resources own iCalendar link. From the Account Settings menu in the top right, choose Account Settings, then Groups and Resources. Click the Resource you want to share, then from the Sharing tab you can copy the iCalendar Link, then add to it in your favourite calendar tool.Each resource can also view their events via a webpage. Click Show in Browser and copy the URL if you are going to give it to others to use for viewing.
Share all resources
You can share your entire account using your accounts iCalendar link. From the Account menu in the top right, choose Account Settings, then iCalendar. There you can copy the iCalendar Link, then add to it in your favourite calendar tool.Note: The older version 1 iCal links includes a hash of the password and permissions of the User that is logged in and supplying the iCal link. Changing the password for this User will stop any previous iCal feeds from working created by this user.
Note: Our iCal feeds will show future events, and a short term historical list. 7 days of historical events is the default, with a 250 event limit, but contact us for details on increasing the historical period.
Add the iCal link to view your Schedule It events in your:
Outlook Online
Outlook Desktop
Google Calendar or Android Device
iPhone or iPad
If you have problems viewing this video you can also view it on YouTube by clicking this link.
Viewing in Outlook Online
From the Add Calendar menu in Outlook online, choose From Internet, then paste the link given by Schedule It for your chosen schedule.Viewing in Desktop Outlook
Right click Other Calendars, From the options choose Add Calendar, then From Internet, then paste the link given by Schedule It for your chosen schedule.Viewing in Google Calendar or on any Android Device
You need to login to your Google calendar with your browser and add the Schedule It link to your account, it will then automatically appear and be available on your Android device. From the Other Calendars menu in Google Calendar, choose Add by URL, then paste the link given by Schedule It for your chosen schedule.Viewing in Apple iCal
Adding subscribed calendars to Android
On your Android device, you may have to clear the existing calendars and re-sync the data for a new calendar to show up.
Settings / Applications / Manage Applications / Calendar -> Clear Data
then Settings / Applications / Manage Applications / Calendar Storage -> Clear Data
Wait a few minutes and you should be able to see the new calendar. If it does the new calendar does not show up, also do the following:
Settings / Accounts & sync -> select your account, uncheck the 'Sync Calendar' option
Wait a few minutes and re-check the Sync Calendar option to see
Refreshing your Google/Outlook Calendar
If you subscribed to Schedule It by adding as an Internet Calendar, then we update the link live and instantly but we have no control over how often your calendar wants to check for the changes. In our link we ask your calendar to refresh its stored information at least once per hour.
Unfortunately Google doesn't refresh its calendar subscriptions in real time like Apple iCal, Microsoft Outlook, and most others do, and there's no way to force a refresh of a subscribed calendar in Google, you just need to wait for them. Google has stated that they refresh calendar feeds 'every few hours' but in our experience it's a good bit less often than that initially. For your first update this can be overnight, but many report this gets quicker and quicker as they see the file is being updating regularly. To reload a feed during testing you can unsubscribe from the file, then subscribe again adding a random number to the end of the link each time so Google thinks its a new file.
Notes: The number of shared calendars that can be created is a ratio of the number of licenses you have and the account type, e.g. With 1 Business Plan license you can share 6 of your resources publicly. (Startup = 3:1, Business = 6:1, Enterprise = 12:1). Only 1 week of historical events and future events are exported, and up to a maximum number of events based on the maximum feed size permitted.
Still need help? Contact Us
Join Us - Live Webinar
...
Close
Help Topics
Search
Contact Us